Table of Contents
Advertisement
Quick Links
Advertisement
Table of Contents

Summary of Contents for heatpumps 4pools Vektro RC32
- Page 1 Vektro Automatic Pool Robot Cleaner User Manual...
-
Page 2: Table Of Contents
Table Of Contents SAFETY WARNINGS & INSTRUCTIONS HOW THE ROBOT WORKS P.10 GETTING STARTED P.10 Charging The Battery P.10 Set-Up Before Use P.12 P.12 Adjustment of Trajectory P.12 Locking pin Pool Preparation P.12 OPERATION P.12 EMPTYING THE DEBRIS COMPARTMENT P.15 MAINTENANCE &... -
Page 3: Safety Warnings & Instructions
SAFETY WARNINGS & INSTRUCTIONS Information contained in this Instruction Manual will help you operate the item safely, protect yourself and others from hazards, and prevent damage to the device and other property. SAVE THESE INSTRUCTIONS WARNING! This is not a TOY. Children should be kept out of reach from this robot and its accessories. - Page 4 DO NOT handle the robot, external adaptor, and charging plug while it is charging with wet limbs and without shoes. You should not operate this robot when people and/or pets are present in the water. DO NOT use this robot without an intact filter in place, otherwise your warranty will be voided as a result.
- Page 5 Make sure the robot is completely dry before charging. CAUTION! This robot is designed for underwater use only; it is not an all-purpose vacuum cleaner. DO NOT attempt to use it to clean anything other than your pool. Use only the original accessories delivered with this product. DO NOT use this robot right after pool-shocking.
-
Page 6: How The Robot Works
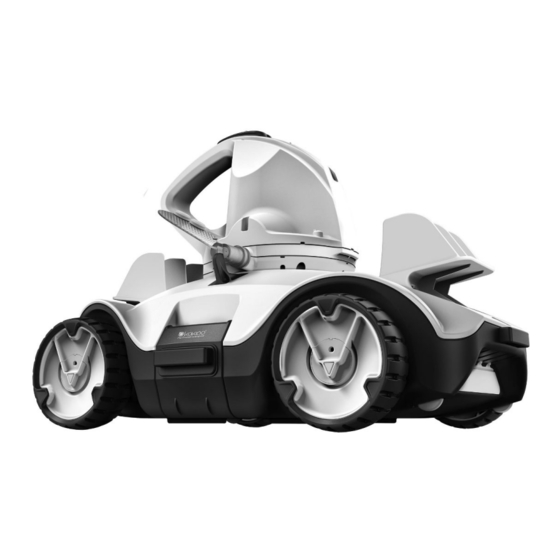
HOW THE ROBOT WORKS The robot has a water-propelling nozzle at the bottom of the swivel head. Water is first sucked in through the suction mouth at the bottom of the robot, which then goes through the filter and is discharged via the propelling nozzle. Water jetting from the nozzle propels the robot forward. - Page 7 3. Connect the external adaptor to the power source. The indicator light on the external adaptor turns red once the charging begins. The indicator light on the external adaptor will turn green when the robot is charged. RED light - Charging GREEN light - Charged ...
-
Page 8: Set-Up Before Use
Set- up Before Use Adjustment of Trajectory Locking Pin The trajectory of the robot is dependent on the position of the pin that fixes the axle to a certain angle. There are two locking pins: the one on the right is fixed and should remain untouched. - Page 9 1. Bring the robot to the side of your pool. NOTE: Only deploy the robot from the pool side (not the pool corner) and ensure it is facing outwards as you do so. Attach the hook of the float to the handle of the swivel head. Press on the side clip to eject the stem from the float.
- Page 10 2. With the robot switched off, submerge it in the pool and gently shake it a few times to facilitate discharge of air. Excess air trapped in the body could result in erratic behavior of the swivel head (i.e. spinning repeatedly in the pool for a few minutes). Power indicator light (Green) 3.
-
Page 11: Emptying The Debris Compartment
As soon as the robot reaches the water surface, locate the grip that is underneath the base and indicated with the hand symbol (see diagram below) to facilitate retrieval from the pool. Make sure to always grip the robot from this end to prevent debris from falling back into the pool during retrieval. -
Page 12: Maintenance & Storage
2. Detach the filter cover and filter plate and remove the debris from the compartment. It is recommended to clean the filter cover net and draining filter plate with splashing water. If brushing is deemed necessary, use only a soft brush to clean it carefully and gently to avoid damages. -
Page 13: Battery Disposal
WARNING! Under no circumstances should you disassemble the swivel head to replace its internal components by yourself. Doing so would void the warranty, expose yourself to potential hazards, and possibly damage the device and other properties. CAUTION! Excessive heat can damage the battery and reduce the lifespan of your robot as a result. -
Page 14: How To Remove The Battery Pack
If leaking fluids come in contact with eyes, do not rub eyes, immediately flush eyes with cool running water for at least 15 minutes and do not rub them. Seek medical attention as soon as possible. How to remove the battery pack for battery disposal only (To be done by authorized technician) Recommended tools (not included): Screwdriver. -
Page 15: Troubleshooting
TROUBLESHOOTING Problem Possible Cause Solution Robot does not start Stained water sensors Use a cotton bud soaked with juice of lemon or vinegar to clean working under water and remove the stains. Robot does not capture Battery is running out Charge the robot again. - Page 16 Debris escapes from Suction mouth’s flap ( at cleaner Suction mouth’s flap works like a door to prevent the debris from the robot bottom) is damaged escaping from the debris compartment. Contact dealer for replacement parts and instruction. Debris clogged at suction mouth and Remove clogged debris from the suction mouth.
Need help?
Do you have a question about the Vektro RC32 and is the answer not in the manual?
Questions and answers