Table of Contents
Advertisement
Available languages
Available languages
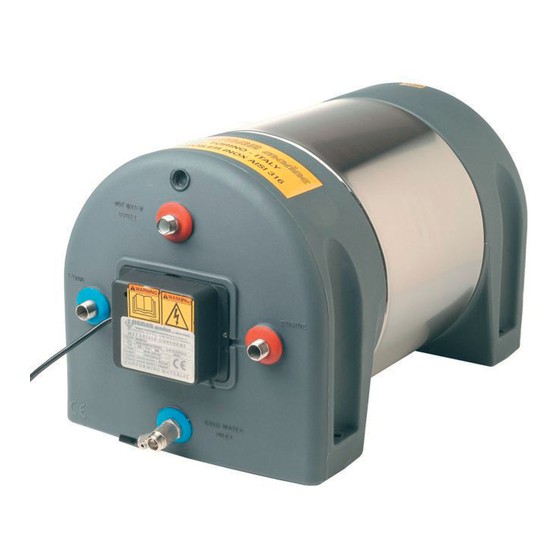
BOILER COMPACT & COMPACT INOX
"COMPACT" e "COMPACT INOX" sono le due
nuove serie innovative di boiler Sigmar Marine in
acciaio Inox Aisi 316, con capacità da 20 a 80, rivestiti
in un robusto e compatto guscio in plastica antiurto,
con staffe integrate. I boiler sono stati progettati per
offrire un compatto, robusto ed elegante aspetto con le
migliori caratteristiche tecniche come l'isolamento
termico e la resistenza all'ambiente marino. Il
particolare disegno consente una installazione a bordo
più facile, sicura e veloce con il migliore rapporto
qualità / prezzo presenti sul mercato.
Capacità
Volume
Larghezza / Width*
Lt.
Gal.
mm
20
5
366
1/3
22
6
287
30
8
366
40
10 ½
366
Capacità
Volume
Lt.
Gal.
Larghezza / Width *
mm
30
8
366
40
10 ½
366
60
16
366
80
21
417
MATERIALE : INOX AISI 316
MONTAGGIO : verticale / orizzontale a pavimento e a soffitto
(a parete con staffe Inox a fascia opzionali)
Orizzontale a Parete modello "HP" codici B020HPC316 /
B022HPC316 / B030HPC316 / B040HPC316 / B030HPI316 /
B040HPI316 / B060HPI316 / B080HPI316
ISOLAMENTO : Poliuretano espanso
RACCORDI MOTORE e ACQUA :
VALVOLA SICUREZZA E NON RITORNO : 5 BAR ± 1
RESISTENZA : Incoloy con tappo Inox AISI 316 1 ¼"
Marine water heaters / calorifiers
SERIE COMPACT
Dimensioni /Size
Lunghezza / Length*
inch
mm
inch
14
430
17
1/3
11
558
22
1/3
14
540
21
1/3
1/3
14
660
26
1/3
SERIE COMPACT INOX
Dimensioni /Size
Lunghezza / Length*
inch
mm
inch
14
540
21
1/2
1/3
14
660
26
1/2
14
875
34
1/2
1/2
16
955
36
1/3
1/3
* Tolleranze/Tolerance –3%+15%
½ " gas BSP UNI ISO 228
Sigmar Marine's "COMPACT" and "COMPACT
INOX" are two new innovative series of water heaters
Inox 316, from 20 to 80 litres, cased in a new sturdy
compact plastic shell with integrated mounting brackets.
Water heaters have been designed not only to offer a
compact, robust and attractive looking product with
better
technical characteristics such as thermal
insulation and resistance to marine environment, but
also to render their application on board safer, securer,
easier and quicker, and
cost/quality on the market.
Heating Element
Altezza / Height *
220 or 110 Volt
mm
inch
358
14
1/8
297
11
2/3
358
14
1/8
358
14
1/8
Heating Element
Altezza / Height*
220 or 110 Volt
mm
inch
358
14
1/8
358
14
1/8
358
14
1/8
410
15
2/3
MATERIALS: INOX AISI 316
INSTALATION : horizontal deck (floor); deckhead
(ceiling); vertical bulkhead (wall): horizontal bulkhead (wall)
only with optional inox brackets)
Horizontal bulkhead (wall) "HP" models P/N B020HPC316 /
B022HPC316 / B030HPC316 / B040HPC316 / B030HPI316 /
B040HPI316 / B060HPI316 / B080HPI316
INSULATION : polyurethane foam
FITTINGS ENGINE and WATER :
SAFETY and NO RETURN VALVE : 5 BAR ± 1 (72 psi)
HEATING ELEMENT : Incoloy with AISI 316 1 ¼" fitting
not least to have the best
Resistenza
Peso
Weight
Kg Lb Gb.
Watt
800
7
14
800
8
16
800
9
18
800
11
22
Resistenza
Peso
Weight
Kg Lb Gb.
Watt
800
9,5
19
11,5
800
23
800
15
30
1200
22
44
½ " gas BSP UNI ISO 228
Codice
P/N
B020UC316
B022UC316
B030UC316
B040UC316
Codice
P/N
B030UI316
B040UI316
B060UI316
B080UI316
Advertisement
Table of Contents

Related Manuals for Sigmar marine COMPACT Series

Summary of Contents for Sigmar marine COMPACT Series
- Page 1 Sigmar Marine’s “COMPACT” and “COMPACT INOX” are two new innovative series of water heaters nuove serie innovative di boiler Sigmar Marine in acciaio Inox Aisi 316, con capacità da 20 a 80, rivestiti Inox 316, from 20 to 80 litres, cased in a new sturdy in un robusto e compatto guscio in plastica antiurto, compact plastic shell with integrated mounting brackets.
- Page 2 SIGMAR marine INDICE/INDEX ITALIANO ISTRUZIONI DI MONTAGGIO BOILER PAG. 2 ENGLISH MOUNTING INSTRUCTIONS WATER HEATER PAG. 9 FRANCAIS INSTRUCTIONS DE MONTAGE CHAUFFE-EAU PAG. 16 DEUTSCH INSTALLATIONS ANLEITUNG WARMWASSERBEREITER PAG. 23 ESPANOL INSTRUCCIONES DE MONTAJE CALENTADOR PAG 30 SWEDISH INSTALLATIONSINSTRUKTIONER VARMVATTENBEREDARE PAG.
-
Page 3: Istruzioni Di Montaggio
ISTRUZIONI DI MONTAGGIO Lo scaldacqua deve essere montato in un vano sufficientemente aerato e riparato da umidità e spruzzi. Benché costruito in materiali resistenti all’ambiente marino, la presenza di un impianto elettrico rende opportuna questa precauzione. La posizione deve essere tale da rendere più corto possibile il percorso dei tubi di collegamento al motore. Bisogna considerare inoltre la facilità... - Page 4 Riportiamo schematicamente quelle che sono le corrette posizioni di montaggio: Montaggio orizzontale a PAVIMENTO. installare il boiler ancorandolo saldamente al pavimento dell’imbarcazione. (modelli identificati con sigla ABHX316 o ABUX316 ) Montaggio orizzontale a SOFFITTO. E’ necessario però invertire le tubazioni di ingresso e uscita acqua. Sconsigliamo questo tipo di installazione in quanto si perdono i vantaggio della coibentazione disassata della serie Compact e si possono creare dei problemi di installazione e di successiva manutenzione per...
- Page 5 Per i modelli della serie Compact è possibile montare un'unica staffa nella parte centrale di unione dei due gusci in plastica. Un'unica staffa noi riteniamo non sia sufficiente a garantire un sicuro ancoraggio specialmente per il modelli da 30 e 40 lt. E’ necessario quindi predisporre di almeno un altro punto di appoggio in corrispondenza dei punti di ancoraggio anteriori o posteriori.
-
Page 6: Collegamento Elettrico
COLLEGAMENTO IDRAULICO ALL’ACQUA SANITARIA Per meglio comprendere le istruzioni sotto riportate‚ necessario che facciate riferimento allo ‘schema di collegamento idraulico ’che troverete nelle pagine seguenti. Collegare il circuito idraulico dell’acqua della barca prima alla valvola di sicurezza e poi al raccordo del boiler contrassegnato da un gommino blu (punto 2 e punto 6).Per i modelli ‘U’... - Page 7 Il termostato è dotato di un dispositivo di sicurezza elettromeccanico che interviene, aprendo il circuito alimentazione disinserendo la resistenza, in caso di rottura del termostato. Tale intervento viene denunciato dal movimento di un perno vicino alla manopola di regolazione della temperatura. Controllare che tale perno sia nella giusta posizione e cioè...
-
Page 8: Inconvenienti E Rimedi
INCONVENIENTI E RIMEDI IMPORTANTE: PRIMA DI RIMUOVERE IL CAPPUCCIO DI PLASTICA NERA DI PROTEZIONE DELLA PARTE ELETTRICA ASSICURARSI DI AVER TOLTO CORRENTE ALL’IMPIANTO. I° NEL CASO IN CUI, CON FUNZIONAMENTO A MOTORE L’ACQUA DEI SERVIZI NON SI SCALDA: A. Controllare che nei condotti di mandata allo scambiatore del boiler non si siano formate bolle d’aria, in tal caso allentare la valvola di sfiato (se montata PUNTO 5) o il raccordo di mandata allo scambiatore (gomma rossa PUNTO 4) e sfiatare l’eventuale aria. -
Page 9: Manutenzione
C. Smollare la valvola di sfiato (se montata punto 7) o il raccordo di uscita dell’acqua calda (gomma rossa punto 1) fino a quando sarà evidente che il boiler si sta svuotando. La SIGMAR MARINE SRL si riserva di modificare senza preavviso le caratteristiche sopra riportate. Pag.8/63... -
Page 10: Mounting Instructions
MOUNTING INSTRUCTIONS Sigmar marine water heaters are built with materials that withstand the rigors of the marine environment. Being an electrical appliance install water heater in a ventilated location where it will not be subjected to humidity and external water spray. - Page 11 To ensure that it functions correctly, mount water heater as follows: Horizontal deck (floor) installation: the water heater must be firmly secured to a deck (models identified with part number ABHX316 o ABUX316). To deckhead (ceiling): Water heater can be mounted horizontally to a deckhead (ceiling) as long as the entry and exit water connections are inverted.
- Page 12 The Compact series of water heaters can be mounted horizontally to a bulkhead (wall) using only one fastening mounting bracket placed over the central “union” point of the two external plastic shells. On the larger Compact models (30 and 40-litre), the use of only one fastening bracket is not sufficient...
-
Page 13: Electrical Connection
Adjust the thermostat setting by turning the dial clockwise with a screwdriver blade until the arrow points to the desired temperature setting (our production sets it to 60°C). Sigmar Marine thermostats are equipped with a high temperature cutout safety switch, which is an electro-mechanical device that opens Pag.12/63... - Page 14 the current circuit and disconnects the electric heating element if the thermostat fails. When activated, the pin located near the temperature regulator dial is released. To control that pin has not been released and is set correctly, check that pin is lying a few millimeters below the structure’s edge. After double-checking that water heater has filled with water, the power can be turned on (see the plumbing connection above).
-
Page 15: Problems And Solutions
PROBLEMS AND SOLUTIONS IMPORTANT: BEFORE REMOVING THE BLACK PLASTIC CAP PROTECTING ELECTRIC PARTS, BE SURE TO TURN OFF ELECTRIC CURRENT TO WATER HEATER. WHEN THE ENGINE DOES NOT HEAT THE WATER: Ensure that there are no air locks inside the entry pipe to the water heater’s coil. If any, unloosen escape valve (if mounted see plumbing connection diagram, point 5) or heat exchanger’s pipe fitting (marked with red rubber washer see plumbing connection diagram, point 4) and let out any air. -
Page 16: Maintenance
Loosen the pressure relief valve, if mounted, or exit hot water pipe fitting (red rubber washer, see plumbing connection diagram point 1) until the water heater begins to empty. SIGMAR MARINE srl reserves the right to modify the above without prior notice. Pag.15/63... -
Page 17: Instructions De Montage
INSTRUCTIONS DE MONTAGE Le chauffe-eau doit être monté dans une pièce suffisamment aérée et à l’abri de l’humidité et des projections d’eau. Bien que construit avec des matériaux résistants à l’environnement marin, la présence d’une installation électrique rend nécessaire ces précautions. Le branchement doit être effectué de manière à rendre le trajet des tubes de branchement au moteur le plus court possible. - Page 18 Nous représentons schématiquement les positions correctes de montage : Montage horizontal au PLANCHE. Installer le chauffe-eau en le fixant solidement au planché de l’embarcation. (modèles identifiés avec sigle ABHX316 ou ABUX316 ) Montage horizontal au PLAFOND. Dans ce cas il est indispensable d’invertir les tuyaux d’entrée et de sortie d’eau.
- Page 19 Pour les modèles de la série Compact il est possible de monter un seul étrier sur la partie centrale d’union entre les deux parties de plastique. Néanmoins nous pensons qu’un seul étrier n’est pas suffisant à garantir un ancrage sûr spécialement pour les modèles de 30 et 40 Litres.
-
Page 20: Branchement Electrique
RACCORDEMENT HYDROLIQUE A’ L’EAU SANITAIRE Pour mieux comprendre les instructions reportées ci-dessous, il faut vous référer au schéma de raccordement hydraulique que vous trouverez dans les pages suivantes. Connecter le circuit hydraulique de l’eau de l’embarcation à la soupape de sécurité pour commencer puis au raccord du chauffe-eau qui est entouré... - Page 21 MELANGEUR THERMOSTATIQUE REGLABLE notre code 15.003. Fonctionnement: Les mélangeurs thermostatiques SIGMAR marine ont un fonctionnement complètement automatique. Il suffit d’agir sur la poignée, en vissant ou dévissant en suivant les indications de la flèche pour obtenir de l’eau chaude sur un champs de réglage qui va de 38°...
- Page 22 INCONVENIENTS ET REMEDES IMPORTANT: AVANT D’ENLEVER LE CAPUCHON EN PLASTIQUE NOIR QUI PROTEGE LES PARTIES ELECTRIQUES, S’ASSURER D’AVOIR DISACTIVE LE COURANT ELECTRIQUE. I° DANS LE CAS Où , AVEC UN FONTIONNEMENT A’ MOTEUR, L’EAU NE CHAUFFE PAS: D. Vérifier que dans les conduits de portée vers l’échangeur du chauffe-eau il n’y ait pas de bulles d’air, dans ce cas dévisser la soupape de purge d’air (si montée POINT 5) ou le raccord de portée vers l’échangeur (Gaine rouge POINT 4) et faire sortir l’air éventuellement présente.
- Page 23 F. Dévisser la soupape de purge d’air (si montée point 7) ou le raccord de sortie d’eau chaude ( gaine rouge point 1 jusqu’à ce qu’on soit sur que le chauffe-eau est en train de se vider. La SIGMAR MARINE SRL se réserve le droit de modifier, sans préavis, les caractéristiques ci-dessus reportées. Pag.22/63...
- Page 24 INSTALLATIONS ANLEITUNG SIGMAR marine Warmwasserbereiter sind aus seewasserbeständigenWerkstoffen gefertigt. Da es sich um ein elektrisches Gerät handelt, sollte der Warmwasserbereiter in einer gelüfteten Umgebung ohne Feuchtigkeit und äußeres Spritzwasser aufgestellt werden. Die Verbindungsschläuche zwischen Kuhlwasseraustritt am Motor und Anschluß am Gerät sollten so kurz wie möglich sein.
- Page 25 Um eine korrekte Funktion zu gewährleisten, muß der Warmwasserbereiter wie folgt montiert werden. Horizontale Bodenmontage Type ABHX316 oder ABUX316 Deckenmontage Der Warmwasserbereiter kann horizontal unter der Decke installiert werden, solange die Ein- und Auslass-Wasserverbindungen umgekehrt werden. Diese Installation wird aber grundsätzlich nicht empfohlen Wandmontage Der Warmwasserbereiter muss fest gesichert an der Wand angeschraubt werden (Type ABHPX316).
- Page 26 Die Compact Modelle können horizontal mit nur einer Halterung befestigt werden. Bei den grösseren Modellen muss eine zusätzliche Befestigung erfolgen. Vertikale Befestigung ( Type ABUX316) Wenn der Warmwasserbereiter vertikal montiert werden soll (siehe Abb.) Muss sichergestellt sein, daß das weiße Kunststoffrohr in den Heißwasserauslaß...
-
Page 27: Elektrischer Anschluss
ANSCHLUSS DER FRISCHWASSER-LEITUNGEN Zum besseren Verstandnis der nachfolgenden Erläuterungen empfehlen wir, die Zeichnungen am Ende der Anleitung zu beachten. Schließen Sie den Zulaufschlauch vom Druckwasser-System zuerst am Sicherheits- und Rückschlagventil an und dann am Kaltwasser-Einlass (blaue Abdeckkappe, Punkt 2 und 6).Bei den „U”-Modellen /UNIVERSAL) bei vertikaler Montage (Anschlüsse nach oben) müssen Einlass- und Auslassanschlüsse vertauscht werden. - Page 28 Regulierschraube ein kleiner aus dem Thermostat-Gehause herausragender Stift zu sehen. Solange die Sicherung nicht ausgelöst hat, muß sich dieser Stift ein paar Millimeter unterhalb der Gehause-Oberflache befinden. In den Spezial-Ausführungen und dem 12-Liter Modell gibt es diese Sicherung nicht. Überprufen Sie mehrmals, daß sich ausreichend Wasser im Boiler befindet. Schalten Sie das Heizelement ein. Jetzt wird das Wasser im WarmwasserBereiter aufgeheizt.
-
Page 29: Fehlersuche
FEHLERSUCHE ACHTUNG: BEVOR SCHWARZE ABDECKKAPPE ÜBER HEIZELEMENT ABGENOMMEN WIRD,MUß UNBEDINGT DER STROM ABGEKLEMMT WERDEN. I° DER WARMWASSER-BEREITER IST AN DEN KÜHLKREISLAUF DER MASCHINE ANGESCHLOSSEN, DAS FRISCHWASSER WIRD ABER NICHT WARM Prüfen Sie, ob sich im Zulaufschlauch für den Warmetauscher Lufteinschlusse befinden. Wenn ja, Entleerungsventil (soweit vorhanden Punkt 5) öffnen, oder den Schlauch am Anschluß... -
Page 30: Wartung
Sollte der Wasserverlust standig und in großerem MaßBe stattfinden, dann muß überpruft werden, ob sich im Sicherheits-Ventil etwas verklemmt hat und das Ventil dadurch nicht schließen kann. Sollte das nicht der Fall sein und das Ventil trotzdem ständig lecken, dann muß das Ventil ausgewechselt werden. VII°... -
Page 31: Instrucciones De Montaje
INSTRUCCIONES DE MONTAJE El calentador Sigmar Marine esta construido con materiales resistentes a la corrosión marina; sin embargo, al tener componentes eléctricos, es aconsejable que se monte en un lugar aireado y poco húmedo. Para un montaje adecuado se debe intentar la menor longitud posible de tubería entre el motor del barco y el boiler y la disposición accesible de la válvula de seguridad, las conexiones... - Page 32 -Instalación horizontal (suelo) El calentador debe ser fijado firmemente a una base horizontal (suelo). Este sistema es válido para modelos con referencia ABHX316 o ABUX316. -Instalación invertida (en techo) El calentador puede instalarse en el techo, teniendo en cuenta que las entradas y salidas de agua quedarán invertidas.
- Page 33 La Serie Compact puede ser instalada horizontalmente al mamparo (pared) usando un único soporte de fijación que se sitúa en la parte central del calentador (en el punto de unión de las carcasas de plástico). En modelos de mayor capacidad (30 y 40 litros) el uso de un solo soporte resulta insuficiente y precisa de un soporte adicional, esto se consigue utilizando las fijaciones delantera o trasera del calentador.
-
Page 34: Conexiones Electricas
CONEXIONADO A TOMA DE AGUA (fría) Para una mejor comprensión de estas instrucciones, sírvase consultar el diagrama de conexionado de tuberías que encontrará al final de este documento. Primero conecte el sistema de agua del barco en la válvula antiretorno y esta en la toma de agua fría que se identifica por ser de color azul. -
Page 35: Inconvenientes Y Remedios
más abajo, es necesario tomar en cuenta el diagrama de instalación de tuberías para agua doméstica que encontrará en la página siguiente. El boiler debe ser conectado con una válvula de bypass al circuito principal de refrigeración utilizando tubo flexible que soporte la temperatura del líquido de refrigeración del motor. Este circuito puede equiparse con una válvula de control de flujo (ver punto 12) que debe ser regulada de tal manera que la cantidad de líquido refrigerante de la camisa del cilíndro del motor sea estable. - Page 36 Verifique que est‚ desconectado el dispositivo de seguridad electromecánico del termostato (vea instrucciones sobre la conexión eléctrica). Restablezca el contacto metiendo el perno en su posición original, es decir, que quede algunos milímetros por debajo del borde de la estructura. Si el boiler se calienta demasiado y, en consecuencia, interviene el dispositivo de seguridad (temperatura de desconexion = 120°C), controle el termostato y remplazarlo si es defectuoso.
-
Page 37: Mantenimiento
Abra la válvula de seguridad y antiretorno subiendo la palanca de la parte superior de la válvula, asegurándose que el agua que sale se conduzca a sentina. El constructor SIGMAR Marine se reserva el derecho de modificar sin previo aviso las características expuestas en este manual. - Page 38 Installationsinstruktioner (Mounting instructions) Sigmar varmvattenberedare är tillverkade i material som anpassats för att klara av alla påfrestningarna som en marin miljö ställer. Eftersom beredaren är en elektrisk utrustning är det viktigt att den placeras på en väl ventilerad plats där den inte utsätts för fukt eller vattenstänk.
- Page 39 Horisontell däckmontering (Horizontal deck installation) Varmvattenberedaren måste monteras stadigt på däck (Modell med nummer ABHX316 eller ABUX316) Horisontalt mot däck (To deckhead) Varmvattenberedaren kan monteras horisontellt mot däck om anslutningarna för in- och utgående vatten spegelvänds. Vi rekommenderar inte den typen av installation eftersom den termiska verkningsgraden på...
- Page 40 Modellen Inox kan monteras horisontellt mot skott med hjälp av endast ett monteringsjärn som placeras centralt mellan de två externa plastkåporna. På större modeller (30 och 40 liter) krävs åtminstone ett extra monteringsfäste för att det ska vara säkert. Placera extra monteringsfäste på större modeller fram eller bak på...
- Page 41 Färskvatten anslutning (Fresh water plumbing connection) Studera noggrant ritningen för röranslutning på sista sidan för att få en bra bild av anslutningsprocessen. Anslut först vattensystemet till säkerhetsventilen och sedan till kallvattenintaget (märkt med blå gummipackning ritningen punkt 2 och 6). OBS! Om modell U (Universal) monteras vertikalt, med rören uppåt, måste ingående rör bytas mot utgående och tvärtom.
- Page 42 Sigmar Marin termostater är utrustade med ett elektromagnetiskt överhettningsskydd som bryter strömmen till el- patronen om ett fel skulle uppstå. När överhettningsskyddet aktiveras utlöses automat--säkringen, som är placerad i direkt anslutning till temperaturreglaget, ut. När säkringen är placerad på rätt sätt och är outlöst skall den ligga ett par millimeter under kanten.
- Page 43 Felsökning (problems and solutions) VIKTIGT! Kontrollera alltid att strömmen är urkopplad innan den svarta plastkåpan tas av. Motorn värmer inte vattnet: Kontrollera att det inte finns luft i beredarens motorslinga. Om det finns luft, öppna dräneringsventilen om en sådan monterats (punkt 5) eller anslutningarna på beredaren (Märkt med röd gummiring punkt 4) och släpp ut luften.
- Page 44 Öppna tryck/tömningsventilen genom att lyfta ventilens handtag (rikta vattenutsläppet mot kölsvinet eller annan lämplig plats). Lossa tryckvattenregleringsventilen (om monterad) eller öppna varmvattenanslutningen (röd gummiring punkt 1) Töm beredaren helt. SIGMAR MARINE srl reserves the right to modify the above without prior notice. Pag.43/63...
- Page 45 MONTAGE HANDLEIDING Sigmar Marine boilers worden geproduceerd van materialen die bestand zijn tegen de zware omstandigheden welke de scheepvaart aan de producten stelt. Daar het een elektrisch apparaat betreft dient deze in een goed geventileerde ruimte te worden aangebracht en dient de unit spatwatervrij en in een niet al te vochtige omgeving gemonteerd te worden.
- Page 46 Horizontale, op het dek (vloer) montage: De boiler dient voldoende sterk op de ondergrond gemonteerd te zijn. (Types met model aanduiding ABHX316 of ABUX316). Hangend vanaf het plafond: Boilers kunnen ook hangend gemonteerd worden. Echter de in- en uitlaat van het watersysteem dienen dan omgewisseld te worden.
- Page 47 De boilers uit de Compact serie kunnen horizontal gemonteerd worden met behulp van een speciale montagebeugel welke over het centrale deel van de boilerbehuizing gemonteerd dient te worden. Voor de grotere boilers (30 en de 40-liter) uit de Compact serie is de montage van één enkele beugel niet voldoende om tot een voldoende stevige en veilige verankering van de boiler te komen.
-
Page 48: Elektrische Aansluitingen
Stel de thermostaat met een schroevendraaier op de gewenste temperatuur.(fabrieksinstelling is op 60ºC gezet) Sigmar Marine thermostaten zijn voorzien van een oververhittingbeveiliging, deze elektromagnetische schakelaar opent het watercircuit en sluit het verwarmingselement uit indien de thermostaat uitvalt. Indien inwerking getreden springt een pin naast de thermostaatschakelaar uit. - Page 49 u hebt gecontroleerd of er voldoende vloeistof in het systeem aanwezig is kunt u het systeem weer inschakelen. (zie ook bovenstaande foto). Binnen een paar minuten moet de boiler nu weer warm water gaan produceren. AANSLUITEN OP HET KOELSYSTEEM VAN DE SCHEEPSMOTOR. Daar alle moderne verbrandingsmotoren voorzien zijn van vloeistofkoeling bestaat de mogelijkheid om de rest warmte van de motor te gebruiken om de boiler mee op te warmen.
-
Page 50: Problemen En Oplossingen
PROBLEMEN EN OPLOSSINGEN BELANGRIJK: VOORDAT U DE ZWART PLASTIC AFDEKKAP VAN DE ELECTRONICA VERWIJDERT DIENT U EERST DE STROOM TOEVOER NAAR DE BOILER UIT TE SCHAKELEN. INDIEN DE MOTOR DE BOILER NIET VERWARMT: Controleer het systeem op luchtbellen welke doorstroming belemmeren. Indien aanwezig open het ontluchtingsventiel (indien gemonteerd, zie punt 5 van de schematische voorstelling) Of neem de warmwater inlaat (rode markerring) van de motor naar de boiler los en laat zo de lucht ontsnappen. - Page 51 Neem de leiding aan de uitgaande (warmwater) zijde van de boiler los en het water begint uit de boiler te stromen. SIGMAR MARINE srl reserveert zich het recht voor om zonder voorafgaande mededeling wijzigingen aan te brengen in haar producten en of beschrijvingen.
-
Page 52: Instruções De Montagem
INSTRUÇÕES DE MONTAGEM O aquecedor de água deve ser montado num ambiente com ventilação suficiente e protegido de umidade e borrifos. Mesmo sendo fabricado com materiais resistentes ao ambiente marinho, a presença de uma instalação elétrica torna oportuna esta precaução. A posição deve ser de modo a tornar o mais curto possível o percurso dos tubos de ligação ao motor. - Page 53 Reproduzimos esquematicamente aquelas que são as posições corretas de montagem: Montagem horizontal no CHÃO. instalar o boiler fixando-o firmemente ao chão da embarcação. (modelos identificados com a sigla ABHX316 ou ABUX316 ) Montagem horizontal no FORRO. É necessário, porém, inverter as tubulações de entrada e saída de água.
- Page 54 Para os modelos da série Compact é possível montar apenas um suporte na parte central de junção das duas metades de plástico. Apenas um suporte consideramos que não seja suficiente para garantir uma fixação segura sobretudo para os modelos de 30 e 40 l. É, portanto, necessário predispor de pelo menos outro ponto de apoio na correspondência dos pontos de fixação dianteiros ou traseiros.
-
Page 55: Ligação Elétrica
LIGAÇÃO HIDRÁULICA À ÁGUA SANITÁRIA Para entender melhor as instruções contidas abaixo, é necessário consultar o ‘esquema de ligação hidráulica’ que está descrito nas páginas a seguir. Ligar o circuito hidráulico da água do barco antes à válvula de segurança e depois à conexão do boiler marcado com uma borrachinha azul (ponto 2 e ponto 6). -
Page 56: Problemas E Soluções
Neste caso recomendamos a utilização de um MISTURADOR TERMOSTÁTICO REGULÁVEL nosso código 15.003 Funcionamento: Os misturadores termostáticos SIGMAR marine têm um funcionamento totalmente automático. É suficiente agir no manípulo, atarraxando ou desatarraxando seguindo as indicações da seta, para obter água quente num campo de regulagem dos 38°... - Page 57 IMPORTANTE: ANTES DE REMOVER O CAPUZ DE PLÁSTICO PRETO QUE PROTEGE A PARTE ELÉTRICA, VERIFICAR DE TER DESLIGADO A CORRENTE DA INSTALAÇÃO. I° NO CASO EM QUE, COM FUNCIONAMENTO A MOTOR A ÁGUA DOS SERVIÇOS NÃO ESQUENTA: A. Controlar que nas condutas de vazão ao permutador do boiler não tenha a formação de bolhas de ar, nesse caso afrouxar a válvula de alívio (se montada PONTO 5) ou a conexão de vazão ao permutador (borrachinha vermelha PONTO 4) e aliviar o ar que houver.
- Page 58 C. Afrouxar a válvula de alívio (se montada ponto 7) ou a conexão de saída da água quente (borrachinha vermelha ponto 1) e até aparecer evidente que o boiler está esvaziando. A SIGMAR MARINE SRL reserva-se de alterar sem aviso prévio as características citadas acima. Pag.57/63...
- Page 59 Pag.58/63...
- Page 60 CERTIFICATO DI GARANZIA LIMITED WARRANTY CERTIFICAT DE GARANTIE. GEWAHRLEISTUNG GARANTIE CERTIFICAAT CODE ....……………………………………………………………….. TYPE ....………………………………………………………………… VOLT WATT Pmax ....……… ....……… ....……… FIXING ....……………………………………………………………... PROD. LOT ....……………………………………………………… Nome Name Nombre Nom Naam …..…………………………………………………………………………….. Indirizzo Address Dirección Adresse Adres ………............………………………….. ………........……………………………………........……………………………..Data di acquisto Purchase date Fecha de adquisición Date d’achat Aanschaf datum: …….……………………………………….
-
Page 61: Condizioni Di Garanzia
Questa è l’unica garanzia valida, nessuno è autorizzato a modificarne i termini o a rilasciarne altre verbali o scritte. WARRANTY CONDITIONS Sigmar Marine grants a 3 years' warranty on the water heater and a 1 year warranty on the electric parts beginning on the date of purchase. The date of purchase is understood to be: A. -
Page 62: Gewährleistung
La Sigmar Marine Srl declina toda responsabilidad por daños causados directa o indirectamente por ninguna avería del aparato o por el aparato mismo. Esta es la única garantía. Sigmar Marine Srl no autoriza a ningún tercero a modificar, asumir o emitir ningún documento relacionado con la garantia de sus productos. - Page 63 VIII. Le mauvais ou incomplet remplissage du certificat de garantie fera automatiquement échouer la garantie sur le produit. La SIGMAR MARINE S. r. l. ne répond pas d‘éventuels dommages directs causés sur des personnes ou des choses provoqués par des avaries de l‘appareillages qui peuvent provoquer la suspension de l‘utilisation de celui-ci.
-
Page 64: Dichiarazione Di Conformità
European Normative CEI EN 60335-1 and in particular in the European technical Normative CEI EN 60335-2-21 “Particular requirements for storage water heaters”. La SIGMAR MARINE SRL Via Faulenta 12 10080 OZEGNA (TO) ITALIA DICHIARA SOTTO LA PROPRIA RESPONSABILITÀ CHE IL PRODOTTO...
Need help?
Do you have a question about the COMPACT Series and is the answer not in the manual?
Questions and answers