Table of Contents
Advertisement
Quick Links
KABD-230 / KABD-250 User Guide
The new Dayton Audio KABD series of boards leverages the convenience of Bluetooth 5.0 with aptX HD
streaming along with the powerful Analog Devices ADAU1701 DSP chip to allow for almost limitless
possibilities for sound customization and still have the convenience of high quality Bluetooth streaming.
Out of the box, basic customizations and volume control can be made by attaching the optional
potentiometers, but to unlock the full potential of your amplifier, attach an ICP1 or KPX programming
board to program your KABD amplifier with the SigmaStudio development tool from Analog Devices.
This allows for limitless possibilities of EQ, limiting, bass enhancement, delays and more.
This guide applies to the KABD-250 and KABD-230, which are 2-channel amplifiers that are identical in
function, with the KABD-250 being capable of 2x50 Watts, and the KABD-230 being capable of 2x30
Watts. The only visual difference between the two is a large round heatsink in the middle of the KABD-
250, and the KABD-230 does not have this heatsink.
Advertisement
Table of Contents

Summary of Contents for DaytonAudio KABD Series
- Page 1 KABD-230 / KABD-250 User Guide The new Dayton Audio KABD series of boards leverages the convenience of Bluetooth 5.0 with aptX HD streaming along with the powerful Analog Devices ADAU1701 DSP chip to allow for almost limitless possibilities for sound customization and still have the convenience of high quality Bluetooth streaming.
-
Page 2: Table Of Contents
Table of Contents KABD-250/230 Visual Overview ........................4 Quick Start and Wiring Guide ........................5 Before You Start ............................5 Power Supplies ............................5 Input Devices ............................5 Speaker Output and Line Output ......................6 Quick Start Steps ............................6 Potentiometer Headers .......................... - Page 3 KABD-4100 for up to 8 channels of amplification. 4. Because of the addition of a built in 5.0 Bluetooth chip in the KABD series, it is not recommended to use the KABD in combination with a KAB for additional outputs in the same way as the DSPB+KAB.
-
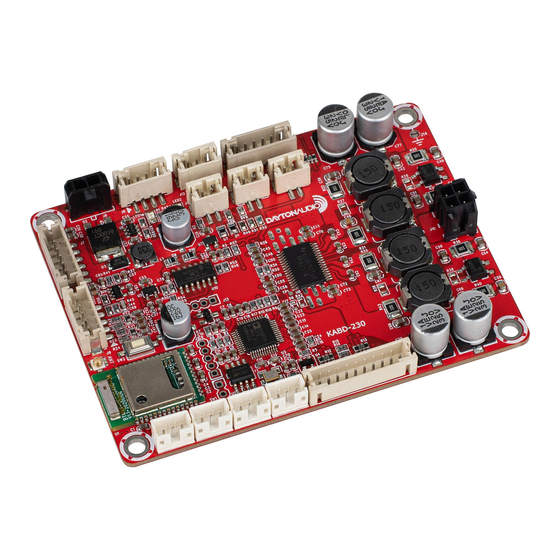
Page 4: Kabd-250/230 Visual Overview
KABD-250/230 Visual Overview The amplifier pictured is a KABD-250, however everything is the same on the KABD-230. The KABD-230 does not have a circular black heatsink like the KABD-250. The location of the port name on the image below represents where pin 1 of that port is. J9 is on the left side of the Line In port below because that is where pin 1 is. -
Page 5: Quick Start And Wiring Guide
Dayton Audio battery boards such as the LBB-3v2 (12V) or LBB-5Sv2 (21V) will work with any KABD series amplifier. Battery modules such as the Dayton Audio KAB-BE are not compatible with the... -
Page 6: Speaker Output And Line Output
• Mixing - By default, input from I2S (Bluetooth) and J9 (analog) are mixed together within the DSP before being sent for amplification. This allows for a smooth transition between aux and Bluetooth without the user needing to touch the speaker/amplifier. This can be reprogrammed via a custom SigmaStudio project. - Page 7 KABD series need this circuit on the battery board itself. Connect a 2.5mm or 2.1mm DC jack to J9 to allow a variety of power supplies to be attached to the KABD-250.
- Page 8 Bluetooth Connection Once powered on, the board’s Bluetooth connection will be available on your phone, tablet, laptop, etc and will show as “DAKAB” in your Bluetooth menu. Once connected and music is playing on the source device, audio should begin playing through your connected speakers.
- Page 9 Input Jack (Optional) A 3.5mm jack comes included in the functional cable pack with attached 5 pin connector, which can be plugged into J9 to function as a line input for external audio sources. This wiring harness could be modified by snipping off the 3.5mm jack, and soldering stereo RCA jacks to the cables according to the pinout on the back of the board or on the chart to the right.
- Page 10 Bluetooth Antenna (Optional) Attaching the external Bluetooth antenna in the function cable kit can be helpful when the KABD is installed in situations where more range is needed, or if the Bluetooth signal is restricted, such as in a metal case.
-
Page 11: Potentiometer Headers
Potentiometer Headers The KABD series of amplifiers come with four headers to make it easy to add external potentiometers, button, switches or rotary encoders to your project. Each of these 3-pin headers expose a voltage supply, GND, and a multipurpose pin of the ADAU1701. The optional cable pack for the KABD series comes with 4 potentiometers with cables that connect directly to these ports, so no soldering is required and they are easy to add to your project. -
Page 12: Potentiometer Port Configuration In Sigmastudio
Potentiometer Port Configuration in SigmaStudio There is some configuration within SigmaStudio required so the ADAU1701 knows to interpret each multipurpose (MP) pin as a potentiometer input or button/switch input. Simply open the hardware configuration menu, then select the “IC 1 – 170x\140x Register Control” tab. Configure the MP pin that corresponds to your potentiometer header to “Input GPIO Debounce”... -
Page 13: Sigma Studio Connection - Quick Start
After programming, it can be removed and used to program as many other KABD amplifier boards as needed. Note that a comprehensive SigmaStudio Programming Guide for the whole KABD series is available wherever you found this document (the product page for the KABD-250 or KABD-230) this section is merely to get you started with / connected to SigmaStudio. - Page 14 The following steps make it easy to connect your programmer to the SigmaStudio development tool, and then your programmer to your KABD amplifier. The steps require a basic knowledge of computer operation, but if the steps are followed closely, it is not too complicated. Please complete these steps in this order for consistent connection.
- Page 15 iii. It could be a driver problem that can be resolved by reinstalling SigmaStudio, using a different USB port, manually uninstalling the driver from Device Manager and then reconnecting the ICP1 / KPX. iv. If possible, try connecting to another PC with a fresh install of SigmaStudio. If it connects, you know it is a problem with the drivers or USB port on your original PC.
-
Page 16: Default Register Configuration In Sigmastudio
Default Register Configuration in SigmaStudio These are the default register settings for a KABD-250 or KABD-230 (and the entire KABD series). It is setup for proper I2S settings for Bluetooth Input, and also sets up the 4 POT ports for potentiometers (if using switches, see other section). -
Page 17: Writing To E2Prom - Burning Custom Sigmastudio Programs To Non-Volatile Memory
Writing to E2Prom – Burning Custom SigmaStudio Programs to Non-Volatile Memory This step writes your custom program to non-volatile memory on the KABD amplifier. This means that the program will be retained on the KABD even after it has been powered off and then back on again. This can be reprogrammed as many times as needed. - Page 18 4. The program should now be written to E2PROM after it finishes programming. This means you can remove your programmer from the KABD, and your program should remain programmed on the board after power cycling the KABD.
-
Page 19: Example Projects For The Kabd-250 And Kabd-230
Below are some examples of how the KABD-250 or KABD-230 could be used. Download the SigmaStudio programming guide for the KABD series and the project pack found on the product page of the KABD- 230 or KABD-250 for details about how the necessary DSP programming can be achieved to achieve these projects. -
Page 20: Gaming/Arcade Machines, Kiosks Or Other Commercial Systems
the line output capability of the KABD amplifiers to connect a powered subwoofer, and even add some room EQ to the subwoofer. 3) For creating 2-way speakers with active crossovers, a 4 channel amplifier such as the KABD-4100 or KABD-430 is better suited for this type of project because 4 channels can power a stereo pair of tweeters and woofers, but a 2 channel KABD only has 2 powered outputs. -
Page 21: Example Sigmastudio Projects
On the product page for the KABD-250 or KABD-230, you will find a zip file that contains numerous project examples for the entire KABD series. For further descriptions of the projects, see the end of ( but read all of ) the “SigmaStudio Programming Guide for the KABD Series of Amplifiers” Guide. You will find... -
Page 22: Kabd-250 Specifications
KABD-250 Specifications Electrical Specifications Specifications typical @ +25°C, powered by 24V DC, unless otherwise noted. Audio Specifications... -
Page 23: Kabd-230 Specifications
KABD-230 Specifications Electrical Specifications Audio Specifications...
Need help?
Do you have a question about the KABD Series and is the answer not in the manual?
Questions and answers