Advertisement
Quick Links
Advertisement

Summary of Contents for Omnia OKS-604S
- Page 1 Smart Wall Socket User Guide OKS-604S...
- Page 2 Notes Before Installation 1. Wi-Fi Only support a 2.4GHz network (802.11 b/g/n). 2. Neutral wire Required. 3. Basic electrical wiring knowledge or experience required , or please consult a professional electrician. 4. Do not load more than the maximum power capacity of the device.
-
Page 3: Specifications
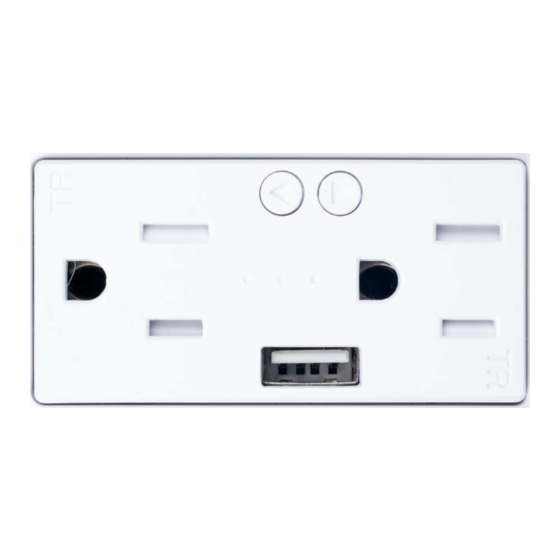
Specifications Type Smart Wall Socket Model OKS-604S Power supply mode Neutral+Live Wire Rated Current 15A(Max) Rated Voltage AC110-125V~50/60Hz Single 1500W Total 2500W Load Power Inductive Load<2000W USB Output 5V/2.1A Wireless Frequency 2.4GHZ Wireless Standard IEEE802.11 b/g/n Indicator light meaning Description... - Page 4 Power Indicator light 1 Socket Hole ON/OFF Button USB Changer ON/OFF Button Wi-Fi Indicator light Socket Hole Face Plate Power Indicator light 2 Live wire Neutral Wire 80mm Ground...
-
Page 5: Installation
Installation Guide STEP 1. STEP 2. Turn off circuit breaker. Remove the original socket Find your socket’s control in your In the wall cassette find the circuit breaker and turn it off, neutral wire, line wire ground wire. Ground Line O O N N O O F F F F O O N N... - Page 6 STEP 3. Label your wires. Mark or record the corresponding line before removing the old socket Line Neutral...
- Page 7 STEP 4. Install socket Use wire-nuts to connect the socket wires to your home wires , following the diagram. Be careful to match each line. Then remove the stickers, screw the socket into the wall, and attach the faceplate. For safety, please connect the ground wire.
- Page 8 STEP 5. STEP 6. Turn on circuit breaker Check the Wi-Fi light. Turn on your socket’s power from To start the paring mode, press one the circuit breaker. of the buttons until the WiFi Press the socket a few times to indicator light blinks.
- Page 9 Install the “Smart Life”APP Step A. Search “Smart Life”app in Apple app store, Google Play, or scan the QR code bellow and install it. The free app”Smart Life” is compatible with mobile devices the support IOS8.0 above, Android 4.4 above. Step B.
- Page 10 Step C. Add the switch to Smart Life APP Note: This smart socket can only support 2.4G network and cannot work with 5.0G network. please check if your home network is 2.4G and make sure that your phone has been connected to your WI-FI home network. (1)Tap”+”...
- Page 11 EZ Default Mode(Recommend) Indicator light rapidly blinks (2 times per second). Step 1. Make sure the indicator blinks rapidly, if not, hold any of the ON/OFF buttons for 7 seconds to enter on pairing mode. Enter Wi-Fi Password C onfirm P ower on the device and confirm that indicator light rapidly blinks How to make indicator rapidly blink...
- Page 12 AP Mode(Alternative) Indicator light slowly blinks (1 time every 3 second). Step 1.When the indicator blinks rapidly, press and hold any of the ON/OFF buttons for another 7 seconds. the indicator will blinks slowly. AP Mode P ower on the device and confirm that indicator light rapidly blinks P ower on the device and confirm that indicator light slowly blinks...
- Page 13 AP Mode steps continued. Enter Wi-Fi Password C onfirm S martLife_ xxxx C onnect Now Step 4. Step 5.
- Page 14 Back S martLife-506D C onnected WLAN Step 6. Step 7.
- Page 15 Add Device Socket Share with Family Done Step 8. Step 9. Modify socket name...
- Page 16 Step D: Give a name to the socket and tap ”Done”. You will find the device you’ve named is shown on the app homep- age. Tap the device to enter the setting page. Note: The name you give to the device will be the name for voice control on Amazon Alexa or Google Home later.
- Page 17 After completing install you can control the socket with Smart Life APP on this setting page. Note: Both socket holes can be controlled separately, long press the name to rename as desired. Click to enter settings Try on/off and timer functions on the app to control the socket.
- Page 18 Try timer function to easily set up schedule to turn on/off smart socket. Note: Both socket holes can be individually timed. Note: If you want to control the light with Amazon Alexa, please continue to read Page 10. If you want to control the light with Google Home, please skip Page 10 and read Page 13 directly.
- Page 19 How to control the switch with Amazon Alexa? Please make sure that your Alexa APP is connected to Amazon Echo and both work together successfully under your Wi-Fi home network. Step A: Log in your Alexa APP, tap top left corner, and tap ”Skills”.
- Page 20 Step B: Type ”Smart Life”, find “Smart Life” from the search result and tap it to enable the skill.
- Page 21 Step C: Enter your account and password of “Smart Life” app, tap “Link now”. Then tap “Authorize” on the next page to bind Smart Life account to Alexa. Same account and password as Smart Life App...
- Page 22 Step D: Once your Smart Life account is successfully bound to Alexa, the following page will pop up. Tap “Done” on top left corner, then tap ”DISCOVER DEVICES” on the next page.
- Page 23 Step E: Wait a few seconds for Alexa to detect the switch from Smart Life app and you will find the device named "Socket" has been paired to Alexa APP from “Smart Life” APP. Socket After Step E is done, you can now control the switch with Alexa app on this setting page.
- Page 24 Tap to turn ON/OFF the socket. Switch is on Step F: Now you are able to control the socket via Amazon Alexa. Try these commands and see what happens by asking Alexa: Alexa, turn on “device name” Alexa, turn off “device name” Note: The device name is the one you give to the socket on “Smart Life”...
- Page 25 How to control the switch with Google Home? Preparation: • Have downloaded the Google Home app • Have registered your Google Account (only support US ac- count) • Have paired Smart Socket with Smart life App and named with a simply and easily recognizable name. •...
- Page 26 Step D: Enter your account and password of “Smart Life” app, tap “Link now”. Then tap “Authorize” on the next page to bind Smart Life account to Google Home. P lease login with your S mart life account +1 US LINK ACCOUNT Link Now...
- Page 27 Step E: You will find that Google Home has found the device named “Socket” on this page. Socket Socket...
- Page 28 Step F: Now you are able to control the socket via Google Home. Try these commands and see what happens by asking Google ok, Google, turn on “device name”. ok, Google, turn off “device name”. Note: The device name is the one you give to the switch on “Smart Life”...
- Page 29 Please note when adding device: 1.Confirm device is powered on. 2. Confirm device is waiting for network configuration. 3. Confirm that device, smart phone and router are as close to each other. 4. Make sure the network function of router and smart phone are unblocked. 5.Confirm the entered router password is correct.
- Page 30 FCC NOTE: This device complies with Part 15 of the FCC Rules. Operation is subject to the following two conditions: this device may not cause harmful interference, this device must accept any interference received, including interference that may cause undesired operation . The manufacturer is not responsible for any radio or tv interference caused by unauthorized modifications or change to this equipment.
- Page 31 Smart Wall Socket OKS-604S User Manual w w w . s m a r t o m n i a . c o m smart.omnia smartomniacr...