
Summary of Contents for GUTA GT107-2
- Page 1 Model No. GT107-2 Scan here to contact us [24Hrs Online] https://guta.afterservice.vip...
-
Page 2: Table Of Contents
Contents Product Components --------------------------------------------- Button and Icon Description --------------------------------- System Programming ------------------------------------------- 1. Wireless Programming ------------------------------------------- 2. Inflation Programming ------------------------------------------- Delete Sensor’s ID Code ----------------------------------------- ---------------------------------- 1. Delete Single Sensor ID Code -------------------------------------- 2. Delete all Sensors ID Code System Parameter Settings ---------------------------------- 1. -
Page 3: Product Components
Product Components Item Quantity Display Micro USB Cable Suction cup Dashboard Mount Sensor Number Sticker User Manual Repeater Optional Button and Icon Description... -
Page 4: System Programming
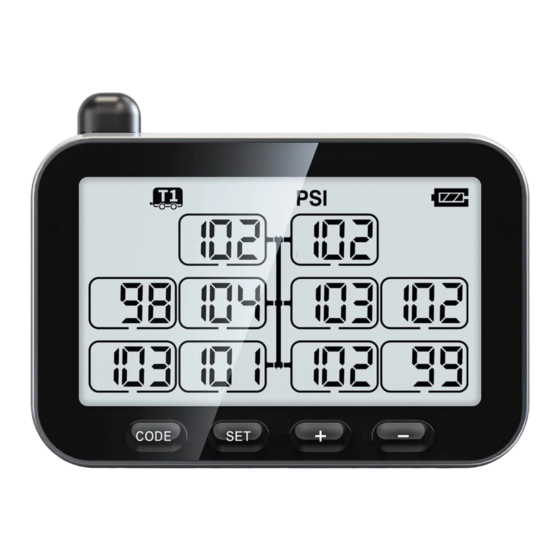
Icons Descriptions Icons Descriptions Sensor Low Tire Icon Battery Indicator Monitor Power Temperature Unit Indicator Trailer1, Trailer2, Pressure Unit Trailer3 Repeater Alert Icon Indicator System Programming 1. Wireless Programming Step 1: In the Standby mode, press and hold the“CODE” button for 3 seconds with a beep to enter the Learning mode, and the current tire“... - Page 5 Step 2: Press the “+”/ “-” button to select the desired tire. Step 3: Place the sensor onto the top right of the monitor (next to the “ ” Label). Step 4: Short press the “CODE” button once with a “Bi”, a red LED will start flashing and the sensor ID code will be displayed on the screen.
-
Page 6: Inflation Programming
Note: If users do not press any button within 1 minute, the monitor will exit the Learning mode and the current pressure value will be displayed. 2. Inflation Programming Step 1: In the Standby mode, press and hold the “CODE” button for 3 seconds to enter the Learning mode with a beep. - Page 7 Note: If there is a “BiBi”, it indicates program failed. Please try Step 3 again to work on the sensor until the monitor displays the sensor ID. Step 4: Press the “+” button to work on the next tire, or hold and press the “CODE” button for 3 seconds to store the operation.
-
Page 8: Delete Sensor's Id Code
Press “+” and “-” buttons simultaneously to stop programming and return to the Standby mode without saving the operation. Delete sensor ID and all sensor IDs could be operated in this operation too. For details please refer to the instructions below. Delete Sensor’... -
Page 9: Delete All Sensors Id Code
Step 2: Select the desired tire you want to delete by Pressing the “+” or “-” button. Step 3: Hold and press the “-” button for about 3 seconds and release it after a beep. There will be an “FFF FFF” displayed on the screen, which indicates that the sensor ID has been deleted successfully. - Page 10 Step 2: Hold and press the “-” button. Do not release it until you hear the “BiBi”, which indicates that all the sensor IDs have been cleared. Step 3: Shortly press the “SET” button to save the above operation and return to the Standby mode.
-
Page 11: System Parameter Settings
System Parameter Settings 1. Factory Default Setting Reference Setting Pressure 131 PSI (9 BAR) High Pressure Alert 164PSI (11.3 BAR) Low Pressure Alert 98 PSI (6.8 BAR) High Temperature Alert 194°F (90℃) Pressure Unit Temperature Unit °F 2. Product Specifications Pressure Range 0-188 PSI (0- 13 BAR) Working... -
Page 12: Parameter Settings
3. Parameter Settings In the Standby mode, hold and press the “SET” button for about 3 seconds. Do not release until a beep to do the parameter settings. Step 1: Firstly you will see the pressure unit PSI or BAR flashes, press “+”... - Page 13 Step 3: After setting the temperature unit, shortly press the “SET” button to set the HIGH & LOW PRESSURE ALERT parameter of each truck axle, the first and second number of the 1st axle tire pressure value will flash. Shortly press the“+” or “-” button to set the desired pressure.
- Page 14 Press the “CODE” button to set the third number while it is flashing. After setting the pressure parameter, repeat Step 3 to set the HIGH & LOW PRESSURE ALERT parameter for all the truck axle. Step 4: After setting the HIGH&LOW PRESSURE ALERT parameter of each truck axle , shortly press the “SET”...
- Page 15 Press the “CODE” button to set the next number while it is flashing. After setting the pressure parameter, repeat Step 4 to set the HIGH & LOW PRESSURE ALERT parame- ter for T2, T3 truck. Long press the “SET” button to save the above operation and return to the Standby mode.
-
Page 16: System Alerts
System Alerts 1. High-Pressure Alert The monitor will alert with beeps. The corresponding faulty tire “ ”and “ ” will flash when the tire pressure is higher than the high- pressure alert parameter. 2. Low-Pressure Alert The monitor will alert with beeps. The corresponding faulty tire “... - Page 17 3. High-Temperature Alert The monitor will alert with beeps. All tires pressure value change into a temperature value. The corresponding faulty tire “ ” and “ ” will flash when the tire pressure is higher than the high- temperature alert parameter.
- Page 18 5. Lost Sensor Signal When the monitor has not received one of the sensor's signal for more than 1 hour, the corresponding faulty tire “ ”and “ ” will flash pressure and temperature value will disappear. Tips: Please stop the vehicle in a safety area to check the no signal tire and the sensor.
-
Page 19: Safety Cautions
6. Sensor Low Battery Alert When a sensor is low battery, “ ” and “ ”will flash as below, please change the battery. Safety Cautions It is highly recommended to read the instructions below before installing the system: The monitor should be installed inside the vehicle where it does not affect normal driving. - Page 20 Driver should stop the vehicle and get off to check the tire fast leakage occurs or the pressure goes up quickly in the tire. Be ware of flat tire when there is high pressure and take care of fuel consumption and balance while suffering from low pressure.
-
Page 21: Warranty Information
vehicles and long trailers. Due to the air expansion and contraction, the tire pressure and temperature will change while driving. There is normal tire leakage in every tire, TPMS will not affect the tire pressure if the pressure data drops after long-time driving. -
Page 22: Contact Us
QR code to get a quick response and a satisfactory solution. Amazon Platform: “Contact Seller” Official Website: http://www.guta-tech.com/ Email Address: guta@afterservice.vip Scan here to contact us [24Hrs Online]...
Need help?
Do you have a question about the GT107-2 and is the answer not in the manual?
Questions and answers
How do I hide or display a trailer