Table of Contents
Advertisement
Advertisement
Table of Contents
Troubleshooting

Related Manuals for Garmin RVCAM 795


Summary of Contents for Garmin RVCAM 795
- Page 1 RVCAM 795 / CAMPERCAM 795 Owner’s manual...
- Page 2 © 2022 Garmin Ltd. or its subsidiaries All rights reserved. Under the copyright laws, this manual may not be copied, in whole or in part, without the written consent of Garmin. Garmin reserves the right to change or improve its products and to make changes in the content of this manual without obligation to notify any person or organisation of such changes or improvements. Go to www.garmin.com...
-
Page 3: Table Of Contents
Installing the dash camera memory card............2 Driver awareness features and Mounting Considerations....... 2 alerts..........14 Mounting and Powering the Garmin Enabling or Disabling Driver Alerts..15 Device in Your Vehicle......3 Red light and speed cameras....15 Turning the device on or off....6 Advanced Driver Assistance System... - Page 4 Stopping the route.........32 Viewing the list of notifications..41 Using Suggested Routes...... 32 Going to an address or location using the Garmin Drive app......42 Avoiding Delays, Tolls and Areas..33 Hands-free calling......... 42 Avoiding traffic delays on your route........... 33 Placing a call........
- Page 5 Editing and saving your active route........... 46 Device maintenance....... 56 Loyalty Programmes......46 Logging service history......47 Garmin Support Centre......56 Adding service categories....47 Map and Software Updates....57 Deleting service categories....47 Connecting to a Wi‑Fi Network..57 Renaming service categories...
- Page 6 Mounting the Device......65 Opening the Front Cover....66 Connecting Accessories....67 Connecting a Control Input....68 Connecting the Device to Vehicle Power..........69 Pairing with a Garmin Navigation Device..........70 Garmin PowerSwitch Specifications........70 Troubleshooting........ 70 Table of contents...
-
Page 7: Getting Started
• Update the maps and software on your device (Map and Software Updates, page 57). • Mount the device in your vehicle and connect it to power (Mounting and Powering the Garmin Device in Your Vehicle, page • Align the dash camera (Aligning the camera, page •... -
Page 8: Installing The Dash Camera Memory Card
Installing the dash camera memory card Before the device can record video from the integrated dash camera, you must install a camera memory card. The camera requires a microSD memory card from 4 to 256 GB with a speed rating of Class 10 or higher. You ®... -
Page 9: Mounting And Powering The Garmin Device In Your Vehicle
Mounting and Powering the Garmin Device in Your Vehicle WARNING This product contains a lithium-ion battery. To prevent the possibility of personal injury or product damage caused by battery exposure to extreme heat, store the device out of direct sunlight. - Page 10 3 Plug the other end of the vehicle power cable into a power outlet in your vehicle. 4 Fit the tab on the bottom of the mount into the slot on the back of the device, and press the device into the mount until it clicks.
- Page 11 Getting started...
-
Page 12: Turning The Device On Or Off
Turning the device on or off • To turn the device on, press the power button , or connect the device to power. • To put the device in power saving mode, press the power button while the device is on. While in power saving mode, the screen is off and the device uses very little power, but it can wake instantly for use. -
Page 13: Status Bar Icons
Active vehicle profile. Select to view the vehicle profile settings (Editing a vehicle profile, page Current time. Select to set the time (Setting the Time, page 55). Battery charge level. Garmin Drive ™ app connection status (Pairing with Your Smartphone, page 39). Temperature. Select to view the weather forecast (Viewing the Weather Forecast, page 44). -
Page 14: Adjusting The Screen Brightness
Adjusting the screen brightness 1 Select > Display > Brightness. 2 Use the slider bar to adjust the brightness. Vehicle Profiles WARNING Entering your vehicle profile characteristics does not guarantee that your vehicle's characteristics will be accounted for in all route suggestions or that you will receive the warning icons in all cases. Limitations may exist in the map data such that your device cannot account for these restrictions or road conditions in all cases. -
Page 15: Switching The Vehicle Profile
Switching the Vehicle Profile You can manually switch to another vehicle profile at any time. 1 From the status bar, select the vehicle profile icon, such as 2 Select a vehicle profile. The vehicle profile information appears, including measurements and weight. 3 Select Select. -
Page 16: Dash Cam Recording
Dash Cam Recording NOTICE Some jurisdictions may prohibit or regulate recording audio and video or taking photographs. Jurisdictions may require that all parties have knowledge of the recording and provide consent before you record audio and video or take photographs. It is your responsibility to know and comply with all laws, regulations and any other restrictions in your jurisdiction. -
Page 17: Videos On Your Computer
Vault automatically while it is connected to a Wi‑Fi network. You can store videos in the Vault for up to 24 hours with your Garmin Drive account. There is no size limit to the amount of data you can store. -
Page 18: Editing And Exporting A Video
Voice-activated features WARNING The Garmin device uses natural language processing to understand the intent of your spoken requests. You can ask questions or give spoken commands using natural language and complete sentences. Many example phrases are provided in the manual, but you can experiment with speaking to the device using the language most comfortable to you. -
Page 19: Launching Garmin Voice-Activated Navigation
Going to a Favourite Location Using Your Voice It is useful to start a route on your Garmin device each time you travel to a favourite location, even though you may already know how to get there. Your device can help you avoid reported traffic delays and construction that may affect your route. -
Page 20: Placing A Phone Call Using Your Voice
The driver alerts and speed limit features are for information only. They do not replace your responsibility to abide by all posted speed limit signs and to use safe driving judgement at all times. Garmin is not responsible for any traffic fines or citations that you receive for failing to follow all applicable traffic laws and signs. -
Page 21: Enabling Or Disabling Driver Alerts
2 Select or clear the tick box next to each alert. Red light and speed cameras NOTICE Garmin is not responsible for the accuracy of or the consequences of using a red light or speed camera database. NOTE: this feature is not available for all regions or product models. -
Page 22: Forward Collision Warning System
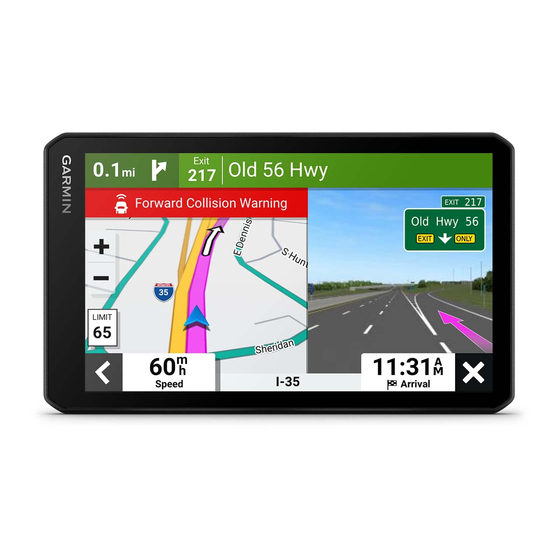
The FCWS relies on the camera to provide a warning of upcoming vehicles and, as a result, may have limited functionality in low visibility conditions. For more information, go to garmin.com /warnings. The FCWS feature alerts you when the device detects that there is not a safe distance between your vehicle and the vehicle in front of you. -
Page 23: Lane Departure Warning System
The LDWS relies on the camera to provide warnings for lane markers and, as a result, may have limited functionality in low visibility conditions. For more information, go to garmin.com/warnings. The LDWS feature alerts you when the device detects you may be crossing a lane boundary unintentionally. For example, the device alerts you if you cross some solid painted lane boundaries. -
Page 24: Warning And Alert Symbols
Lane departure warning performance tips Several factors affect the performance of the lane departure warning system (LDWS). Some conditions may prevent the LDWS feature from detecting lane departures. • The LDWS feature provides alerts only when your vehicle speed exceeds 65 km/h (40 mph). •... -
Page 25: Restriction Warnings
Restriction warnings Height Weight Length Width Trailer height Trailer weight Trailer length Trailer width No boat trailers allowed No campers allowed No trailers allowed No propane No left turn No right turn No U-turn Road condition warnings Risk of grounding Lateral wind Narrow road Sharp curve... -
Page 26: Alerts
Alerts Weighbridge Road not verified for motorhomes Finding and saving locations The maps loaded in your device contain locations, such as restaurants, hotels, vehicle services, and detailed street information. The Where To? menu helps you find your destination by providing several methods to browse, search, and save this information. -
Page 27: Trendy Places
Trendy Places NOTICE Garmin is not responsible for the accuracy or timeliness of the Tripadvisor or Michelin information. You are ® responsible for understanding and complying with any applicable rules, laws or regulations associated with points of interest. The Trendy Places search feature includes both Tripadvisor and Michelin points of interest and ratings, providing a comprehensive list of attractions. -
Page 28: Location Search Results
Location Search Results The location search results appear in a list, with the nearest location at the top. Each numbered location also appears on the map. You can scroll down to view more results. Plan Arrival Select to use the Plan Arrival tool. Select to view detailed information about the location. -
Page 29: Changing The Search Area
Changing the search area By default, the device searches for locations near your current location. You can also search other areas, such as near your destination, near another city, or along your active route. 1 Select Where To?. 2 Select next to the current search area 3 Select a search area. -
Page 30: Finding Campsites
Foursquare ® NOTICE Garmin is not responsible for the accuracy or timeliness of information provided by Foursquare. You are responsible for understanding and complying with any applicable rules, laws or regulations associated with points of interest. Foursquare is a location-based social network. Your device includes millions of pre-loaded Foursquare points of interest, which are indicated by the Foursquare logo in your location search results. -
Page 31: Tripadvisor
2 Select Tripadvisor NOTICE Garmin is not responsible for the accuracy or timeliness of the Tripadvisor information. You are responsible for understanding and complying with any applicable rules, laws or regulations associated with points of interest. Your device includes Tripadvisor traveller ratings. Tripadvisor ratings appear automatically in the search results list for restaurants, hotels and attractions. -
Page 32: Finding A Junction
Finding a junction You can search for a junction between two streets, motorways, or other roads. 1 Select Where To? > Junctions. 2 Follow the on-screen instructions to enter street information. 3 Select the junction. Finding a location using coordinates You can find a location using latitude and longitude coordinates. -
Page 33: Adding A Shortcut
Adding a shortcut You can add shortcuts to the Where To? menu. A shortcut can point to a location, a category, or a search tool. The Where To? menu can contain up to 36 shortcut icons. 1 Select Where To? > Personalise. 2 Select an item. -
Page 34: Assigning Categories To A Saved Location
Assigning Categories to a Saved Location You can add custom categories to organise your saved locations. NOTE: categories appear in the saved locations menu after you have saved more than 12 locations. 1 Select Where To? > Favourites. 2 Select a location. 3 Select 4 Select >... -
Page 35: Starting A Route By Using The Map
Starting a route by using the map You can start a route by selecting a location from the map. 1 Select View Map. 2 Drag and zoom the map to display the area to search. 3 If necessary, select to filter the displayed points of interest by category. Location markers (coloured dots) appear on the map. -
Page 36: Your Route On The Map
Your route on the map As you travel, the device guides you to your destination using voice prompts and information on the map. Instructions for your next turn or exit, or other actions appear across the top of the map. Distance to the next action. -
Page 37: Active Lane Guidance
Active lane guidance As you approach some turns, exits, or interchanges in your route, a detailed simulation of the road appears beside the map, if available. A coloured line indicates the proper lane for the turn. Viewing turns and directions While navigating a route, you can view next turns, lane changes, or other directions for your route. -
Page 38: Changing Your Active Route
Changing Your Active Route Adding a location to your route Before you can add a location to your route, you must be navigating a route (Starting a route, page 28). You can add locations to the middle or end of your route. For example, you can add a petrol station as the next destination in your route. -
Page 39: Avoiding Delays, Tolls And Areas
Avoiding Delays, Tolls and Areas Avoiding traffic delays on your route Before you can avoid traffic delays, you must be receiving traffic information (Receiving traffic data using your smartphone, page 44). By default, the device optimises your route to avoid traffic delays automatically. If you have disabled this option in the traffic settings (Traffic Settings, page 55), you can view and avoid traffic delays manually. -
Page 40: Using The Map
Disabling a custom avoidance You can disable a custom avoidance without deleting it. 1 Select > Navigation > Custom Avoidances. 2 Select a created avoidance. 3 Select > Disable. Deleting custom avoidances 1 Select > Navigation > Custom Avoidances > 2 Select an option: •... -
Page 41: Map Tools
Map tools Map tools provide quick access to information and device functions while you view the map. When you activate a map tool, it appears in a panel at the edge of the map. Stop: stops navigation of the active route. Camera: provides dash cam controls and displays forward collision and lane departure alerts. -
Page 42: Customising The Up Ahead Categories
Customising the up ahead categories You can change the location categories that appear in the Up Ahead tool. 1 From the map, select > Up Ahead. 2 Select a category. 3 Select 4 Select an option: • To move a category up or down in the list, select and drag the arrow next to the category name. •... -
Page 43: Viewing Trip Data
• Select Reset Max. Speed to reset the maximum speed. Viewing upcoming traffic NOTICE Garmin is not responsible for the accuracy or timeliness of the traffic information. Before you can use this feature, your device must be receiving traffic data (Traffic, page 44). -
Page 44: Viewing Traffic On The Map
Do not read or interact with notifications while driving, because doing so can cause distraction that could lead to an accident resulting in serious personal injury or death. The Garmin Drive app allows your device to receive smart notifications and live information, such as live traffic data and weather information. -
Page 45: Pairing With Your Smartphone
1 From the app store on your smartphone, install the Garmin Drive app. 2 Turn on your Garmin device and place the device and your smartphone within 3 m (10 ft.) of each other. 3 On your phone, open the Garmin Drive app. -
Page 46: Viewing Videos And Photos On Your Smartphone
Viewing Videos and Photos on Your Smartphone Before you can view videos and photos on your smartphone, you must pair your Garmin device with the Garmin Drive app (Pairing with Your Smartphone, page 39). NOTE: the device stops recording and alerts are disabled while viewing videos or photos. -
Page 47: Receiving Notifications
Do not read or interact with notifications while driving, because doing so can cause distraction that could lead to an accident resulting in serious personal injury or death. Before you can use this feature, your device must be connected to a supported phone running the Garmin Drive (Live services, traffic and smartphone features, page 38). -
Page 48: Going To An Address Or Location Using The Garmin Drive App
Going to an address or location using the Garmin Drive app You can use the Garmin Drive app to search for an address, business or point of interest and send it to your Garmin device for navigation. 1 From the Garmin Drive app, select Where To?. -
Page 49: Using The Call History
> Phone > Call Home. Disconnecting a Bluetooth device You can temporarily disconnect a Bluetooth device without deleting it from the paired devices list. The Bluetooth device can connect to your Garmin device automatically in the future. 1 Select > Wireless Networks. -
Page 50: Traffic
To provide traffic information, your device must be receiving traffic data. • All product models can receive subscription-free traffic data using the Garmin Drive app. Traffic data is not available in all areas. For information about traffic coverage areas, go to garmin.com/traffic. Receiving traffic data using your smartphone Your device can receive subscription-free traffic data while connected to a smartphone running the Garmin Drive app. -
Page 51: Viewing Weather Near A Different Town
• To add a favourite town, select Add Town, and enter a town name. Viewing the weather radar Before you can use this feature, your device must be connected to a supported phone running the Garmin Drive (Live services, traffic and smartphone features, page 38). -
Page 52: Editing And Reordering Locations In A Route
3 Select OK to save your route, which you can navigate again later (optional). Loyalty Programmes From your Garmin device, you can access loyalty programmes from some of the travel plazas in the United States, including Pilot Flying J Travel Centers. You can use the loyalty programme apps on your Garmin device to check reward points balances and other loyalty programme information. -
Page 53: Logging Service History
> Delete Records. 4 Select the service records to be deleted. 5 Select Delete. photoLive traffic cameras Before you can use this feature, your device must be connected to the Garmin Drive app (Live services, traffic and smartphone features, page 38). -
Page 54: Viewing And Saving Photolive Traffic Cameras
Viewing and Saving photoLive Traffic Cameras You can view live images from nearby traffic cameras. You can also save traffic cameras for areas you travel frequently. 1 Select > photoLive. 2 Select Touch to Add 3 Select a road. 4 Select a traffic camera location. A preview of the live image from the camera appears next to a map of the camera's location. -
Page 55: Garmin Powerswitch™ App
Displays Garmin PowerSwitch device tabs and custom layout tabs Activating a Power Switch Before you can use the Garmin PowerSwitch app to activate a switch, you must install your Garmin PowerSwitch device in your vehicle and pair it with the Garmin PowerSwitch app. -
Page 56: Customising A Button
Before you can use control input functions, you must connect a control input to your Garmin PowerSwitch device. You can assign one or more switches to turn on when the Garmin PowerSwitch device receives a signal from a control input. -
Page 57: Routines
Routines Routines automate your Garmin PowerSwitch device. When you define a routine on your compatible Garmin navigation device, it turns switches on or off automatically when the conditions of the routine are met. For example, you can set a routine to turn on a switch at specific time each day or when your vehicle reaches a specific speed. -
Page 58: Settings
Skip Next Stop Confirmation: sets a confirmation message to appear when skipping a location on your route. myMaps: sets which installed maps the device uses. Enabling maps You can enable map products installed on your device. TIP: to purchase additional map products, go to garmin.com/maps. 1 Select > Map Display > myMaps. 2 Select a map. -
Page 59: Navigation Settings
Navigation settings Select > Navigation. Calculation Mode: sets the route calculation method. Avoidances: sets road features to avoid on a route. Custom Avoidances: allows you to avoid specific roads or areas. Environmental Zones: sets the avoidance preferences for areas with environmental or emissions restrictions that may apply to your vehicle. -
Page 60: Proximity Alerts Settings
The wireless camera settings allow you to manage paired Garmin wireless cameras and camera settings. Settings in this menu only appear when a wireless camera is connected to your Garmin device. See the manual for your wireless camera for more information about pairing a wireless camera with your Garmin device. -
Page 61: Display Settings
Display settings Select > Display. Colour Mode: allows you to select day or night colour mode. If you select the Auto option, the device automatically switches to day or night colours based on the time of day. Brightness: allows you to adjust the display brightness. Display Timeout: allows you to set the amount of idle time before your device enters sleep mode while using battery power. -
Page 62: Device And Privacy Settings
• Connect the device to an optional power adapter accessory, such as a wall power adapter. You can purchase an approved Garmin AC-DC adapter suitable for home or office use from a Garmin dealer or www.garmin.com. The device may charge slowly when connected to a third-party adapter. -
Page 63: Map And Software Updates
• You can connect the device to a Wi‑Fi network to update directly on the device (recommended). This option allows you to update your device conveniently without connecting it to a computer. • You can connect the device to a computer and update it using the Garmin Express application (garmin.com /express). -
Page 64: Updating Maps And Software Using A Wi-Fi Network
TIP: if a map update is interrupted or cancelled before it completes, your device may be missing map data. To repair missing map data, you must update the maps again using either Wi‑Fi or Garmin Express. Device maintenance... -
Page 65: Updating Maps And Software With Garmin Express
Updating Maps and Software with Garmin Express You can use the Garmin Express application to download and install the latest map and software updates for your device. 1 If you do not have the Garmin Express application installed on your computer, go to garmin.com/express... -
Page 66: Device Care
1 On your computer, go to garmin.com/express. 2 Select an option: • To view the system requirements and verify the Garmin Express application is compatible with your computer, select System Requirements. • To install on a Windows computer, select Download for Windows. -
Page 67: Restarting The Device
Restarting the Device You can restart your device if it stops functioning. Hold the power button for 12 seconds. Removing the Device, Mount and Suction Cup Removing the Device from the Mount 1 Press the release tab or button on the mount. 2 Tilt the top of the device downwards and lift the device from the mount. -
Page 68: My Memory Card Has Degraded And Needs To Be Replaced
1 Clean the suction cup and windscreen with surgical spirit. 2 Dry with a clean, dry cloth. 3 Mount the suction cup (Mounting and Powering the Garmin Device in Your Vehicle, page My device is not acquiring satellite signals • Verify the GPS simulator is turned off (Navigation settings, page 53). -
Page 69: My Device Does Not Connect To My Phone
About memory cards You can purchase memory cards from an electronics supplier, or purchase pre-loaded Garmin mapping software (www.garmin.com). Memory cards can be used to store files such as maps and custom POIs. Formatting the Dash Cam Memory Card The dash cam requires a memory card formatted using the FAT32 file system. You can use the device to format your card using this file system. -
Page 70: Transferring Data From Your Computer
Incorrectly wiring the power cable can result in damage to the vehicle or the battery and can cause bodily injury. You can use a connected Garmin PowerSwitch device to control lights, fans and more from your Garmin device. Appendix... -
Page 71: Mounting Considerations
Avoid wires, gauges, air bags, air bag covers, heating, ventilation, and air conditioning and other items when drilling pilot holes and attaching the mount to the vehicle. Garmin is not responsible for any damages or consequences arising from the installation. -
Page 72: Opening The Front Cover
Opening the Front Cover You must open the front cover to make electrical connections. 1 Lift the front cover latch and rotate it anticlockwise. 2 Pull the front cover off of the device. Appendix... -
Page 73: Connecting Accessories
Accessory requirements: • Verify the amperage rating of each accessory before wiring it to the Garmin PowerSwitch device. The device supports accessories up to 30 A for each channel and a maximum of 100 A for the entire system. -
Page 74: Connecting A Control Input
CAUTION Do not connect the accessory ground wires to the ground terminal (GND) on the Garmin PowerSwitch device, as doing so could result in personal injury or property damage, or could negatively impact device functionality. 3 Verify that all electrical connections are tight and will not come loose during use. -
Page 75: Connecting The Device To Vehicle Power
Connecting the Device to Vehicle Power Before you can connect the device to vehicle power, you must remove the warning tag from the +12V terminal on the device. You should always confirm all electrical connections are secure and will not come loose while operating the device. -
Page 76: Pairing With A Garmin Navigation Device
If the device detects a system load of more than 100 A, it turns off all outputs automatically. • Inspect all electrical connections for an electrical short circuit. The device withstands incidental exposure to water of up to 1 m for up to 30 min. For more information, go to www.garmin.com/waterrating. Appendix... - Page 78 August 2022 GUID-3D42553F-058C-48E4-9E9B-0BF243FDE816 v2...
Need help?
Do you have a question about the RVCAM 795 and is the answer not in the manual?
Questions and answers