Skytrofa Auto-Injector Instructions For Use Manual
Single-patient use
Hide thumbs
Also See for Auto-Injector:
- Instructions for use manual (70 pages) ,
- Quick reference manual (8 pages)
Table of Contents
Advertisement
Quick Links
Advertisement
Chapters
Table of Contents

Related Manuals for Skytrofa Auto-Injector


Summary of Contents for Skytrofa Auto-Injector
- Page 1 Instructions for Use Single-patient use...
- Page 2 Cartridge dose release from bar flashes. cartridge. needle. Turn the auto-injector up and down Check cartridge and throw away Turn on the auto-injector Prepare for injection Turn the auto-injector up Check that Press and Choose an injection site: Wash hands.
- Page 3 Step-by-step Instructions for the SKYTROFA Auto-Injector Read and follow this Instructions for Use Page that comes with your auto-injector before you start using it. This information does not Important Information …………… 4 take the place of talking to your healthcare provider about your medical condition or Before You Begin …………………...
- Page 4 Important Information Important information about your Do not use your auto-injector with other SKYTROFA Auto-Injector: medicines or needles. The auto-injector is used to give Do not share your auto-injector with (administer) SKYTROFA under your skin other people, even if the needle has been (subcutaneously).
- Page 5 Before You Begin The SKYTROFA Auto-Injector Product Overview The auto-injector is an electronic, reusable device for people needing injections of SKYTROFA. It automates parts of the Charger procedure for injecting SKYTROFA. The auto-injector is designed for personal USB to home use, so that the injections may be...
- Page 6 Connect the USB (large end of the the battery icon located at the base cable) to the charger (only use the of the auto-injector (see Figure C) is provided charger). Plug the charger flashing red or green, it is charging.
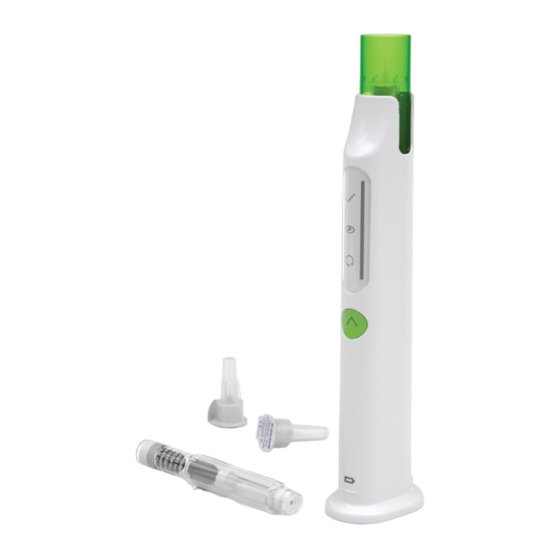
- Page 7 Sharps Supplies needed for an injection: Container From SKYTROFA Auto-Injector packaging (see Figure A): • 1 SKYTROFA Auto-Injector From SKYTROFA packaging (see Figure D): • 1 SKYTROFA Cartridge • 1 Omnican fine 0.25 mm x 4 mm Alcohol Wipe (31G x 5/32”) B. Braun needle...
-
Page 8: Table Of Contents
How to Use Step-by-Step Guide Page Prepare …………………………… 14 Does Your Weekly Dose Require 2 Cartridges? Mix ………………………………… 20 Your healthcare provider may prescribe Inject ……………………………… 26 a dose that requires use of the medicine in 2 cartridges. After Injection …………………… 32 If you have been prescribed a dose that requires 2 cartridges: •... -
Page 9: Prepare
1.1 Check the expiration date and cartridge dose on the cartridge packaging (see Figure E). Figure F Remove the SKYTROFA cartridge 1.3 Screw the needle straight on the from the packaging according to the cartridge by turning clockwise until instructions on its lid. - Page 10 2.5 Check the battery icon on the base Figure H of the auto-injector to see if it is 2.1 Disconnect the auto-injector from the charged. The battery icon is green charger when charged.
- Page 11 (see Figure J). Figure L • You will hear a click, the green top Do not use the auto-injector if you will stop flashing, the green mixing cannot insert the cartridge. Please call icon will light up, and the battery Ascendis Pharma Customer Support.
-
Page 12: Mix
(page 14). • Make sure the auto-injector is standing upright on a flat surface. If the auto-injector is not upright, the medicine mixing will pause. 4.2 The auto-injector has finished the If you see a slowly flashing green mixing... - Page 13 Figure N If you wait more than 2 hours before preparing and doing the injection 5.1 Turn the auto-injector up and down to (Step 6 to Step 9, pages 24–31), the mix the medicine by hand. You auto-injector will automatically cancel will hear a ‘tick’...
- Page 14 (Eye icon will light up) Figure P Figure O 6.1 Keep the auto-injector upright for 6.2 Pull off the needle cover (see Figure P). automatic air removal (see Figure O). The green eye icon will light up. Wait until you hear 2 loud beeps and Removing the needle cover will allow the entire progress bar lights up.
-
Page 15: Inject
Figure Q (page 14). 7.1 Check the mixed medicine in the inspection window on the side of the auto-injector (see Figure Q). The medicine should look colorless and clear. Some air bubbles are okay. Do not inject the medicine if there... - Page 16 Inject Prepare for injection 8.2 Wash your hands with soap and water (see Figure S). Front Back Stomach (abdomen) Buttocks Figure S Thighs Figure R 8.3 Clean the injection site with an alcohol wipe (see Figure T). 8.1 Choose an injection site. There are 3 areas of your body you Do not inject through clothes.
- Page 17 9.2 Remove the auto-injector from the skin Figure U Figure V after the injection is finished 9.1 Press and hold the green top against (see Figure V).
- Page 18 Figure W Figure X Figure Y 10.1 Press the needle cover back on when Do not use the auto-injector if you the green top flashes (see Figure W). cannot remove the cartridge as instructed. Please call Ascendis Be careful when handling needles to Pharma Customer Support.
- Page 19 11.1 Check that the cartridge is empty of hazardous waste inside the medicine (see Figure Z). container Do not use the auto-injector if there When your sharps disposal container is medicine left in the cartridge after is almost full, you will need to follow injection.
-
Page 20: Does Your Weekly Dose Require 2 Cartridges
After Injection Does Your Weekly Dose 12.3 Charge the auto-injector if the battery Require 2 Cartridges? icon has been flashing before or after the injection. For more information Then take the second injection by about how to charge the auto-injector repeating Step 1 to Step 11 (pages page 49. - Page 21 Troubleshooting and Car Page Troubleshooting ….…….……… 40 Cleaning and Maintenance …… 48 Charging and Charger Cable … 49 Storing …………………………… 50...
-
Page 22: Troubleshooting
Troubleshooting - What do you see? Green flashing Red flashing icons icons If you see any If you see any of these of these pages 46–47. pages 42– 43. Green battery Red battery icon icon If you see this If you see any page 45. - Page 23 (see Figure AB). injection, the auto-injector will pause the injection (see Figure AC). Do this: Place the auto-injector in an upright position and the mixing or air removal will continue. Do this: Press the green top against skin and the injection will start again.
- Page 24 Battery is fully charged. The auto-injector is ready to use (the battery icon turns off while the auto-injector is in use). Do this: If you are charging the auto-injector, disconnect it from the charger.
- Page 25 2 hours after automatic mixing (Step 4, page 20) or 2 hours after manual Do this: The auto-injector can be used as usual for mixing (Step 5, page 22) is completed. the remaining injections. When there are no more...
-
Page 26: Cleaning And Maintenance
Before cleaning, the cartridge must outlet. Connect the Micro-USB (small end be removed. of the cable) to the rear of the auto-injector. For protection, charge the auto-injector The green top needs to be cleaned on the with the protective cover on. Read more outside and on the reachable part of the pages 8–9. -
Page 27: Storing
59°F to 86°F (15°C to 30°C), between use. If the auto-injector is stored For technical details of the conditions at higher or lower temperatures, you under which the auto-injector can be used,... - Page 28 Product Information Page Product Safety ……….….……… 54 Expiration ………………………… 56 EMC Compliance Levels ……… 58 Technical Specification ………… 60 Symbols ………………………… 62 Warranty and Disclaimer ……… 64 Parts Overview ………………… 65...
-
Page 29: Product Safety
Do not place the auto-injector in liquid. last attempted injection. Do not wash the auto-injector in a Do not use the auto-injector if you think it dishwasher. may be damaged. Do not expose the auto-injector to Do not open or change the auto-injector. -
Page 30: Expiration
(DD), printed as YYYY-MM-DD. non-replaceable battery. When there are 5 injections or less than Do not throw away (dispose) in household 1 month left, the auto-injector will indicate trash. this when turned on. Read more page 47. When the auto-injector reaches its... -
Page 31: Emc Compliance Levels
EMC Compliance Levels Electromagnetic EMC - Voltage dips and Basic EMC Compatibility (EMC) interruptions: IEC / EN 60601-1-2, Standard a) <5% UT for 5 sec Compliance Levels 4-th Edition b) <5% UT for 0.5 cycles IEC 61000-4-11 c) 70% UT for 25 cycles EMC - RF Field radiated d) 40% UT for 5 cycles emission in 10 m (maximum):... -
Page 32: Technical Specification
The use conditions provided here are for the functioning. Use and store SKYTROFA Auto-Injector device. The use conditions for SKYTROFA Auto-Injector outside SKYTROFA cartridges with medicine and needles may such an environment. -
Page 33: Symbols
See Instructions for Use. including a battery that cannot be replaced, and must not be disposed of using standard waste collection. Applied parts SKYTROFA Auto-Injector is a type BF device and provides protection against electrical shock and electrical current SKYTROFA Auto-Injector packaging leakage. -
Page 34: Warranty And Disclaimer
Green Mixing The expiration date is located at the bottom Medicine mixing is in progress Status Icons of the auto-injector and is indicated by year (YYYY), month (MM), and date (DD), printed Read more about status icons on as YYYY-MM-DD. - Page 35 Keep Track of Your Injections This is your Instructions for Use • For quick overview of steps, read your Quick Reference Guide • For training video, go to www.skytrofa.com Instructions Quick Training for Use Reference Guide Video Ascendis Pharma Customer Support...
Need help?
Do you have a question about the Auto-Injector and is the answer not in the manual?
Questions and answers