Table of Contents
Advertisement
Available languages
Available languages
Quick Links
Advertisement
Table of Contents

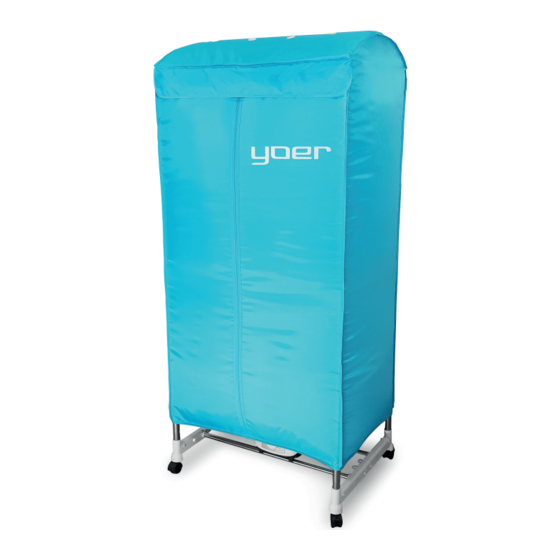
Summary of Contents for Yoer CD01B
- Page 1 Suszarka do ubrań Clothes Dryer CD01B QUICK DRYER PL ● EN...
-
Page 2: Warunki Bezpieczeństwa
POLSKI WARUNKI BEZPIECZEŃSTWA Przed przystąpieniem do użytkowania dokładnie zapoznaj się z niniejszą instrukcją. 1. Podczas korzystania z urządzenia lub po zakończeniu jego pracy, upewnij się, że suszarka znajduje się co najmniej 1,5 m od źródła wody lub ognia. Przeczyść urządzenie wilgotną szmatką. 2. -
Page 3: Zasada Działania
POLSKI ZASADA DZIAŁANIA Element grzewczy PTC charakteryzuje się bezpieczeństwem, oszczędnością energii oraz długą żywotnością. Urządzenie działa w następujący sposób: Wentylator wytwarza dodatnie ciśnienie powietrza wewnątrz obudowy. Powietrze podgrzewane jest za pomocą grzałki PTC, a następnie wdmuchiwane do komory suszarki. ... -
Page 4: Montaż Urządzenia
POLSKI Rura Φ 25 mm x 630 mm – 4 szt. Rura Φ 25 mm x 690 mm – 9 szt. Pokrowiec – 1 szt. Kółka – 4 szt. (w tym 2 szt. z blokadą) Urządzenie bazowe – 1 szt. MONTAŻ... - Page 5 POLSKI 2. Umieścić 4 kółka w odpowiednich otworach dwóch dolnych uchwytów. Każdy z uchwytów powinien posiadać zamontowane jedno kółko z blokadą oraz jedno bez blokady. uchwyt dolny zacisk wciśnij do góry kółko 3. Umieść obydwie końcówki 2 rur o wymiarach Φ 19 mm x 680 mm w otworach znajdujących się na środku uchwytów dolnych.
- Page 6 POLSKI 5. Zamontuj pokrowiec tak, aby w znajdujących się w nim otworach narożnikowych mieściły się 4 rury zamontowane na dolnych uchwytach. 6. Umieść 2 rury Φ 25 mm x 630 mm w bocznych otworach uchwytów środkowych. Φ 25 mm x 630 mm uchwyt środkowy wsuń...
- Page 7 POLSKI 8. Umieść 2 rury Φ 25 mm x 630 mm w bocznych otworach górnych uchwytów, następnie umieść w środkowych otworach 1 rurę Φ 25 mm x 690 mm. górny uchwyt Φ 25 mm x 630 mm rura Φ 25 mm Φ...
-
Page 8: Demontaż Urządzenia
POLSKI 11. Umieść urządzenie bazowe na dwóch rurach znajdujących się w dolnej części konstrukcji. Wylot powietrza powinien zostać umieszczony w otworze pokrowca. Następnie złóż pokrowiec zgodnie z poniższym schematem. 12. W celu zakończenia montażu zapnij zamek pokrowca. DEMONTAŻ URZĄDZENIA W celu demontażu urządzenia wykonaj powyższe czynności montażu w odwrotnej kolejności. 8... -
Page 9: Instrukcja Użycia
POLSKI INSTRUKCJA UŻYCIA 1. Włóż wtyczkę do gniazdka z uziemieniem. 2. Przekręć pokrętło w kierunku zgodnym z ruchem wskazówek zegara wybierając od 0 do 180 min. Możesz ustawić czas suszenia odzieży według własnych potrzeb. Urządzenie rozpocznie pracę i zaświeci się wskaźnik zasilania. - Page 10 W przypadku roszczenia gwarancyjnego należy zwrócić się do specjalistycznego punktu sprzedaży lub bezpośrednio do autoryzowanego serwisu YOER. W momencie składania reklamacji należy podać rodzaj usterki oraz dołączyć kopię dowodu zakupu. 10...
-
Page 11: Important Safeguards
ENGLISH IMPORTANT SAFEGUARDS Please read this instruction carefully before your first use of this product. 1. Whenever this machine is being using or not, make sure to keep it at least 1.5 M away from water or fire source. Clean it with damp cloth insteading water rinsing. 2. -
Page 12: Specifications
ENGLISH SPECIFICATIONS Gift box size: 710 x 240 x 265 mm Appliance gross weight: 5.5 kg Appliance net weight: 6.5 kg Master carton size: 725 x 495 x 290 mm Rated voltage: 220-240V Rated frequency: 50/60 Hz Rated power: 1000W Standard clothes drying period: 0 –... -
Page 13: Installation
ENGLISH 4 pcs Φ 25 mm x 630 mm round tubes 9 pcs Φ 25 mm x 690 mm round tubes 1 pc Cloth cover 4 pcs wheels (2 with brake) 1 pc main machine INSTALLATION 1. Insert 2 pcs positioning pins into the corresponding holes of the folding tubes and insert them in place; All 4 pcs folding pipes are inserted into the positioning pins to set the position. - Page 14 ENGLISH 2. Put the 4 pcs wheels into the bottom holes of the two bottom frames, each bottom shelf is fitted with a brake and a non-brake. under-frame clamp spring insert into the upside wheel 3. Insert the 2 pcs bottom frames into the middle side holes with 2 pcs round tubes are Φ 19 mm x 680 mm. Φ...
- Page 15 ENGLISH 5. Install the square cloth cover through the oblong pipes at the 4 angle holes at the bottom of the lower bracket. 6. Insert 2 pcs Φ 25 mm x 630 mm round tubes into the base middle frame side holes. Φ...
- Page 16 ENGLISH 8. Insert 2 pcs Φ 25 mm x 630 mm round tubes into the upper frame both sides holes, insert 1 pc Φ 25 mm x 690 mm round tube into the hole in the middle of a long bracket. upper-frame Φ...
- Page 17 ENGLISH 11. Attach the main engine to two round tubes on the bottom shelf, the outlet of the main machine is aligned with the inlet at the bottom of the cloth cover, and then put the cover on, as it has shown. 12.
-
Page 18: Troubleshooting
ENGLISH OPERATION INSTRUCTION 1. Insert the plug into power socket that has earth contact. 2. Rotate the switch, clockwise direction from 0-180 min, you can set the drying time you need, machine will start working, at the meantime, power indicator illuminate. 3. -
Page 19: Warranty And Repair
The warranty does not apply to defects resulting from natural wear of components or nor breakables such as glass and ceramic items. If you need a help, please contact seller or directly YOER service. 19... - Page 20 Producent: Yoer Bernardyńska 2 64-000 Kościan, Polska www.yoer.pl CD01B QUICK DRYER...
Need help?
Do you have a question about the CD01B and is the answer not in the manual?
Questions and answers