Advertisement
Quick Links
Advertisement

Summary of Contents for Douglas Lighting Controls Dialog WIR-3110
- Page 1 WIR-3110 ® IR Setting Unit User Manual...
-
Page 2: Table Of Contents
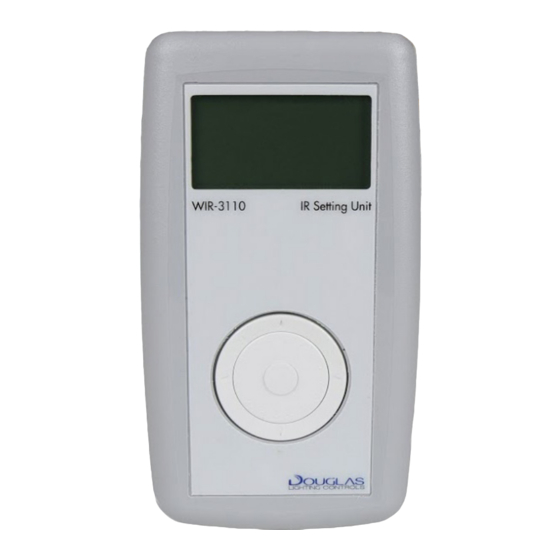
Contents Infrared Setting Unit Description and Function of IR Setting Unit Description and Function of LCD Setting a Switch Setting a Dimmer Switch Setting a 8-Contact Input Unit Setting a Occupany Sensor Setting a Photo Sensor PAGE 2 universaldouglas.com... - Page 3 Description & Function Infrared Receptor Liquid Crystal Display Panel (LCD) UP / DOWN Buttons Toggles Up or Down through option fields LEFT / RIGHT Buttons Selects the input component number to be programmed (Left for previous, Right for next) Scroll Wheel Scrolls through all options associated with a partiuclar field (clockwise forward, counter- clockwise backward)
- Page 4 Description & Function Liquid Crystal Display Panel (LCD) 1. Device Name 6. Function of Selected Device The device that you are programming. Available devices are: Sets a switch’s function. Options are: ON only, OFF only, 1-4 Button Switch, 8 Button Switch, Dimmer Switch, 8-Contact Toggle (ON and OFF), Dim Up, Dim Down.
-
Page 5: Setting A Switch
Setting a Switch Setting a Switch Step 1 - Switch Configuration Using the UP/DOWN buttons, move the cursor until it highlights the ‘#-Button Switch’ field. Select the switch configuration that matches the switch that you are programming by rotating the scroll wheel clockwise or counterclockwise. *Instructions apply for a Key Switch as well Step 2 - Input Type... -
Page 6: Setting A Dimmer Switch
Setting a Dimmer Switch Setting a Dimmer Switch Step 1 - Switch Configuration Using the UP/DOWN buttons, move the cursor until it highlights the ‘Dimmer Switch’ field. Step 2 - Dimming Type Using the UP/DOWN buttons, move the cursor until it highlights the ‘Type’ field. Select the dimming type (Dim an individual output channel or Dim a group) to apply to the switch that you are programming by rotating the scroll wheel clockwise or counterclockwise. -
Page 7: Setting A 8-Contact Input Unit
Setting a 8-Contact Input Unit Setting a 8-Contact Input Unit Step 1 - Selecting a 8-Contact Input Unit Using the UP/DOWN buttons, move the cursor until it highlights the ‘8-Contact Input’ field. Select the 8-Contact Input Unit from the list of options by rotating the scroll wheel clockwise or counterclockwise. - Page 8 Setting a 8-Contact Input Unit Setting a 8-Contact Input Unit Step 6 - Delay ON *If you are connecting an Occupancy Sensor By Others and wish to use the built in delay time, adjust the time directly on the sensor according to the manufacturers specifications and set the delay ON and OFF fields of Using the UP/DOWN buttons, move the cursor until it highlights the ‘On’...
-
Page 9: Setting A Occupany Sensor
Setting a Occupancy Sensor Setting a Occupancy Sensor Step 1 - Delay ON Using the UP/DOWN buttons, move the cursor until it highlights the ‘Occupancy PIR’ field. Step 2 - Input Type Using the UP/DOWN buttons, move the cursor until it highlights the ‘Type’ field. Select the input type (Individual, Group, Preset Local, Preset Global) to apply to the sensor that you are programming by rotating the scroll wheel clockwise or counterclockwise. -
Page 10: Setting A Photo Sensor
Setting a Photo Sensor Setting a Photo Sensor Step 1 - Photo Sensor Selection Using the UP/DOWN buttons, move the cursor until it highlights the ‘Photo Sensor’ field. Step 2 - Photo Type Using the UP/DOWN buttons, move the cursor until it highlights the ‘Type’ field. Select the input type (Local Photo and Global Photo) to apply to the sensor that you are programming by rotating the scroll wheel clockwise or counterclockwise. - Page 11 Notes Learn More at www.universaldouglas.com UniversalDouglasSupport Douglas Lighting Controls (877) 873-2797 techsupport@universaldouglas.com Universal Lighting Technologies (800) 225-5278 tes@universaldouglas.com universaldouglas.com Rev. 5/12/22 PAGE 11 universaldouglas.com...
Need help?
Do you have a question about the Dialog WIR-3110 and is the answer not in the manual?
Questions and answers