Table of Contents
Advertisement
Quick Links
DANGER
FIRE OR EXPLOSION HAZARD
If you smell gas:
•
Shut off gas to appliance
•
Extinguish any open fl ame.
•
If odor continues, leave the area immediately.
•
After leaving the area, call your gas supplier or fi re department.
Failure to follow these instructions could result in fi re or explosion,
which could cause property damage, personal injury, or death.
WARNING: If the information in this manual is not followed
exactly, a fi re or explosion may result causing property damage,
personal injury, or loss of life.
INSTALLER:
Leave this manual
with the appliance.
CONSUMER:
Retain this manual for
future reference.
Dual Fuel Gas Fire Pit
OWNER'S MANUAL
ASSEMBLY AND OPERATING IN STRUC TIONS
Model PIT2141AS
DANGER
WARNING: For outdoor use only.
Installation and service must be
performed by a qualifi ed installer,
service agency, or the gas supplier.
WARNING
1. Do not store or use gasoline,
or other fl ammable vapors and
liquids, in the vicinity of this or any
other appliance.
2. An LP-cylinder not connected
for use shall not be stored in
the vicinity of this or any other
appliance.
CARBON MONOXIDE HAZARD
This appliance can produce carbon
monoxide which has no odor.
Using it in an enclosed space can kill you.
Never use this appliance in an enclosed
space such as a camper, tent, car or home.
Advertisement
Table of Contents

Summary of Contents for Red Stone PIT2141AS
- Page 1 Dual Fuel Gas Fire Pit OWNER’S MANUAL ASSEMBLY AND OPERATING IN STRUC TIONS Model PIT2141AS DANGER WARNING: For outdoor use only. Installation and service must be FIRE OR EXPLOSION HAZARD performed by a qualifi ed installer, If you smell gas: service agency, or the gas supplier.
-
Page 2: Table Of Contents
TABLE OF CONTENTS: General Warnings ..........2-3 Fire Pit Specifi cations. -
Page 3: General Warnings
GENERAL WARNINGS: WARNING • The installation must conform with local codes or, in the absences of local codes, with the National Fuel Code, ANSI Z223.1/NFPA54, or CAN/CGA-B149.1, National Gas and Propane Installation Code. • All installation and repair should be done by a qualifi ed installer, service agency, or the gas suppler. •... - Page 4 WARNING • Do not operate on a boat or vehicle. Always place the fi re pit on a fi rm and level noncombustible surface. • When in use, minimum clearance to adjacent combustible materials, gasoline and other fl ammable liquids and vapors; sides-36 inches (91 cm); top-72 inches. Certain items or materials, when stored under the fi re pit or nearby will be subjected to radiant heat and could be seriously damaged.
-
Page 5: Fire Pit Specifications
FIRE PIT SPECIFICATIONS: Product Name Dual Fuel Gas Fire Pit Model No. PIT2141AS Rated Heat Output 62,000 BTU/h (18.15 kWh) Fuel Propane-LPG or Natural Gas-NG Gas Supply 20 lb. LP-gas cylinder Manifold Pressure 11 inches WC for LP / 7 inches WC for NG Orifi ce Size (diameter) 2.55 (0~+0.02)mm... - Page 6 WARNING • Turn off the cylinder valve when your fi re pit is not in use. • Handle the tank with care. • Always secure the cylinder in an upright position. • Never connect an unregulated LP gas cylinder to your fi re pit. •...
-
Page 7: Hose / Regulator Specifications And Installation
LP GAS CYLINDER (TANK) RUBBER SEAL INSPECTION: • Inspect the propane tank valve rubber seal for cracks, wear or deterioration prior to use. A damaged rubber seal can cause a gas leak, possibly resulting in an explosion, fi re or severe bodily harm. •... -
Page 8: Leak Testing
HOSE / REGULATOR: Your fi re pit is equipped with a Type 1 connection device with the following features: 1. The system will not allow gas fl ow from the cylinder until a positive connection to the valve has been made. Note: The cylinder valve and fi re pit control knob must be turned OFF before any connection is made or removed. - Page 9 DANGER To prevent fi re or explosion hazard: • DO NOT smoke or permit ignition sources in the area while conducting a leak test. • Perform test OUTDOORS in a well ventilated area that is protected from the wind. • Never perform a leak test with a match or open fl ame.
-
Page 10: Pre-Start Check List
PRE-START CHECK LIST: WARNING Property damage, bodily harm, severe burns, and death could result from failure to follow these safety steps. These steps should be performed after the fi re pit has been assembled and prior to each use. DO NOT operate this fi re pit until you have read and understand ALL of the warnings and instructions in this manual. - Page 11 LIGHTING THE FIRE PIT: 1. Make sure control knob is in OFF position. 2. Push and turn control knob to “LOW” . 3. Push in and hold control knob while pressing ignitor for 3 to 5 seconds. If ignition does not occur in 5 seconds, turn knob to “OFF,” wait 5 minutes and repeat lighting procedure.
-
Page 12: Burner Cleaning And Maintenance
BURNER CLEANING AND MAINTENANCE: Screws • Keep the appliance free and clear of combustible materials, gasoline and other fl ammable vapors and liquids. • For safe and peak performance of your fi re pit, perform these checks at least twice per year or after extended periods of storage. •... -
Page 13: Storage And Maintenance
STORAGE AND MAINTENANCE: To obtain the best performance from your fi re pit, you must perform the following storage and maintenance activities on a regular basis: • Allow at least 35 minutes for the fi re pit to cool down after use, then disconnect and remove the cylinder. •... -
Page 14: Assembly Instructions
READ ALL SAFETY WARNINGS & ASSEMBLY INSTRUCTIONS CAREFULLY BEFORE ASSEMBLING OR OPERATING YOUR FIRE PIT. WE RECOMMEND TWO PEOPLE WORK TOGETHER WHEN AS SEM BLING THIS UNIT. The following tools are required to assemble this Red Stone Gas Fire pit: • Phillips Screwdriver PARTS LIST:... - Page 15 Attach rail supports to fi re pit body using eight M6 x 12 mm bolts. Set rails in place. Use Allen wrench to attach rails to rail supports using eight M6 x 60 mm bolts and M6 nuts. Secure rail braces to rail supports using sixteen M4 x 10 mm bolts.
- Page 16 Attach feet to fi re pit body using eight M6 x 12 mm bolts. Spread lava rocks evenly around fi re pit base. Do not pile lava rock over burner tube more than 1/2 inch.
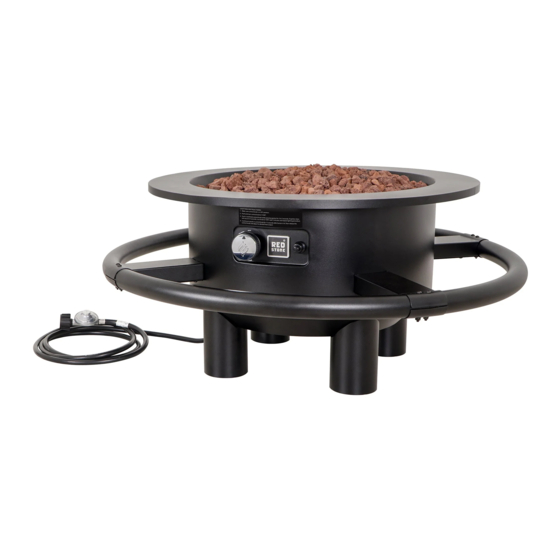
- Page 17 Red Stone PIT2141AS Assembled...
- Page 18 WARRANTY The Boltz Group warrants to the original pur chas er that the Red Stone Gas Fire Pit is free from defects due to workmanship or materials for: One-year: on valves, frame, housing, and other related parts The Boltz Group’s obligations under this warranty are limited to the following guidelines: •...
Need help?
Do you have a question about the PIT2141AS and is the answer not in the manual?
Questions and answers