
Summary of Contents for Elecfreaks TOOCA Laser 1
- Page 1 TOOCA Laser 1 User Manual TOOCA Laser 1 快速使用指南 V1.0 深 圳 市 恩 孚 电 子 科 技 有 限 公 司 SHENZHEN EF TECHNOLOGY CO., LIMITED...
- Page 2 For a better experience in using our products, you can also learn how to use the engraving machine in the following ways: View the accompanied instructions and videos in the TF card. Visit the wiki of TOOCA Laser 1 via https://www.elecfreaks.com/learn-en/tooca-laser-1 to find relevant software/hardware information, contact details, operation and maintenance instructions.
- Page 3 13. Users should comply with the laws and regulations of the corresponding countries and regions where the equipment is located (used), abide by professional ethics, pay attention to safety obligations, and strictly prohibit the use of our products or equipment for any illegal purposes. ELECFREAKS will not be responsible for any violators' legal liability under any circumstances.
- Page 4 Parameters Model TOOCA Laser 1 Machine size 568*632*198mm Net weight 3.2kg Operation system Windows /MacOS Input 100-240V~ 50-60Hz Output DC 24.0V 3.0A Range of operating temperature 0℃-35℃ Safety certification IEC60825, FDA, CE, RoHS, FCC, UKCA, UL and PSE Engraving size...
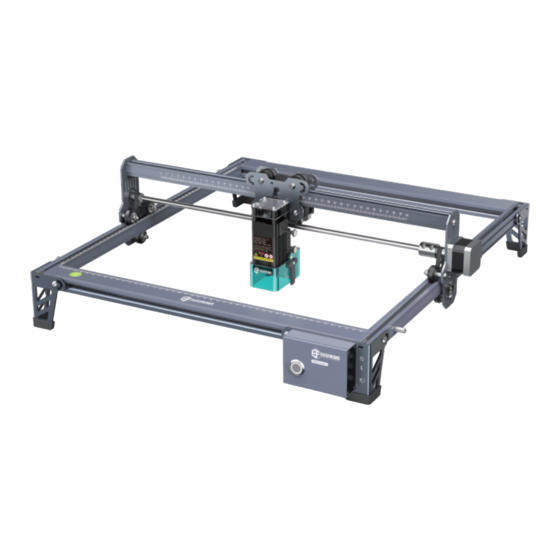
- Page 5 Equipment Intro(5W) Rear X-axis profile Tripod Left Y-axis assembly X-axis assembly Tripod Tripod Laser module (5W) Front X-axis profile Right Y-axis assembly Control box assembly Power interface Type-C interface TF Card Slot...
- Page 6 Equipment Intro(10W) Rear X-axis profile Tripod Left Y-axis assembly X-axis assembly Tripod Tripod Multi-level fixed focus bar Laser module (10W) Front X-axis profile Right Y-axis assembly Control box assembly Power interface Type-C interface TF Card Slot...
-
Page 7: Parts List
Parts List 1. X-axis assembly & Control box assembly 7. Laser module*1 2. Front X-axis profile*1 8. Power adaptor*1 3. Rear X-axis profile*1 9. Power cord*1 4. Left Y-axis assembly*1 10. Linden plywoods*2 5. Right Y-axis assembly*1 11. M5*20 screws*18 6. - Page 8 14. Open wrench*1 18. Black cable ties*3 15. TF card & card reader *1 19. Dustless cloth*1 TOOCA Laser 1 User Manual TOOCA Laser 1 快速使用指南 V1.0 深 圳 市 恩 孚 电 子 科 技 有 限 公 司...
- Page 9 Assemble Directions 1. Assemble the left Y-axis assembly: Pass the left Y-axis assembly (with the belt up) through the X-axis assembly and put on the belt in the direction shown in the figure: Tighten the belt, and insert two T-shaped nuts into the left Y-axis assembly.
- Page 10 3. Assemble rear X-axis profile and front X-axis profile: Lock with eight M5*20 screws. M5*20 M5*20 M5*20 M5*20 4. Assemble three tripods and control box assembly: Lock with eight screws. M5*20 M5*20 M5*20 M5*20...
- Page 11 5.1. Assemble 5W laser module: Assemble it into the fixing 5.2. Assemble 10W laser module: Please place the plate and the fixed focus bar should contact with the multi-level fixed focus bar between the laser module and surface of the processed material when it is naturally the processed material.
- Page 12 Start Engraving The machine supports real-time working by Type-C or offline working by TF card. Please follow the assembly directions to focus correctly and wipe the protective lens of the laser module with dustless cloth and alcohol to ensure the best engraving effect. Protective lens Offline Working 1.
- Page 13 2. Press the microswitch, it enters preview mode from standby mode, the laser head will emit weak light, and repeat movement around the largest X, Y edge of the processed picture with indicator lighting on. At this time, adjust the material to a suitable position.
-
Page 14: Indicator Status
Indicator Status 1. Light off: The machine is in a power-off state, or the power is abnormal. 2. Breathing light: The machine is in standby mode, you can press the microswitch to enter preview mode or engraving mode. 3. Light flashes: the machine is in upgrade mode or abnormal mode, and the buzzer beeps rapidly, and it will automatically enter standby mode after the upgrade is completed or the abnormality is cleared. - Page 15 User Operation Guide Start Press microswitch again to Place engraving material start engraving Long Press Adjust the focal length Press microswitch, of the laser module Yes or No Short Press Place engraving material In pausing mode, Yes or No Prepare engraving file and save it to TF card Continue engraving Pause engraving...
- Page 16 渲染图...
- Page 17 感谢您选择恩孚科技的产品。 为了您使用方便, 请您在使用之前仔细阅读本快速使用指南, 并严格按照快速使用指南的指示进行 操作。 恩孚科技团队时刻准备为您提供优质的服务。 在使用过程中无论遇到什么问题, 请按照快速使用指南结尾所提供的电话、 邮箱与 我们进行联系。 为了您能够更好地体验我们的产品, 您还可以从以下方式获取设备操作知识: 随机使用说明:您可以在 TF 卡内找到相关使用说明及视频。 您还可以登陆 TOOCA Laser 1 的 wiki 页面 (https://www.elecfreaks.com/learn-en/tooca-laser-1) 寻找相关软硬件、 联系方 式、 设备操作、 案例及素材等信息。 固件升级 登录 wiki 页面 (https://www.elecfreaks.com/learn-en/tooca-laser-1), 点击 “固件更新方式” 下载最新固件, 保存至 TF 卡并 插入机器, 上电可自动更新。...
- Page 18 产品参数 产品型号 TOOCA Laser 1 产品尺寸 568*632*198mm 产品净量 3.2kg 操作系统 Windows /MacOS 输入电压 100-240V 50-60Hz 输出电压 DC 24.0V 3.0A 工作温度范围 0℃-35℃ 安规认证 IEC60825, FDA, CE, ROHS, FCC, UKCA, UL, PSE 雕刻尺寸 400mm*415mm 激光源 半导体激光器 激光波长 455±5nm 光功率 5W/10W 安全等级 Class IV ( FDA 分类标准 ) 激光雕刻软件...
- Page 19 设备简介(5W) 后X轴型材 脚架 左Y轴组件 X轴组件 脚架 激光模组 脚架 (5W) 前X轴型材 右Y轴组件 控制盒组件 电源接口 Type-C 接口 TF 卡槽...
- Page 20 设备简介(10W) 后X轴型材 脚架 左Y轴组件 X轴组件 脚架 脚架 多级定焦条 激光模组 (10W) 前X轴型材 右Y轴组件 控制盒组件 电源接口 Type-C 接口 TF 卡槽...
- Page 21 零部件清单 1.X轴组件+控制盒组件 7.激光模组*1 2.前X轴型材*1 8.电源适配器*1 3.后X轴型材*1 9.电源线 4.左Y轴组件*1 10.木板*2 5.右Y轴组件*1 11.M5*20内六角平圆头螺丝*18 6.脚架*3 12.T型船型螺母*6...
- Page 22 仅限5W激光模组 13.M1.5/M2/M2.5/M3 内六角扳手 17.活性炭吸烟棉*2 14.开口扳手*1 18.黑色尼龙扎带*3 15.TF卡&读卡器*1 19.无尘布*1 TOOCA Laser 1 User Manual TOOCA Laser 1 快速使用指南 V1.0 深 圳 市 恩 孚 电 子 科 技 有 限 公 司 SHENZHEN EF TECHNOLOGY CO., LIMITED 16.防护眼镜*1 20.快速使用指南*1 仅限10W激光模组 21.多级定焦条...
- Page 23 组装说明 1. 安装左 Y 轴组件:将左 Y 轴组件 (同步带朝上) 穿过 X 轴组件, 按图示方向穿好同步带: 拉紧同步带, 同时将两颗 T 型船型螺母嵌入左 Y 轴组件中, 再使用内六角紧定螺钉锁紧同步带。 T 型船型螺母 2. 安装右 Y 轴组件:方法同上。 T 型船型螺母 注意不能锁得太紧, 防止皮带穿孔。...
- Page 24 3. 安装前 X 轴型材与后 X 轴型材 , 一共使用 8 颗 M5*20 内六角平圆头螺丝锁紧。 M5*20 M5*20 M5*20 M5*20 4. 安装三个脚架以及控制盒组件:一共使用 8 颗 M5*20 内六角平圆头螺丝锁紧。 M5*20 M5*20 M5*20 M5*20...
- Page 25 5.1 安装 5W 激光模组:请将它安装至固定板中, 定焦条自然垂 5.2 安装 10W 激光模组:请将多级定焦条放置在模组与加工 直向下时应与雕刻材料表面互相接触, 最后使用右侧的手拧螺 材料之间, 按照定焦条表面的镭雕提示, 使激光模组护目罩底 丝将其锁紧 , 并顺时针拨动定焦条直至被磁铁吸住。 最后插上 部与多级定焦条对应位置相接触, 最后使用右侧的手拧螺丝将 激光模组线。 其锁紧。 例如雕刻或者切割 2mm 厚的椴木板: 激光模组线 激光模组线 多级定焦条 2mm 椴木板 定焦条 2mm 椴木板 注意激光模组必须在断电状态下才能安装与拆卸。 软件安装及使用 随机器附赠的 TF 卡中包含了 LightBurn 以及 LaserGRBL 的使用教程, 您可以通过电脑从 TF 卡中获取相关信息。...
- Page 26 开始雕刻 机器支持 Type-C 实时工作和通过 TF 卡离线工作。 无论您采用何种方式, 雕刻前请按照组装说明部分正确调 焦, 并使用无尘布搭配酒精擦拭激光模组的保护镜片, 保证最佳雕刻效果。 保护镜片 离线工作 1. 上电前先将存有 .gcode 文件 (机器默认读取 TF 卡中最新的 .gcode 文件, 建议雕刻前把其它 .gcode 文件删除) 的 TF 卡插入机器中, 然后将配套的电源适配器一侧插入可远程开关的电源插座中, 另一侧插入控制盒右侧电源接口。 最后打开控制盒左侧的红色电源开关。 电源接口 TF卡槽 电源开关 电源接通后, 机器发出 “滴” 一声, 随后机器复位, 复位完成机器发出 “滴 ... 滴 ...” 两声, 初始化完成后进入待机模式。...
- Page 27 2. 按下微动开关, 机器从待机模式进入预览模式, 激光头会发出弱光, 并围绕所加工图片的最大 X、 Y 边缘重复运动, 指示灯常亮。 此时 可以调整材料至合适位置。 预览模式下, 再次按下微动开关, 机器进入雕刻模式, 此时激光头会发出强光, 机器开始雕刻, 指示灯常亮。 如果需要暂停雕刻, 请按下微动开关, 此时指示灯变成 呼吸灯效果, 再次按下微动开关可以继续雕刻。 如果需要取消雕刻, 请长按微动开关 3 秒, 机器会发出 “滴” 一声, 随后机器复位, 复位完成机器发出 “滴 ... 滴” 两声, 进入待机模式, 指示灯变成呼吸灯效果。 微动开关 3. 雕刻完成后, 机器会长 “滴” 三声, 随后机器复位, 复位完成机器发出 “滴 ... 滴” 两声, 进入待机模式, 指示灯变成呼吸灯效果。 在线工作...
- Page 28 指示灯状态说明 1. 指示灯灭:机器处于断电状态, 或上电异常。 2. 呼吸灯效果:机器处于待机模式, 可按下微动开关进入预览模式或雕刻模式。 3. 指示灯闪烁:机器处于升级模式或异常模式, 同时蜂鸣器发出急促的响声, 等待升级完成或清除异常后自动进入待机模式。 4. 指示灯常亮:机器处于预览模式或雕刻模式, 此时激光头处于出光状态, 需格外注意安全。 异常处理 1. 在预览模式以及雕刻模式中, 如果机器发生侧翻异常或移动, 机器会关闭激光, 电机停止运动, 指示灯闪烁, 同时蜂鸣器发出急促响 声进行报警。 处理办法:请将机器恢复至原来位置, 清除异常后按下机器控制盒上的微动开关继续预览或雕刻。...
- Page 29 用户操作流程图 开始 放置雕刻材料 再次按下微动开关开始雕刻 长按 调整激光模组焦距 是否按下微动开关 短按 准备雕刻文件并存入TF卡 是否处于暂停模式 将TF卡插入机器 是 否 继续雕刻 暂停雕刻 停止雕刻 接通电源并打开开关 结束 机器进行初始化 等待初始化完成 按下微动开关进入预览模式...
-
Page 30: Warranty
WARRANTY Before returning the product and filling in a warranty, please contact after-sale person for going through after-sale formality. And attach this warranty card along with the returned machine. Repair □ Change □ Return □ Malfuction And Damage Depiction Or Return Name:... - Page 32 ※ 因每款机型不同, 实物与图可能有所差异, 请以实物为准, 最终解释权归深圳市恩孚电子科技有限公司。 Brand: ELECFREAKS Website: www.elecfreaks.com Telephone: 0086-0755-29048789 Address: Room 301, building 1, Zhongtai Electrics Technology Area, Dong Huan 1 Rd, Long Hua Dist,Shenzhen, CN. 品 牌: 恩孚科技 网 站: www.elecfreaks.net 电 话: 0755-29048789 地 址: 深圳市龙华区龙华街道油松社区恒丰小区1号楼新中泰工业园3楼...
Need help?
Do you have a question about the TOOCA Laser 1 and is the answer not in the manual?
Questions and answers