Table of Contents
Advertisement
Available languages
Available languages
Quick Links
This page is for printing and
formatting specifications only.
THIS PAGE DOES NOT PRINT
TM
1
210 mm
DO NOT scale artwork for printing.
Each page has been scaled for proper scaling of parts.
Page 1 will be the cover page and first page printed
after this specification page. Any blank pages
needed will be placed at the end of the booklet.
Printer to arrange booklet pages in proper
sequence according to page number.
Revisions:
A: Initial Release: 04/07/2022. KED
Advertisement
Table of Contents

Related Manuals for CHILDCRAFT F00202


Summary of Contents for CHILDCRAFT F00202
- Page 1 This page is for printing and formatting specifications only. THIS PAGE DOES NOT PRINT 210 mm DO NOT scale artwork for printing. Each page has been scaled for proper scaling of parts. Page 1 will be the cover page and first page printed after this specification page.
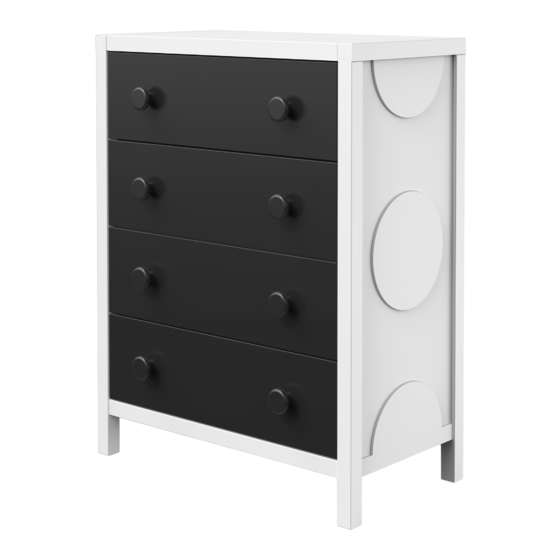
- Page 2 5216 Portside Dr., Medina, OH 44256 USA • PH: 1 330.723.0599 • FAX: 1 330.722.5037 www.childcraftbaby.com Orbit Chest Model Covered: F00202 KEEP INSTRUCTIONS FOR FUTURE USE FOR CUSTOMER SERVICE CALL 330-723-0599. DO NOT CALL RETAILER OR RESELLER FOR SERVICE AS THEY ARE NOT AUTHORIZED TO RESOLVE ANY SERVICE ISSUES.
-
Page 3: Parts List
PREPARATION PARTS LIST Carefully remove and lay out all hardware and parts. Part Description Part Number Qty. Check quantities and match the parts list. Construct furniture on an even flat floor. A. Left Side 23103044 Note: During the assembly process whenever using B. - Page 4 Furniture Parts AB20495_G2 Hardware Package AB20495_G3...
- Page 5 STEP 1 A x 1 C x 1 D x 1 E x 1 O x 2 CC x 4 DD x 4 EE x 2 BB x 10 CC x 4 EE x 2 DD x 4 BB x 8 BB x 2 AB20495_G4 STEP 2...
- Page 6 STEP 3 N x 2 HH x 28 N x 2 HH x 28 AB20495_G6 TOP DRAWER ASSEMBLY STEP 1 I x 1 J x 1 K x 1 FF x 4 FF x 2 FF x 2 AB20495_G7...
- Page 7 LOWER DRAWER ASSEMBLY STEP 1 (x 3) J x 1 L x 1 M x 1 FF x 4 FF x 2 FF x 2 AB20495_G11 DRAWER ASSEMBLY STEP 2 (x 4) F x 2 G x 1 FF x 2 H x 1 FF x 6 FF x 2...
- Page 8 DRAWER ASSEMBLY STEP 3 (x 4) FF x 2 FF x 2 AB20495_G9 DRAWER ASSEMBLY STEP 4 (x 4) AA x 2 GG x 2 GG x 2 AA x 2 AB20495_G10...
-
Page 9: Drawer Installation
DRAWER INSTALLATION These slide sections mounted on inside of dresser must be fully extended for install. This side section mounted to drawer. Drawers may need to be pushed in and out to properly set slides. AB20495_G13 DRAWER REMOVAL AB20495_G12... - Page 10 ANTI TIP KIT ALIGNMENT For Anti Tip Kit Installation, top of Anti Tip Bracket should be placed along the top edge of the chest. Please refer to Anti Tip Kit instructions for install. AB20495_G14 WARNING WARNING Serious or fatal crushing injuries can occur from furniture tipover. To help prevent tipover: •...
-
Page 11: Maintenance, Cleaning, And Storage
MAINTENANCE, CLEANING, AND STORAGE MAINTENANCE: Upon completion of the assembly, check to make sure all screws, bolts and connectors are tightened and secure. Periodically check furniture for damaged hardware, loose joints, missing parts or sharp edges before and after assembly and frequently during use. DO NOT use furniture if any parts are missing or broken. - Page 12 5216 Portside Dr., Medina, OH 44256 É-U • Téléphone: 1.330.723.0599 Télécopieur: 1.330.722.5037 • www.childcraftbaby.com Coffre Orbite Couvert Modèle: F00202 CONSERVER LES INSTRUCTIONS POUR USAGE FUTUR. POUR LE SERVICE À LA CLIENTÈLE, APPELEZ LE 1-330-732-0599. N’APPELEZ PAS LE VENDEUR OU LE DISTRIBUTEUR POUR LE SERVICE À...
-
Page 13: Liste Des Pièces
PRÉPARATION LISTE DES PIÈCES Retirez délicatement et exposer tout le matériel et les Description de la pièce Numéro d’article Qtè pièces. Vérifier les quantités et correspondre à la liste des pièces. A. Côté gauche 23103044 Construisez des meubles sur un sol plat et uniforme. B. - Page 14 Parties de Meubles AB20495_G2 Crèche Parties AB20495_G3...
- Page 15 ÉTAPE 1 A x 1 C x 1 D x 1 E x 1 O x 2 CC x 4 DD x 4 EE x 2 BB x 10 CC x 4 EE x 2 DD x 4 BB x 8 BB x 2 AB20495_G4 ÉTAPE 2...
- Page 16 ÉTAPE 3 N x 2 HH x 28 N x 2 HH x 28 AB20495_G6 ASSEMBLAGE DU TIROIR SUPÉRIEUR ÉTAPE 1 I x 1 J x 1 K x 1 FF x 4 FF x 2 FF x 2 AB20495_G7...
- Page 17 ASSEMBLAGE DU TIROIR INFÉRIEUR ÉTAPE 1 (x 3) J x 1 L x 1 M x 1 FF x 4 FF x 2 FF x 2 AB20495_G11 ASSEMBLAGE DU TIROIR ÉTAPE 2 (x 4) F x 2 G x 1 FF x 2 H x 1 FF x 6...
- Page 18 ASSEMBLAGE DU TIROIR ÉTAPE 3 (x 4) FF x 2 FF x 2 AB20495_G9 ASSEMBLAGE DU TIROIR ÉTAPE 4 (x 4) AA x 2 GG x 2 GG x 2 AA x 2 AB20495_G10...
-
Page 19: Installation Des Tiroirs
INSTALLATION DES TIROIRS Ces sections de diapositives monté à l'intérieur du coffre doit être complètement étendu pour l'installation. Cette section latérale est montée sur un tiroir. Les tiroirs peuvent avoir besoin d'être poussés vers l'intérieur et vers l'extérieur pour régler correctement les glissières. - Page 20 ALIGNEMENT DU KIT ANTI BASCULE Pour l'installation du kit anti-basculement, le haut du support anti-basculement doit être placé le long du bord supérieur du coffre. Veuillez vous référer à Anti Tip Instructions du kit pour l'installation. AB20495_G14 AVERTISSEMENT WARNING Des blessures graves ou mortelles peuvent se produire lorsqu’un meuble se renverse. Pour éviter les renversements: •...
- Page 21 ENTRETIEN, NETTOYAGE, ET STOCKAGE ENTRETIEN: À la fin de l’assemblage, assurez-vous que toutes les vis, boulons et connecteurs sont serrés et sécurisé. Vérifiez périodiquement meubles pour le matériel endommagé, les joints lâches, des pièces manquantes ou des bords tranchants avant et après l’assemblage et fréquemment pendant l’utilisation. NE PAS utiliser meubles si des pièces sont manquantes ou brisées.
Need help?
Do you have a question about the F00202 and is the answer not in the manual?
Questions and answers