Table of Contents
Advertisement
Advertisement
Table of Contents

Summary of Contents for Aeritech NB ONE+
- Page 1 NB ONE+ Flight Controller Installation and Use Manual Manufacturer: Aeritech 2017 Jiangsu ai rui taike unmanned aircraft science and technology co ltd, http://www.aeritech-uav.com (dead link) sold by/as in 2021 • NHI • LHI • JMT NEW NB One NB One+ 32 Bit Flight Controller...
-
Page 2: Nb One+ Flight Controller
Thanks to the helpers I have been able to put this Manual together with the help through the work of a few people from https://www.rcgroups.com who are paultbg, who wrote a short summary about the standard NB ONE marbelo, who also wrote a short summary about the standard NB ONE as well as provided a link to an english Manual in excellent print quality. -
Page 3: Content Of Delivery
Content of Delivery 3 of 21... -
Page 4: Table Of Contents
Inhaltsverzeichnis NB ONE+ Flight Controller......................1 Content of Delivery.........................3 Product characteristics ........................5 Description............................6 (1) Dip Switches.........................6 Selection of aircraft type......................6 Adjustment of servo direction....................6 (2) Servo connections........................7 (3) Remote Control Receiver Wiring..................8 Receiver OUT to FlightController IN..................8 Mode Switch...........................8 (4) Flight Controller Installation....................9 (5) Potis S and R........................10 Poti „S“... - Page 5 5 of 21...
-
Page 6: Product Characteristics
Product characteristics This is a Flight Controller for fixed-wing aircrafts. This product supports three aircraft types: T-tail, V-tail and delta wing. It provides three flight modes: (1) Stabilization On, Attitude Mode, Altitude / Fixed height Mode* • (2) Manual Mode •... -
Page 7: Description
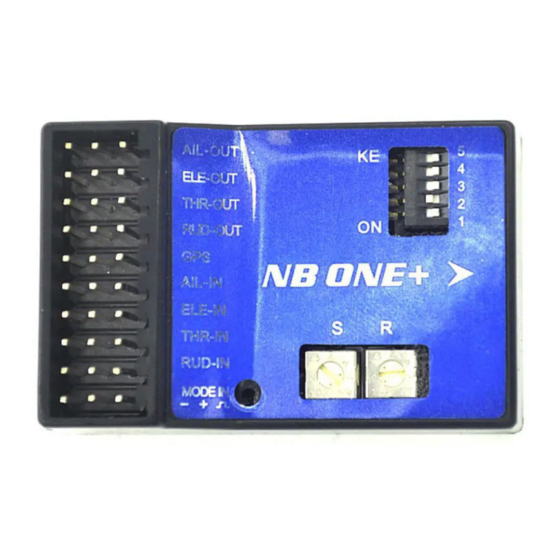
Description (1) Dip Switches Selection of aircraft type Use Dip Switches 1 and 2 to select the aircraft type #2 ON is for a regular plane Adjustment of servo direction I do not quite understand the meaning of this graphic!! 7 of 21... -
Page 8: Servo Connections
(2) Servo connections Connect the servos to the respective OUT Ports of the FlightController For the Aileron Out you need a Y-Cable to connect 2 Servos for separate aileron controls. Connect the GPS Antenna to the respective port on the FlightController. OUT to Servos Aileron Elevator... -
Page 9: Remote Control Receiver Wiring
(3) Remote Control Receiver Wiring Prepare a PWM receiver with at least 5 channels and corresponding RemoteControl. The RemoteController should be set to the Fixed-Wing mode. NOTE: For the V-tail and flying wing the flight controller will automatically mix controls without the need for remote control settings. -
Page 10: Flight Controller Installation
(4) Flight Controller Installation ---> Direction of Nose The FlightController can only be mounted as described above, horizontally and the arrow must be pointed to the nose! From NB ONE Reviews the unit needs to be mounted perfectly leveled with the plane as you cannot offset any •... -
Page 11: Potis S And R
(5) Potis S and R Poti „S“ The Poti „S“ adjusts the control sensitivity of the aircraft clockwise adjusts it to increase sensitivity Poti „R“ The Poti “R” adjusts the radius of the FENCE mode 100 - 300m clockwise adjusts it to increase the radius NOTE: For the first test flight please turn the Poti “R”... -
Page 12: Power On
(6) Power ON NOTE: For the first time please remove the propeller to avoid injuries. After Power-On the aircraft needs to be motionless for the initial stage to be completed. This process can take up to 10 seconds. When the initial stage is completed the sound of the ESC can be heard. LED Status Indication The RED LED is showing the status of the GPS The GREEN LED is showing the Control Mode that the User has selected. -
Page 13: Calibration Of Neutral Point In Remotecontrol
Calibration of Neutral Point in RemoteControl First storage of ZERO postions for the sticks On the RemoteController put the Throttle to minimum (bottom), the other channels are in the middle then switch the Flight Mode Switch six times quickly through all positions. After calibrating the RemoteController users are NOT ADVISED to adjust the TRIM on the RemoteController. - Page 14 From NB ONE Reviews NOTE Set your radio transmitter as a normal plane (Even if you are using the flight controller on a flying wing). The FlightController will do all the required mixing according to the plane type you select using the dip switches. Once everything is connected, turn on the aircraft (remove your propellers when testing new stuff!!!).
-
Page 15: Servo Direction Setting - Remotecontroller
(7) Servo Direction Setting – RemoteController This is to check for the correct operation of the servos when in (2) Manual Mode NOTE: Adjustment of servo direction has to be done in the RemoteController! NOTE: Remove the Propeller for this test and make sure the throttle stick is in the bottom position. -
Page 16: Servo Direction Setting - Flightcontroller
(8) Servo Direction Setting – FlightController This is to check that the controls move in the correct direction when in the Automatic Modes (1) and (3) NOTE: Adjustment of servo direction has to be done in the Flightcontroller unsing the DIP Switches 3 to 5 ! NOTE: Remove the Propeller for this test and make sure the throttle stick is in the bottom position. -
Page 17: Flight Modes
(9) Flight Modes 1) Fixed Height Mode – Attitude / Altitude Hold - Aquire Mode This mode actually consists of 3 Modes. The first is the attitude hold mode which will keep the aircraft in level flight. The second Mode is the Altitude hold Mode which assures a safe altitude for flighing (35m). -
Page 18: Manual Mode
2.) Manual Mode The FlightController will not interfere with the signals from the RemoteControl / YOUR INPUTS You have full control over the aircraft. From NB ONE Reviews Not too many details here, use this mode to trim the plane in the first flight; once trimmed, land the plane and "teach"... - Page 19 Is it 100 +m or 150+m??? NOTES On a new flight location for it takes about 7 minutes for the first GPS positioning; the second time positioning is faster. The light on the GPS module is not the basis for successful positioning. This depends on whether the RED light of the FlightController is always on.
-
Page 20: From Online Descriptions Of Sales Shops
From Online Descriptions of Sales Shops 1. Do well in installation and commissioning by referring to the instructions. 2. Understanding of electronic fence: This flight controller can set the radius of 100-300 meters of electronic fence. After carrying GPS module and starting the fence mode, when the aircraft flies to the fence boundary, it will take the initiative to return. - Page 21 Flight attention points: 1. refer to the instructions, do a good job of installation and commissioning. 2. repeatedly check the control direction of the gyroscope, and the direction of the joystick control. (Check the working direction of the gyroscope first, then adjust the control direction of the remote control) Ground test.
Need help?
Do you have a question about the NB ONE+ and is the answer not in the manual?
Questions and answers