Table of Contents
Advertisement
ORIGINAL INSTRUCTIONS
®
TM
RVMP
FlexTemp
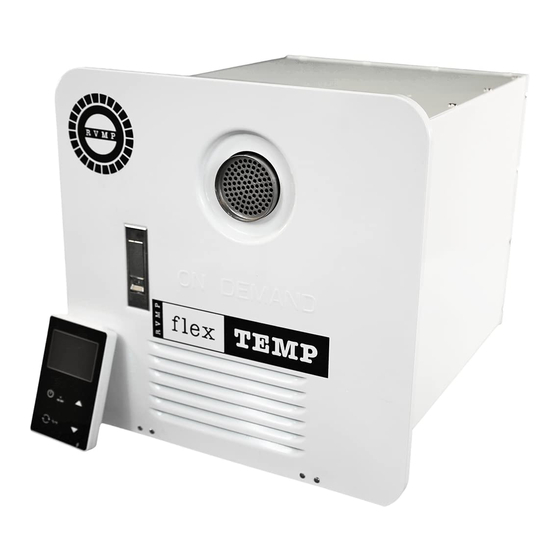
On-Demand Gas Water Heater
Product Model No: FG-SBMC-11
USER MANUAL
(Picture shown here is for reference only)
Authorized for Installation in Recreational Vehicles
Visit rvmp.co • Copyright© 2022 RV Mobile Power, LLC. - All Rights Reserved.
Read this manual carefully before operation.
This manual includes important guidance for safety operation.
Advertisement
Table of Contents

Summary of Contents for RVMP flexTEMP FG-SBMC-11
- Page 1 (Picture shown here is for reference only) Authorized for Installation in Recreational Vehicles Visit rvmp.co • Copyright© 2022 RV Mobile Power, LLC. - All Rights Reserved. Read this manual carefully before operation. This manual includes important guidance for safety operation.
-
Page 2: Table Of Contents
WELCOME TO THE FLEXTEMP™ FAMILY! SAFE OPERATION ENVIRONMENT SAFE OPERATING GUIDELINES DRIVING GUIDELINES PRODUCT DETAILS PERFORMANCE CHARACTERISTICS TECHNICAL SPECIFICATIONS WIRING DIAGRAM EXPLODED VIEW INSTALLATION OPERATIONS IN FREEZING TEMPERATURES WINTERIZING THE APPLIANCE REGULAR INSPECTION HARD WATER TREATMENT ERROR CODES TROUBLESHOOTING CHART TECHNICAL MARKING SPECIFICATIONS LIMITED WARRANTY (NORTH AMERICAN CONSUMER SALES) -
Page 3: Welcome To The Flextemp™ Family
Welcome to the FLEXTEMP™ Family! Thank you for choosing the Flex Temp™ On-Demand Gas Water Heater from RVMP®. This appliance is a direct vent tankless water heater for installation in recreational vehicles only and for use with liquified petroleum gas only. Before installing or operating your new appliance, please read this manual carefully and carefully follow all instructions and safety precautions. -
Page 4: Safe Operation Environment
Flex Temp™ and RVMP® will not be held liable for any consequences of user’s failure to install and use the appliance in accordance with the requirements of this manual. -
Page 5: Driving Guidelines
● The operator is responsible for using the appliance for potable water only. They are responsible for ensuring non-potable water sources, components, or heating systems, new or old, are not connected in any means to the appliance. DRIVING GUIDELINES ● The operator is responsible for ensuring all components are seated and locked in place before moving the RV, check the following: (1) Access door is flush with the mounting plate. - Page 6 General Internal Components View Detailed Internal View...
- Page 7 Control Board Layout Name Type / Model Technical data Pressure relief J416 3/4" NPT (M) x 3/4" NPT (F) valve Motor KDBF105 DC 24V, R 3000r/min Power Switch KCD1 125VAC, T=125℃ Fuse holder 250V,10A Fuse(not show) 0.315-10.0A Burner control unit 12Vd.c, Operation temperature -10℃...
- Page 8 Combination gas PCV-10-02FD Operation temperature -25℃ to 80℃ control Temperature limiting KSD301 53℃ Operate thermostat Anti-freezing 250V, 10A, 5℃ operate. 15℃ cutoff thermostat KJ1/KJ2 (relay) SJ-S-112DM AC250V, 5A, T105 XHB-4BH CN4, 3A XHB-8BH CN7, 3A XHB-9BH CN6, 3A Connector on PCB CN1, 7.5A VH-4BH(HX39600-4A) VH-2BH(HX39600-2A)
-
Page 9: Performance Characteristics
PERFORMANCE CHARACTERISTICS ● Microcomputer intelligent control The CPU chip of the system automatically sets the optimal operation parameters for the appliance according to the bathing environment data such as water volume, ambient water temperature, gas pressure, and the desired hot water temperature. -
Page 10: Technical Specifications
TECHNICAL SPECIFICATIONS Models FG-SBMC-11 Rated heat load (Btu/h) 55000 Rated water production capacity 8kg/min (2.11Gallons/min) Exhaust mode Forced exhaust Control mode Water control system Pulse electronic ignition Ignition mode Applicable water pressure 0.1MPa - 0.75MPa (14.5 psi - 109 psi) Minimum flow for starting 2.8L/min (0.74Gallons/min) Rated voltage... -
Page 11: Wiring Diagram
WIRING DIAGRAM... -
Page 12: Exploded View
EXPLODED VIEW... -
Page 13: Installation
INSTALLATION DANGER WARNING: Suffocation and/or Fire Hazard Observe all installation material in accordance with governing codes and ordinances. Failure to the follow all instructions will result in serious injury, property damage, or death. The installation of this appliance, along with all subsequent components to support installation and operation of the appliance, must conform with country, state and local codes. - Page 14 ● DO NOT vent the water heater using a venting system serving another appliance. ● DO NOT install directly into a shower, or near direct heat. Prepare Opening Choose a location to place the appliance, based on the following criteria: a.
- Page 15 a. Dimensions for cutout are: 13.040” h x 13.080” w x 18” of clear space at rear of unit. (See drawing above) b. Ensure that the front edge of the opening is surrounded by a solid frame which can accept anchors for securing the appliance.
- Page 16 2. Feed propane line into proximity of the appliance install location, leave enough length to flex into position so that when connected no kinks are created. NOTE: An approved semi-flexible metallic pipe is acceptable to connect as an extension from the propane line to the appliance.
- Page 17 Prepare Electrical Wiring WARNING WARNING: Electrical Shock Hazard ● Disconnect all power before performing any work. ● Always use a certified and proven 12V isolated power supply, that is properly grounded to the RV. ● Follow all applicable codes, regulations and instruction material when performing service work. Failure to follow instruction could result in serious injury or death.
- Page 18 Prepare Remote Control 1. Determine a location to install the wall remote control within the interior of the RV. 2. Drill a 3/4" hole and clean the edges. 3. If necessary, run two electrical wires that extend the wall control connections (blue wires) to the appliance connections (blue wires) using the appropriate wire size.
- Page 19 8. Connect the power supply wires (red and black wires on rear of water heater) to the appropriate nominal 12V DC power source connection. NOTE: The red wire is positive (+) and the black wire is negative (-). 9. Connect the wall controller wires (2 blue wires on the appliance). NOTE: Polarity does not matter, the wires can be connected to either blue wires.
- Page 20 14. Apply any additional amount of water sealant around the flange and perimeter of the front of the appliance. Close the front access door. Check for Possible Gas Leak WARNING WARNING: Fire and Explosion Hazard ● Ensure test pressures are below 40in-wc (100mbar). ●...
- Page 21 6. Repair any leaks as needed. Initial Startup WARNING Ensure all necessary system leak tests are complete before performing any functional test. Failure to follow instructions could lead to serious injury, property damage or death. 1. Verify the power switch is in the “OFF” position. 2.
-
Page 22: Operations In Freezing Temperatures
4. If freezing conditions will occur, winterize according to instructions below. Operations in Freezing Temperatures This water heater is equipped with an automated warming system for use in cold weather conditions. The purpose of this system is to keep the water heater from freezing when the RV is used in conditions where the ambient air is near the freezing temperature of water, and thus prevents water in the unit from freezing. -
Page 23: Regular Inspection
○ DO NOT exceed 30PSI into the water heater ○ While completing the blow out process for the entire water system, take time to isolate the water heater by closing all drain plugs and faucets and only open the water heater drain plug and filter cover. This ensures maximum pressure and flow is isolated through the water heater for complete evacuation. -
Page 24: Hard Water Treatment
When exposed to higher water hardness concentrations, it is advised to provide a proper water treatment device for the incoming water to the coach. Hard water may lead to performance reduction of your appliance overtime. Contact FLEXTEMP/RVMP for decalcification instructions (support@rvmp.co). Error Codes If the appliance malfunctions, a beep alarm will sound and an error code will display on the remote controller. - Page 25 Error in the outlet water temperature sensor. 1. Sensor could be disconnected, or the 1. Inspect the connector and wiring. Replace connection is loose or having poor contact. connector or wiring if damaged or loose. 2. Open circuit or short circuit from a sensor 2.
-
Page 26: Troubleshooting Chart
pressure for the unit. Remove anything that 1. Inlet water pressure too low. limits or restricts available water pressure. Possible failure with gas inlet valve. Before or during normal combustion process, an open 1. Inspect and repair or replace damaged condition or short in the valve is detected. - Page 27 Check for any fault or error codes and Malfunction in control board. address the issue per the error code table herein. Propane is empty or low. Refill propane supply and retry. The gas valve and/or water inlet valve are Make sure these valves are completely not completely open.
-
Page 29: Technical Marking Specifications
Technical Marking Specifications... -
Page 30: Limited Warranty (North American Consumer Sales)
FLEX TEMP LIMITED WARRANTY (NORTH AMERICAN CONSUMER SALES) This Limited Warranty ("Warranty") outlines applicable coverage and claims procedures for Products, as defined herein, sold as Flex Temp™ Aftermarket Division which is referenced herein as "Warrantor", "we", "us" or "our". Coverage. Subject to the following terms and conditions, we warrant ONLY to you as the original consumer ("you" or "your") who purchases the product directly from Flex Temp™... - Page 31 NEGLIGENCE AND FOR FAILURE OF ESSENTIAL PURPOSE ARE EXPRESSLY WAIVED AND RELEASED. UNDER NO CIRCUMSTANCES WILL OUR LIABILITY FDR ANY DEFECT IN THE GOODS, WHETHER BASED ON CONTRACT, TORT, WARRANTY, OR ANY OTHER THEORY, EXCEED THE PURCHASE PRICE OF THE PRODUCTS. YOU ACKNOWLEDGE AND DECLARE THAT THESE LIMITATIONS AND WAIVERS HAVE BEEN BROUGHT TO YOUR ATTENTION AND EXPLAINED, THAT YOU HAVE READ AND UNDERSTAND ALL TERMS AND AGREE TO BE SO BOUND, AND THAT YOUR RECEIPT OF THE WARRANTY AND PRODUCT, AND ANY PAYMENT FOR THESE, SIGNIFIES THAT YOU HAVE VOLUNTARILY AND KNOWINGLY CONSENTED TD...
- Page 32 To ensure trouble free warranty coverage it is important that you register your hot water heater. You may register on-line at the links presented below or by filling out and returning to RVMP the warranty registration card supplied with your hot water heater.
- Page 33 Product Details & Digital Manual Product Warranty Registration RV Mobile Power, LLC Phone: (855) HAPPYRV Email: support@rvmp.co www.rvmp.co...
- Page 34 Visit rvmp.co • Copyright© 2022 RV Mobile Power, LLC. - All Rights Reserved. v1.1.1...
Need help?
Do you have a question about the flexTEMP FG-SBMC-11 and is the answer not in the manual?
Questions and answers