
Subscribe to Our Youtube Channel
Summary of Contents for Robe TAP5-EZ2-32-F4
- Page 1 May 23, 2018 Original Operating Manual ECO automatic lamb feeder Program version 01.01 and higher TAP5-EZ2-32-F4 / TAP5-EZ2-50-F4...
-
Page 2: Table Of Contents
Table of contents Table of contents Introduction ..............5 Transport. - Page 3 Table of contents Operating modes ............22 4.3.1 Automatic mode .
- Page 4 Table of contents 9.1.5 Boiler not filled (E--5) ..........41 Warnings .
-
Page 5: Introduction
Introduction 1. Introduction This operating manual puts you in the position to operate this automatic feeder machine safely as intended. • Read through this operating manual carefully before commissioning the automatic feeder and ask your service technician to explain anything you have not understood during the ini- tial commissioning. -
Page 6: Components, Automatic Feeder
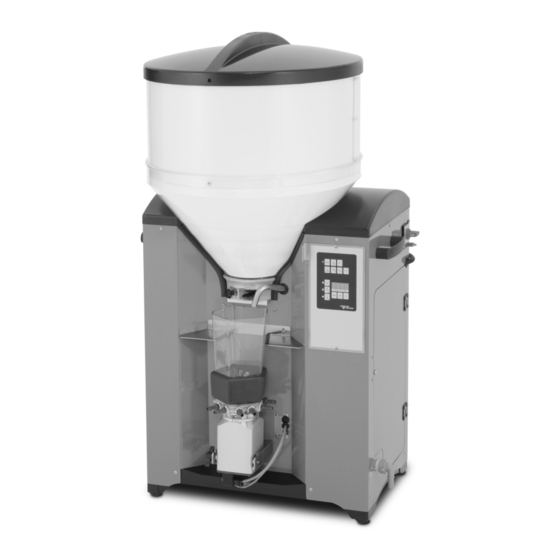
Introduction Components, automatic feeder 1 Storage container with attachment for milk substitute 2 Main switch 3 Screw for potential equalization 4 Handle 5 Control unit 6 On the right in the machine housing: Water valve, electronic boiler, overheating protection 7 Water connection 8 Height-adjustable feet 9 Mixer (mixer jar + mixer motor) 10 Hose connections... -
Page 7: Technical Data
Introduction 1 Lid hanger Technical data 1.3.1 Electrical connection Note: The data for the electrical connection can be found on the name plate on the left side of the base frame. 1.3.2 Dimensions 1.3.3 Weight approx. 34 kg... -
Page 8: Water Connection
1.3.7 Number of feeding stations and animals TAP5-EZ2-50-F4: up to 8 feeding stations with 25-30 lambs each TAP5-EZ2-32-F4: up to 6 feeding stations with 25-30 lambs each 1.3.8 Name plate The name plate is located above the left side door on the outside of the automatic feeder. It con- tains information about the manufacturer, type and number of the automatic feeder, information about connecting the feeder to the power supply as well as its certification. -
Page 9: Manufacturer's Contact Details
Introduction Manufacturer's contact details Please contact us if you have any questions about our products or require technical support. When you contact us, always specify the model, serial number and program version of your au- tomatic feeder so that we can tailor our service to your unit. The device number and model are located on the name plate on the left of the automatic feeder housing. -
Page 10: Important Safety Instructions
Important safety instructions 2. Important safety instructions Intended use The automatic feeder should only be used for the automatic preparation, heating and dosage of liquid animal feed for young animals. Target group 2.2.1 Necessary qualifications of the owner The owner must be a trained farmer or have good practical experience in farming. He must know the relevant accident prevention regulations and generally accepted safety regulations. -
Page 11: Your Duties
Important safety instructions • The following specific hazards are associated with the automatic feeder's electrical system: • Electrical discharge. If there is an electrical or voltage discharge, electric current flows through parts of the automatic feeder that are normally insulated. Touching the unit can cause a fatal electric shock. -
Page 12: How Am I Warned Of Hazards
Important safety instructions • Carefully read the operating manual before starting to use your automatic feeder and ask your service engineer to explain anything that you do not understand before you use it for the first time. • Follow the health and safety and accident prevention regulations. •... -
Page 13: What Are The Components Of A Hazard Description
Important safety instructions Make sure that all the specified safety labels are fitted to your automatic feeder and that they are in a legible condition. If the safety labels are difficult to read, replace them immediately. New safety labels are available from Förster-Technik GmbH. 2.5.1 What are the components of a hazard description? A hazard description always consists of the following elements:... -
Page 14: Safety Signs
Important safety instructions Safety signs Different safety notices are attached at the hazardous points on the automatic feeder. Warning signs, prohibition and instruction notices. What are warning signs? Warning signs consist of: • A pictogram in a yellow triangle illustrating the potential hazard. What are prohibitory signs? Prohibitory signs have a pictogram of the prohibited action in a red circle with a line through it. -
Page 15: Signs On The Machine
Important safety instructions Burning/scalding Danger due to dry run of the heating system Automatic startup No spraying Grounding symbol 2.6.2 Signs on the machine The meanings of the individual signs attached to the outside or inside of the machine are de- scribed below. -
Page 16: Safety Devices
Important safety instructions Permitted water pressure This sign indicates that the permitted water pressure should be between 2.5 and 6 bar. Reset safety temperature limiter This sign explains how you can safely activate the safety temperature limiter. You can find the exact procedure in chapter Reset Interrupt boiler current supply This sign shows you how you should properly pull the plug. - Page 17 Important safety instructions Safety temperature limiter The automatic feeder's heating system is equipped with a safety temperature limiter that will be triggered in the event of overheating (70°C) and that will then shut down the heating system. The safety temperature limiter is triggered if the water gets too hot or if the heating system is running dry.
- Page 18 Important safety instructions WARNING! There is a risk of injury due to automatic start-up Do not reach into the hazardous area of the powder discharge opening. The powder dosing can start up automatically at any time, crushing or cutting off your fingers. ►...
-
Page 19: Hygiene
Hygiene 3. Hygiene As a farmer with experience in raising lambs, you understand how unhygienic conditions affect the health of your lambs. Diarrhea and respiratory infections are frequently occurring infectious diseases in lambs. Every sick lamb involves additional costs, for example for veterinarians and medication, and re- quires extra time for care. -
Page 20: Operation
Operation 4. Operation The keypad In this operating manual, only the keypad symbols are used for instructions and not their des- ignations. Keypad symbol Function Automatic mode Temperature control of boil- er/portion counter Reset portion counter Start/stop mixer Manual function water Manual function MP Heat up cleaning water MP quantity setting... -
Page 21: Operating Controls
Operation Start Correction keys Operating controls 4.2.1 Auto Press this key to switch the automatic feeder on and off. 4.2.2 Temperature query of boiler/portion counter Press this key to query the boiler temperature. Press this key again to query the number of positions. -
Page 22: Operating Modes
Operation Operating modes The feeder knows the two operational modes automatic mode and offline mode. If the feeder is in automatic mode, the animals will be fed. The offline mode is used to perform actions that cannot be carried out in regular operation, such as setting the feed components or washing the mixer. -
Page 23: Commissioning
Commissioning 5. Commissioning • The automatic feeder may only be put into service by a service technician. • When returning the automatic feeder to service, proceed as described in “putting into serv- er”. The appendix contains a checklist with all points you have to observe during commissioning or recommissioning (see 12.1 "Checklist for commissioning and recommissioning"... -
Page 24: Water Connection
Commissioning • Set up the automatic feeder in a location where the temperature cannot exceed 40°C and the humidity cannot exceed 80%. • Always set up the automatic feeder on an even surface. Note: Using its adjustable feet, if necessary, you can level the automatic feeder. •... -
Page 25: Opening Hose Fittings
Commissioning Opening hose fittings There are eight hose fittings on the automatic feeder mixer. Two of them are open and six are closed with a plug. 1. With an appropriate tool, press the plug of the hose fitting you would like to open into the mixer jar. -
Page 26: Installing The Suction Hose Bracket For Cleaning
Commissioning Installing the suction hose bracket for cleaning • Attach the suction hose bracket for cleaning the automatic feeder in the vicinity of the feed- ing station. NOTICE! The suction hose bracket must be installed higher than the position of the mixer so that the cleaning water cannot flow out of the hoses. -
Page 27: New Installation
Commissioning New installation When commissioning and re-commissioning the automatic feeder, the program must be com- pletely reinstalled. This will remove superfluous data as well as no longer current or incorrect settings from the memory. • Press and keep the keys pressed down when you switch on the feeder. All set values will be reset to the default values. -
Page 28: Setting Portion
Commissioning The temperature of the feed in the mixer jar must correspond to the mixing temperature speci- fied by the MP manufacturer. ► Keep to the feed temperatures recommended in this operating manual. 5.12 Setting portion So that the automatic feeder can dose and mix the components water and MP exactly, the dos- ages must first be determined and set manually. -
Page 29: Operation
Operation 6. Operation Filling the powder container • Only pour in milk powder that is suitable for lamb feed and automatic feeders. NOTICE! Make sure that no paper or other foreign bodies enter the powder container. Otherwise, the dosing mechanism could be damaged or the dosage accuracy impaired. As a result, your animals could receive insufficiently concentrated feed and might not receive ade- quate feed or any feed at all. -
Page 30: Setting The Water
Operation 6.4.1 Setting the water 1. Press to exit automatic mode. 2. Press . The LED next to the key lights up. 3. Hold an empty measuring vessel under the water outlet and press . In the time that is indicated in the control unit display, a certain amount of water is dispensed. -
Page 31: Cleaning
Cleaning 7. Cleaning In order to maintain the required hygienic status, all parts of the automatic feeder or the assem- blies that are attached to it that could come into contact with liquid or powdered perishable an- imal feed or additives must be cleaned, such as mixer jar and suction hoses. Remember: •... -
Page 32: Cleaning Agents
Cleaning Cleaning agents WARNING! Beware of chemical burns from cleaning agents. The cleaning agent can burn your eyes or hands. ► Always wear safety glasses and protective gloves when using cleaning agents for cleaning. Follow the safety instructions in the safety data sheet of the cleaning agent and wear the safety equipment required by the instructions. - Page 33 Cleaning The mixer is intensively cleaned by a cleaning cycle. This cleaning cycle consists of: • Pre-cleaning • Main cleaning with the addition of cleaning agent • Rinsing with clear water If rinsing is to be carried out with cleaning agent, the cleaning agent must be added manually at the beginning of the main cleaning cycle.
-
Page 34: Cleaning The Suction Hose
Cleaning 8. Switch the automatic feeder back on and tip out the cleaning water or drain it via the suction hoses. 9. For rinsing press . Fill the mixer jar with water and empty it via the suction hoses. Note: You will achieve a better cleaning result if for rinsing you also start the mixer interval by pressing 10. -
Page 35: Cleaning The Powder Discharge Opening
Cleaning 6. Connect the hose cleaning pistol to the water hose and press the cleaning sponge through the suction hose with water pressure by actuating the hose cleaning pistol. 7. Drain the cleaning water from the suction hose. 8. Reattach one end of the suction hose to the teat and the other end to the mixer. 9. - Page 36 Cleaning 6. Reinstall the dry dosing tongue. 7. Insert the protective grid for the powder hopper attachment and tighten the three screws in the holes provided for this purpose. 8. Only fill with milk powder when the feeder is to be used again. 9.
-
Page 37: Shutdown
Shutdown 8. Shutdown You can shut down the automatic feeder temporarily or permanently. To make the procedure easier and ensure that you do not miss any steps, see the check list Shutting down the automatic feeder in the appendix (see 12.3 "Shutdown checklist" ). Temporary shutdown You can temporarily shut down the automatic feeder, for example from the end of one lambing season to the start of the next. - Page 38 Shutdown 1. Turn off the automatic feeder using the main switch and disconnect the power plug. 2. Drain any water from boiler to prevent frost damage to the automatic feeders. NOTICE! Beware of damage to the automatic feeder. Frozen water expands and can damage automatic feeder components that contain water, such as the solenoid valves.
-
Page 39: Permanent Shutdown
Shutdown NOTICE! Pressure washers can damage the automatic feeder. ► Only clean the automatic feeder by hand using a damp cloth. 12. Cover the automatic feeder with a tarpaulin. This will protect it from dirt. Permanent shutdown If you are going to permanently shut down the automatic feeder, you must dispose of it in ac- cordance with the law. -
Page 40: Faults And Warnings
Faults and warnings 9. Faults and warnings Faults In the event of a failure, automatic mode is interrupted and no feed is prepared. Respond im- mediately to the failure and ensure that your animals are supplied with feed using an alternative method as long as the automatic feeder is out of service. -
Page 41: Boiler Not Filled (E--5)
Faults and warnings Only for service technicians Possible causes and measures: • The heating rod is defective. Check the heating rod for continuity. • The temperature sensor is defective. • No voltage is applied to the heating system. Check the customer’s fuses. •... -
Page 42: Disposal
Disposal 10. Disposal All automatic feeder components, liquids and solids must be disposed of in compliance with the applicable official regulations for proper waste recycling and disposal in your country. If you are not certain which regulations apply to you, ask your service technician and use the Internet or the yellow pages to find out which government agency is responsible for your jurisdiction. -
Page 43: Care And Maintenance Schedule/Routine Tasks
Care and maintenance schedule/routine tasks 11. Care and maintenance schedule/routine tasks This chapter covers regular maintenance work and functional inspections on the automatic feeder as well as its accessories. These ensure that the required hygienic standards are main- tained. Maintenance work includes, for example, calibration, hygiene-related cleaning as well as scheduled replacement of wearing parts. -
Page 44: Maintenance Intervals And Activities
Care and maintenance schedule/routine tasks WARNING! There is a risk of injury due to automatic start-up. The powder mixing unit can start up automatically at any time, crushing or cutting off your fin- gers. ► Do not reach into the hazardous area of the powder mixing unit. Turn off the automatic feed- er with the main switch and disconnect the power plug before reaching into the powder con- tainer. -
Page 45: Checking Components For Compliance With National Regulations
Care and maintenance schedule/routine tasks Care/maintenance interval Daily Wee months months Inspection of the lambs Intensive mixer • Visually check the correct functioning of electrodes and mixer blades • Visually inspect mixer for leaks • Visually inspect the effectiveness of the cleaning cycles ... -
Page 46: Appendix
Appendix 12. Appendix 12.1 Checklist for commissioning and recommissioning Note: You must carefully read the instructions in the operating manual, in particular the safety instructions, and observe them before putting the automatic feeder into service. Commissioning Tell end users that the automatic feeder must be installed so that it is frost-proof. Tell end users that the automatic feeder must be protected from rain and moisture. -
Page 47: Materials List
Appendix 12.2 Materials list The materials used in the automatic feeder include: • Brass, Enzidor • Silicon carbide • Carbon • V2A, V4A • Plastics: PET, TPE, silicone, PVC, NBR, ABS, PUR • Viton • Vulcanized fiber, graphitized • Rubber 12.3 Shutdown checklist Pull the power plug... -
Page 48: Index
Index Index Automatic feeder 42 Cable 42 Auto 21 Circuit board 42 Cleaning agents 42 Boiler 8 Hoses 42 Boiler not filled 41 Boiler temperature query 21 Electrical connection 7 23 Electrical connection provided by the customer Care and maintenance schedule 43 Checking components by means of measure- ments 45 Faults... - Page 49 Index Material list 47 Start/stop mixer 21 Milk powder container 8 Switching on the automatic feeder 26 Name plate 8 Temporary shutdown 37 Number of feeding stations and animals 8 Transport 5 Operational modes Warnings Automatic mode 22 Temperature in the boiler is too high 41 Offline mode 22 Water connection 8 Overheating 40...
- Page 50 Make: Automatic feeder Type: TAP0-EZ1-28-M, TAP0-EZ1-32-M, TAP0-EZ1-38-M, TAP0-EZ1-50-M, TAP1-EZ1-32-M, TAP1-EZ1-38-M, TAP5-EZ2-50-F3, TAP5-EZ2-32-F3, TAP5-EZ2-28-F3, TAP5-EZ2-50-F4, TAP5-EZ2-32-F4, TAP5-EZ2-28-F4 Function: Automatic preparation, heating, and dosing of liquid feeds for young animal feeding It is expressly declared that the machinery fulfils all relevant provisions of the following EU Directives:...
Need help?
Do you have a question about the TAP5-EZ2-32-F4 and is the answer not in the manual?
Questions and answers