
Summary of Contents for Pitney Bowes F767
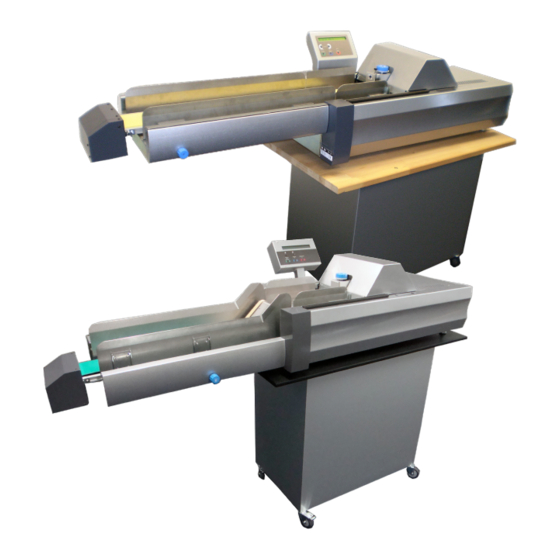
- Page 1 F767 Document Feeder F774 & F772 High Capacity Loaders Operator Guide English Version...
-
Page 3: Table Of Contents
Important Safety Notes ............... 1-2 A Note to the Operator ..............1-4 About Your System ..............1-4 The F767 Document Feeder ..........1-4 The F774/F772 High Capacity Loader ........1-5 System Components - F767 ............1-6 Operator Controls - F767 ............1-10 Chapter 2—Operation... - Page 4 Options Available ..............4-2 Handling Material Stoppages ............4-3 Stoppages in the F767 Document Feeder ......4-3 Troubleshooting Charts .............. 4-5 Troubleshooting Using the F767 Scan Error Screens ....4-8 Operator Maintenance ..............4-8 Chapter 5—Reference Service ..................5-2 Compliance ................5-2 Equipment Specifications ............
- Page 5 If you require help or wish to purchase supplies for your system, contact your machine supplier. • Contact information for all European Pitney Bowes companies is given in a separate publication supplied with your system. • If your system has been provided by a dealer or company outside the European area, contact details will be on the rear cover of this guide, or on a label fixed to the machine.
- Page 6 Table of Contents SDC927D...
- Page 7 This chapter lists the key features of your system, and presents important safety information. Important Safety Notes ..............1-2 A Note to the Operator..............1-4 About Your System ..............1-4 The F767 Document Feeder ..........1-4 The F774/F772 High Capacity Loaders ......... 1-5 System Components - F767 ............1-6 Operator Controls - F767............1-10 SDC927D...
-
Page 8: Important Safety Notes
Follow the normal safety precautions for all office equipment: Safety Notes • It is strongly recommended that you use only Pitney Bowes approved supplies, in particular aerosol dusters. Improper storage and use of aerosol dusters or flammable aerosol dusters, can cause an explosive- like condition that could result in a personal injury and/or property damage. - Page 9 Introduction • 1 Important • Ensure there is no strain on the power cord and that it does not become jammed between the equipment, walls or furniture. Safety Notes (continued) • Be certain the area in front of the wall receptacle into which the machine is plugged is free from obstruction.
-
Page 10: A Note To The Operator
1 • Introduction A note to the These instructions explain how to setup and use the Model F767 Document Feeder and the optional Model F774/F772 High Capacity Loader. Please Operator spend a few moments reading through them; understanding what the... -
Page 11: The F774/F772 High Capacity Loader
Loaders After loading material into the F774/F772, operation is controlled by the F767 Document Feeder, as a result of which the F774/F772 will only convey material when instructed to do so by the Universal Feeder. In the event of a material stoppage in the Document Feeder, the F774/F772 High Capacity Loader will stop. -
Page 12: System Components - F767
Operator controls are conveniently grouped on the front of the feeder. Components - Five multi-function controls govern all programming and paper F767 handling functions. See page 1-12 for details. Operator Display The display prompts you through the programming process, shows a list of available programs and displays error messages. - Page 13 Introduction • 1 Control A Control C SDC927D...
-
Page 14: System Components - F767
1 • Introduction System Main Power Switch Applies power to the F767 Document Feeder and the F774/F772 High Components Capacity Loaders. - F767 (continued) Feeder Side Guides and Controls Used to control the material being fed into the system. Rotate the control to adjust the guides. - Page 15 Introduction • 1 Feeder Side Guide Feeder Side Guide Feeder Side Guide Feeder Side Control Feeder Side Control Folder SDC927D...
-
Page 16: Operator Controls - F767
In the programming mode, answers NO to prompts; also acts as a STOP button during continuous operation. If material is in the accumulation area of the F767 i.e. the last set in a job run, pressing this button will eject the material through the DI900/DI950 Inserting System. - Page 17 2 • Operation This chapter tells you how to setup, load and run the F774/F772 High Capacity Loaders and the F767 Document Feeder. F767 Document Feeder Setup ............2-2 Accumulator Input Frame Position ........2-2 Accumulator Ramp Height ............. 2-2 Power Up ................2-3 Select the Program ..............
-
Page 18: F767 Document Feeder Setup
2 • Operation F767 Document This section explains how to select a program and set the F767 for the material being run: Feeder Setup NOTE: A support arm holds the Top Cover open. Accumulator Lower the F767 Front Cover. Input Frame... -
Page 19: Power Up
Before turning the system ON, refer to the Important Safety Notes on Power Up page 1-2. Turn the F767 Main Power Switch ON. The F767 will momentarily display the version number of the software, and then show the listing of available programs. The Exit (Blue) indicator will light. -
Page 20: Select The Program
R shows the OMR status DI900/DI950 F767 is ready - see page 2-17 Inserter signal confirmation - see page 2-17 The display shows the program selected and the main program options. To set speed, use the Arrow Buttons until the speed you want is displayed. -
Page 21: Loading Orientation
Operation • 2 Loading The Loading Orientation is shown when you select a program. There are four possible loading orientations: Orientation Face up, bottom first Face up, top first Face down, bottom first Face down, top first When feeding individual pieces of material during setup, or when loading material prior to a job run, it is important to observe the correct loading orientation for the program selected. -
Page 22: Feeder Side Guides Adjustment
2 • Operation Feeder Side Rotate the Feeder Side Guide adjusting wheel anticlockwise until Guides the side guides are wider apart than Adjustment the material to be run. Place a sheet or booklet onto the Feed Deck. Turn the Feeder Side Guide adjusting wheel clockwise to close the side guides up to the sheet or booklet, then turn it anticlockwise... -
Page 23: Set The Scanning Head
Operation • 2 Place material (2-10 pieces) into the feed deck area (A) before loading material onto the belts. Then load the bulk of the material shingled as shown on the right. F772- Position the material as shown on the right and move backstop position to within 3mm of material. -
Page 24: Side To Side Adjustment Of Omr Scanners
2 • Operation Side to Side Bottom Scanning Connect power and turn ON. Open the Top and Front Covers. Adjustment of OMR Scanners Open the separator. Unlock lever a, turn knob c clockwise as far as it will go and hold in position while locking lever a. - Page 25 Operation • 2 Top Scanning Connect power and turn ON. Open the Top Cover. Open the separator. Unlock lever a, turn knob c clockwise as far as it will go and hold in position while locking lever a. Slide a sheet under the separator and observe the scanner beam on the sheet.
-
Page 26: Side To Side Adjustment Of Bcr Scanners
2 • Operation Side to side Bottom Scanning Connect power and turn ON. Open the Top and Front Covers. Adjustment of BCR Scanners Open the separator. Unlock lever a, turn knob c clockwise as far as it will go and hold in position while locking lever a. - Page 27 Operation • 2 Top Scanning Connect power and turn ON. Open the Top Cover. Open the separator. Unlock lever a, turn knob c clockwise as far as it will go and hold in position while locking lever a. Press the Green, Blue and Red buttons at the same time to enter the Menu.
-
Page 28: Setting The Material Guide Fingers
2 • Operation Setting the Open the Top Cover. Material Guide The guide fingers can be raised or lowered into one of three detented positions, depending on the material being run: Fingers Lowered for sheets. Mid position for thin booklets of approx. - Page 29 Operation • 2 Feeder Head Open the Top Cover. Adjustment for cut sheets and Turn knob c anticlockwise until it booklets up to stops. 2.5mm thick Raise lever a to unlock Feeder Head. Lever A Unlocked Position Place material under Feeder Head and lower lever a to lock into Lever A position.
-
Page 30: Feeder Head Adjustment For Booklets 2.5Mm Thick Or Greater
2 • Operation Feeder Head Open the F767 Top Cover. Adjustment for booklets 2.5mm Turn knob c anticlockwise until it thick or greater stops. Raise lever a to unlock Feeder Lever A Head. Unlocked Position Lever A Locked Place a booklet all the way under Position the first and second rollers. -
Page 31: Transport Material To Accumulator
Load a sheet or booklet. Press Run Confirm (Green) until a piece is fed into the accumulator area. Setting the Raise the F767 Top Cover and lower the Front Cover. Accumulator Side Guides Rotate knob g clockwise to set the Accumulator Side Guides. -
Page 32: Deactivate Inline Test
You only need to carry out this step if you are NOT using the F774/F772 High Capacity Loaders. If the loader IS being used, it will automatically load sheets onto the F767's Feed Deck. See F774/F772 setup on the next page. Flex and aerate the material stack to ensure good separation. -
Page 33: Running The System
DI950 controls to run a Trial Piece and to start and stop continuous operation. If the F767 is running an OMR program, three blocks will show on the display as illustrated below. When running non-OMR jobs, blocks 2 and 3 only will show on the display. - Page 34 2 • Operation 2-18 SDC927D...
- Page 35 3 • Programming This chapter explains how to program and manage jobs that can be held in the F767 Document Feeder's memory. About Programming Jobs ............3-2 Adding a Non-Scanning Program ..........3-2 Adding a Scanning Program............3-5 Programming an 'OMR DI900/DI950' Job ......3-5 Programming a 'BCR Standard' Job ........3-11...
-
Page 36: About Programming Jobs
3 • Programming About The F767's memory holds up to 99 pre-programmed jobs that you can recall with a few button presses. Programming This chapter explains how to program jobs into the system. It commences Jobs with a non-scanning job and follows with some examples of typical scanning jobs. - Page 37 Programming • 3 Press the Green button to confirm each character. When the name is complete, press Red to continue. The display shows the material selection screen: 017> Material: PAPER/DF <-->=SELECT Green=CONFIRM Blue=EXIT Use the Arrow Buttons to select the material for this job: Paper/DF Sheets with double detect turned ON (default setting).
- Page 38 Red=GO ON Setting a count tells the feeder how many sheets are in each collated set. The F767 will collate the requested number of forms before transporting them into the DI900/DI950 system. The default setting is 01 – a single sheet insert (one piece per cycle).
-
Page 39: Adding A Scanning Program
Programming • 3 Adding a Background information on scanning is given in the DI900/DI950 Operating Guide. This section assumes you understand scanning and how it applies Scanning to the job you are programming. It also assumes you are familiar with Program programming non-scanning jobs as described on page 3-2. - Page 40 3 • Programming 018> Name of new program : -------- <-->=ALPHA Green=CONFIRM Red=GO ON You can enter a program name up to eight characters long, using any combination of alpha and numeric characters. Use the Arrow Buttons until the first character of your program name appears.
- Page 41 Programming • 3 Use the Arrow Buttons to select the material loading orientation: Face up, bottom first Face up, top first Face down, bottom first Face down, top first Press Green to confirm your selection. The display requests the scanning version: 018>...
- Page 42 3 • Programming Example: 26mm code length with 6 scan lines gives an increment of 26 divided by 5 (the number of gaps) = 5.2mm Enter this increment using the Arrow Buttons. The figure entered is in units of 0.01mm i.e. in the example above 5.2mm would be entered as 520. Press Green to confirm.
- Page 43 Programming • 3 You must now enter the distance from the lead edge to the bench mark: Dist. lead edge to bench mark : 00 mm <-->=VALUE Green=CONFIRM Red=GO ON Use the Arrow Buttons to set the distance, then confirm by pressing Green.
- Page 44 3 • Programming You now need to tell the system in which direction to read the scan code: 018> OMR scanning : NORMAL <-->=SELECT Green=CONFIRM Blue=EXIT The options available are: NORMAL Where the system will expect the Bench Mark to be the FIRST mark in the scan code.
-
Page 45: Programming A 'Bcr Standard' Job
Programming • 3 Programming a Step by Step Instructions With the feeder ON, press the Green, Blue and Red buttons at the same 'BCR Standard' time. The display will show: Select: NEW NON-SCANNING JOB <-->=SELECT Green=Confirm Blue=EXIT Press the Arrow Buttons to select ‘NEW SCANNING JOB’. Select: NEW SCANNING JOB <-->=SELECT Green=Confirm... - Page 46 3 • Programming Paper/DF Sheets with double detect turned ON (default setting). This will be the most common setting for sheets. Paper Sheets with the double detect turned OFF. This is not recommended as the feeder will not sense double feeds.
-
Page 47: Deleting A Program
Programming • 3 019> BCR location : Top Front <-->=SELECT Green=CONFIRM Blue=EXIT Use the Arrow Buttons to select where the BCR scanner is located, Bottom Rear, Bottom Front, Top Rear or Top Front. Press Green to confirm. Programming a BCR scanning job is now complete. Deleting a With the feeder ON, press the Green, Blue and Red buttons at the same time. -
Page 48: Modifying A Program
3 • Programming Modifying a With the feeder ON, press the Green, Blue and Red buttons at the same time. The display will show: Program Select: NEW NON-SCANNING JOB <-->=SELECT Green=Confirm Blue=EXIT Use the Arrow Buttons to select ‘MODIFY JOB’. Select: MODIFY JOB <-->=SELECT Green=Confirm... - Page 49 The User's Menu .................4-2 Options Available ..............4-2 Handling Material Stoppages ............4-3 Stoppages in the F767 Document Feeder ......4-3 Troubleshooting Charts ...............4-5 Troubleshooting Using the F767 Scan Error Screens ....4-8 Operator Maintenance ..............4-8 SDC927D...
-
Page 50: The User's Menu
If the code is read successfully, the lights will flash faster and the characters read will display on the operator display. Total Feed Cycles This option displays the total cycles that the F767 has performed. Motor Test LED and Key Test Show Sensor Status Double Feed Adjust These are primarily for service use. -
Page 51: Handling Material Stoppages
Troubleshooting & Maintenance • 4 Handling This section describes how to clear material stoppages from the F774/F772 High Capacity Loader and the F767 Document Feeder. Material Stoppages Stoppages in the The F767 may stop indicating a misfeed. The indicator on the Stop/... - Page 52 4 • Troubleshooting & Maintenance Accumulator Area… Open the Top Cover. Carefully clear any stalled material, taking care not to damage the accumulator drive O rings. Close the Top Cover. Press Run Confirm (Green) to restart operation. TIP: If you are running stiff material, it may aid removal if the Accumulator Ramp e is moved out of the way.
-
Page 53: Troubleshooting Charts
Check for correct position of the F767 Feeder Side appears slow/ Guides (see page 2-6). sluggish. Clean the material feed belts (see page 4-2). Check the Feeder Head/Separator adjustments (see page 2-13 for the F767 or page 2-15 for the F774/F772). SDC927D... - Page 54 If scanning is being used, check it is selected in both the F767 AND the DI900/DI950 programs. Feeder display Take a single sheet and load it onto the F767 Feed indicates 'No Deck (see page 2-5). Material for Double Material not being transported to Take-Away Roller.
- Page 55 Troubleshooting & Maintenance • 4 Problem Possible Cause Feeder display Check the position of the Input Frame (see page indicates 'Wrong 2-2). Input Frame Position'. Feeder display Check the Accumulator Side Guides settings (see indicates 'Misfeed page 2-6). on Conveyor'. Check to ensure that the green accumulator belts are properly installed on all pulleys.
-
Page 56: Troubleshooting Using The F767 Scan Error Screens
4 • Troubleshooting & Maintenance Troubleshooting It is possible to use the Scan Error Screens to check that the Universal Feeder has read the appropriate scan marks. An example Scan Error Using the F767 Screen is shown below: Scan Error Screens Scan System Error ....- - -... - Page 57 5 • Reference This chapter contains reference information that you might find useful from time to time. Service..................5-2 Compliance .................5-2 Equipment Specifications ............5-3 Material Specifications..............5-4 SDC927D...
-
Page 58: Service
5 • Reference Service Service for your system is available throughout the world. Should you have questions about your system, or require service or assistance with your particular application, please call your machine supplier. Contact details are given at the front of this book or in a separate document supplied with your system. -
Page 59: Equipment Specifications
Reference • 5 Equipment Electrical F767: 100-240VAC, 50/60Hz, 5A Specifications F774: 100-240VAC, 50/60Hz, 5A F772: 100-240VAC, 50/60Hz, 5A Physical Dimensions F767: 480mm High x 600mm Wide x 1000mm Long F774: 500mm High x 500mm Wide x 900mm Long F772: 500mm High x 500mm Wide x 900mm Long... -
Page 60: Material Specifications
5 • Reference Material F767 Document Feeder Specifications Weight (Sheets) 60g/m minimum to 165g/m maximum Thickness (Booklets) 4mm maximum Length 100mm minimum to 297mm maximum Width 130mm minimum to 210mm maximum Feed Tray Capacity (without loader fitted) Up to a maximum stack height of 35mm. -
Page 61: Index
Index SDC927D Index-1... - Page 62 Index About Your System 1-4 F731 Accumulation Area 1-6 About 1-4 Accumulator Components 1-6, 1-8 Input Frame 2-2 Controls 1-10 Ramp 2-2 Setup 2-2 Side Guides 2-15 Stoppages 4-3 Transport To 2-15 F734/F735 Arrow Buttons 1-10 About 1-5 Features F731 1-4 F734/F735 1-5 Feed Deck , 2-14, 2-16, 1-6, 4-6 Batch Count 3-2...
- Page 63 Index Normal Scanning 3-10 Ramp Accumulator 2-2, 2-15 red lever 1-6, 1-6–1-10, 1-6–1-10 Reverse Scanning 3-10 Run Confirm Button 1-10 OMR— See Programming/Scanning Running the System 2-17 Operator Display 1-6 Operator Maintenance 4-8 Operator Note 1-4 Orientation 2-16, 3-3, 3-6, 3-7, 3-12, 3-14, 4-6 Outsort 2-16, 2-17 Safety 1-2 Scan Error Screens 4-8...
- Page 64 Index Index-4 SDC927D...
- Page 66 For Service or Supplies: PB Form SDC927D (9-22) © Pitney Bowes Limited, 2022 We have made every reasonable effort to assure the accuracy and usefulness of this guide, however we cannot assume responsibility for errors or omissions or liability for the misuse or misapplication of our products.
Need help?
Do you have a question about the F767 and is the answer not in the manual?
Questions and answers