Cox Universal Remote Control Manual & Codes
- User manual (48 pages) ,
- User manual (28 pages) ,
- User manual (52 pages)
Advertisement
- 1 INTRODUCTION
- 2 FEATURES AND FUNCTIONS
- 3 INSTALLING BATTERIES
- 4 PROGRAMMING DEVICE CONTROL
- 5 PROGRAMMING TV/VCR COMBO CONTROL
- 6 MANUFACTURER'S CODES
- 7 SEARCHING FOR YOUR CODE
- 8 CHECKING THE CODES
- 9 PROGRAMMING ID LOCK
- 10 PROGRAMMING CHANNEL CONTROL LOCK
- 11 USING THE MASTER POWER KEY
- 12 RE-ASSIGNING DEVICE KEYS
- 13 CHANGING VOLUME LOCK
- 14 TROUBLESHOOTING
- 15 ADDITIONAL INFORMATION
- 16 Documents / Resources
INTRODUCTION
The Cox Universal Remote Control by Universal Electronics is our latest generation universal remote control. It is designed with sophisticated technology that will allow you to consolidate the clutter of all of the original remote controls in your home entertainment system. Moreover, it's packed with easy-to-use features such as:
- Preprogrammed to operate the cable converter supplied by Cox Communications
- Preprogrammed interactive technology links hot keys to your interactive service
- Master Power key for master on/off control of all of your equipment with a single keystroke
- Cable ID Lock to lock your remote control for use only with the cable converter
- Channel Lock to lock channel selection only to the cable converter
- Code Search to help program control of older or discontinued components
- Code library for video and audio devices
- Color-coded keys to quickly locate popular functions
Before using the product, you will need to program it to operate the specific home entertainment devices you wish to control. Follow the instructions detailed in this manual to set up your unit and then start enjoying your new remote control.
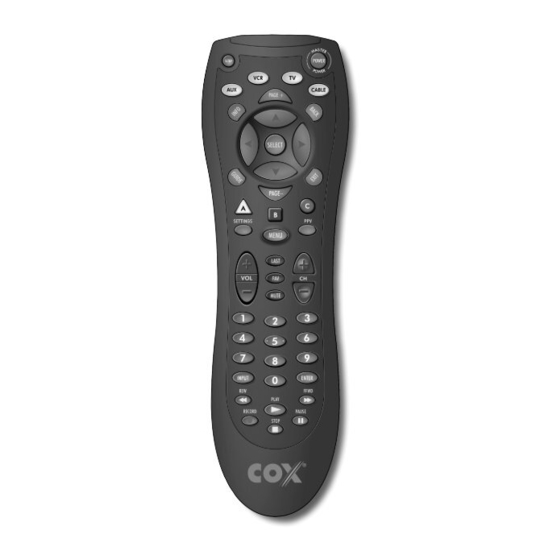
FEATURES AND FUNCTIONS
Use the illustration below to locate features on the Cox Universal Remote Control and then study the Key Charts (on the next two pages) to learn how they function.

Key Charts
 | Use SETUP for all programming sequences. |
 | Press POWER once to turn on or off a home entertainment device. Press and hold MASTER POWER for 3 seconds to turn on or off all home entertainment devices (see Using The Master Power Key). |
 | Press AUX, VCR, TV, or CABLE once to select a home entertainment device to control. Each key has an embedded LED (red light) that blinks upon selection and indicates that the remote control is working and is sending signals. |
 | Use INFO to display the current channel and program information. |
 | Use PAGE+ to page up through menu screens and program guide. |
 | Press BACK once to show the previous page while using the interactive service. |
 | Use the Cursor keys to move the cursor in the program guide and menu screens and to navigate within the interactive service. Use SELECT to choose options, PPV events, and to tune programs from the program guide. |
 | Use GUIDE to display the program guide. |
 | Use PAGE- to page down through menu screens and program guide. |
 | Use EXIT to exit out of your cable converter's menu and guide. |
 | Use A, B, or C to access additional cable features (see your cable converter's manual). |
 | Use SETTINGS to access additional cable features (see your cable converter's manual). |
 | Press MENU once to display the available interactive services. |
 | Press PPV to view the available Pay-Per-View event. |
 | Use VOL+ (or VOL-) to raise (or lower) the sound volume. |
 | Press LAST once to recall the last channel. |
 | Use FAV to cycle through your favorite channels stored in your cable converter. |
 | Press MUTE once to turn the sound off or on. |
 | Use CH+ (or CH-) to select the next higher (or lower) channel. |
 | Use INPUT to control the input select feature on most TVs. |
 | Press ENTER once after entering channel numbers on some TVs. |
 | Use the keypad (0 ~ 9) to directly select channels (e.g., 09 or 31). |
 | In the VCR and TV modes, use REW, PLAY, FFWD, STOP, and PAUSE to control your VCR, DVD player, or PVR. To record a program in the VCR or AUX mode, press RECORD twice. In the CABLE mode, use these keys (except RECORD) to control VOD (Video On Demand). |
INSTALLING BATTERIES


- On the back of the remote control, push the tab and lift off the battery cover.
- Obtain two (2) fully-charged AA alkaline batteries. Match the + and – marks on the batteries to the + and – marks in the battery case, then insert the new batteries.
- Align the cover's keys with the case's holes and press the cover back into place. The tab should click when the cover is locked.
- Test the unit by pressing POWER and any mode key (e.g.,AUX,VCR,TV,or CABLE).If the batteries are inserted correctly, the selected mode key will blink once.
NOTE: Whenever batteries need replacement, the remote control will cease to operate. Simply replace the batteries and the remote control will be restored to its full functionality, complete with your favorite settings.
PROGRAMMING DEVICE CONTROL
The Cox Universal Remote Control is preprogrammed to operate your cable converter, an RCA TV, an RCA VCR, and a Pioneer audio receiver. To control devices other than the default brands, perform the following steps; otherwise skip this section:
NOTES: To control a DVD player, program the VCR or AUX key. To control a PVR, program the VCR key. To control a stereo amplifier or receiver, program the AUX key. For TV/VCR Combo control, skip this section and perform the instructions on the next page.
If you have another brand of cable converter and interactive service you would like to control, you'll first need to unlock the cable ID Lock before changing the converter code – see "Programming ID Lock".
- Turn on a device and, if applicable, insert video media,(e.g.,cassette or disc).
NOTE: Please read steps 2-4 completely before proceeding. Highlight or write down the codes and device you wish to program before moving on to step 2. - On the remote control, press a device key once
(e.g.,AUX,VCR,TV,or CABLE).Press and hold![]() SETUP until the selected mode key blinks twice, then release SETUP.
SETUP until the selected mode key blinks twice, then release SETUP. - Use the Manufacturer's Codes (starting) to locate the the type of device and brand name and then enter the first four-digit code for your device. If performed correctly, the selected mode key will blink twice.
NOTE: If the selected mode key emits a long blink, the code is invalid. Repeat steps 2 through 3 and try entering the same code again. - Aim the remote control at the device and press
![]() POWER once. The device should turn off. If it does not, repeat steps 2-3, trying each code for your brand until you find one that works. If it still does not work, try searching for the code (see Searching For Your Code).
POWER once. The device should turn off. If it does not, repeat steps 2-3, trying each code for your brand until you find one that works. If it still does not work, try searching for the code (see Searching For Your Code).
NOTE: If the device does not have a POWER key, press the![]() (Play) key.
(Play) key. - Repeat steps 1 through 4 for each device you want the the remote control to control. For future reference, write down each working device code in the following boxes:
![]()
 SETUP until the selected mode key blinks twice, then release SETUP.
 POWER once. The device should turn off. If it does not, repeat steps 2-3, trying each code for your brand until you find one that works. If it still does not work, try searching for the code (see Searching For Your Code).
PROGRAMMING TV/VCR COMBO CONTROL
If you own a TV/VCR Combo, perform the following instructions to control this device:
- Turn on your TV/VCR Combo and insert a video cassette.
- On the remote control, press
![]() VCR once. Press and hold
VCR once. Press and hold ![]() SETUP until the VCR key blinks twice, then release
SETUP until the VCR key blinks twice, then release ![]() SETUP.
SETUP. - Use the Setup Codes For TV/VCR Combos (on page 17) to locate the brand name and then enter the first four-digit code for your TV/VCR Combo. If you perform this procedure correctly, the VCR key will blink twice.
NOTE: If the VCR key did not blink twice after entering the code's last digit, then repeat steps 2 through 3 and try entering the same code again. - Aim the remote control at your TV/VCR Combo and press
![]() POWER once. The device should turn off. If it does not respond, repeat steps 2-3,trying each code listed for your brand until you find one that works. If it still does not work, try searching for the code (see Searching For Your Code).
POWER once. The device should turn off. If it does not respond, repeat steps 2-3,trying each code listed for your brand until you find one that works. If it still does not work, try searching for the code (see Searching For Your Code). - If you've located a TV/VCR setup code that works your TV/VCR Combo and a separate TV code is also listed, you'll need to program this code into the remote control to access volume control (see Programming Device Control).
If there is no separate TV code listed, you will need to perform the following steps to access volume control:
 VCR once. Press and hold
  SETUP until the VCR key blinks twice, then release
 - Press and hold
![]() SETUP until the VCR key blinks twice, then release
SETUP until the VCR key blinks twice, then release ![]() SETUP.
SETUP. - Enter
![]() 9 - 9 - 3.The
9 - 9 - 3.The ![]() VCR key will blink twice.
VCR key will blink twice. - Press VCR once. The VCR key will blink twice.
 VCR key will blink twice.
- For future reference, write down each working device code in the boxes below:
![]()

MANUFACTURER'S CODES
Setup Codes for TVs:
| AOC | 0030, 0019, 0052 |
| Abex | 0032 |
| Admiral | 0093, 0463 |
| Aiko | 0092 |
| Akai | 0030 |
| Alaron | 0179 |
| Ambassador | 0177 |
| America Action | 0180 |
| Ampro | 0751 |
| Anam | 0180 |
| Anam National | 0055 |
| Audiovox | 0451, 0180, 0092, 0623 |
| Baysonic | 0180 |
| Belcor | 0019 |
| Bell & Howell | 0154, 0016 |
| Bradford | 0180 |
| Brockwood | 0019 |
| Broksonic | 0236, 0463 |
| CCE | 0217 |
| CXC | 0180 |
| Candle | 0030, 0056, 0186 |
| Carnivale | 0030 |
| Carver | 0054 |
| Celebrity | 0000 |
| Cineral | 0451, 0092 |
| Citizen | 0060, 0030, 0056, 0092, 0186 |
| Concerto | 0056 |
| Contec | 0180, 0157 |
| Craig | 0180 |
| Crosley | 0054 |
| Crown | 0180 |
| Curtis Mathes | 0047, 0054, 0154, 0051, 0451, 0093, 0060, 0030, 0145, 0056, 0016, 0166, 0466, 0747 |
| Daewoo | 0451, 0019, 0092, 0623, 0624 |
| Daytron | 0019 |
| Denon | 0145 |
| Dumont | 0017, 0019 |
| Dwin | 0720, 0774 |
| Electroband | 0000 |
| Electrohome | 0381, 0389 |
| Emerson | 0154, 0236, 0463, 0180, 0178, 0019, 0179, 0038, 0177, 0623, 0624 |
| Envision | 0030 |
| Fisher | 0154 |
| Fujitsu | 0179, 0683 |
| Funai | 0180, 0179, 0171 |
| Futuretech | 0180 |
| GE | 0047, 0051, 0451, 0093, 0178, 0021, 0055, 0027, 0747 |
| Gibralter | 0017, 0030, 0019 |
| GoldStar | 0030, 0178, 0019, 0056, 0001, 0032 |
| Gradiente | 0053, 0056 |
| Grunpy | 0180, 0179 |
| Hallmark | 0178 |
| Harley Davidson | 0179 |
| Harman/Kardon | 0054, 0078 |
| Harvard | 0180 |
| Hitachi | 0145, 0056, 0016, 0032, 0038, 0151 |
| Infinity | 0054 |
| Inteq | 0017 |
| JBL | 0054 |
| JCB | 0000 |
| JVC | 0053 |
| KEC | 0180 |
| KTV | 0180, 0030, 0217 |
| Kaypani | 0052 |
| Kenwood | 0030, 0019 |
| Kloss | 0024, 0078 |
| Konka | 0628, 0632, 0638, 0703, 0707 |
| LG | 0056 |
| LXI | 0047, 0054, 0154, 0156, 0178, 0747 |
| Logik | 0016 |
| Luxman | 0056 |
| MGA | 0150, 0030, 0178, 0019 |
| MTC | 0060, 0030, 0019, 0056 |
| Magnavox | 0054, 0030, 0179, 0024, 0186, 0386 |
| Majestic | 0016 |
| Marantz | 0054, 0030 |
| Matsushita | 0250 |
| Megatron | 0178, 0145 |
| Memorex | 0154, 0250, 0463, 0150, 0178, 0179, 0056, 0016 |
| Midland | 0047, 0017, 0051, 0032, 0747 |
| Minutz | 0021 |
| Mitsubishi | 0093, 0150, 0178, 0019 |
| Motorola | 0093, 0055 |
| Multitech | 0180, 0217 |
| NAD | 0156, 0178, 0166 |
| NEC | 0030, 0019, 0056 |
| NTC | 0092 |
| Nikko | 0030, 0178, 0092 |
| Onwa | 0180 |
| Optimus | 0154, 0250, 0166 |
| Optonica | 0093 |
| Orion | 0236, 0463, 0179 |
| Panasonic | 0051, 0250, 0055 |
| Penney | 0047, 0156, 0051, 0060, 0030, 0178, 0021, 0019, 0056, 0027, 0032, 0747 |
| Philco | 0054, 0463, 0030, 0145, 0019 |
| Philips | 0054 |
| Pilot | 0030, 0019 |
| Pioneer | 0038, 0166, 0679 |
| Portland | 0019, 0092 |
| Princeton | 0717 |
| Prism | 0051 |
| Proscan | 0047, 0747 |
| Proton | 0178, 0052, 0466 |
| Pulsar | 0017, 0019 |
| Quasar | 0051, 0250, 0055 |
| RCA | 0047, 0051, 0093, 0019, 0038, 0090, 0679, 0747 |
| Radio Shack | 0047, 0154, 0180, 0030, 0178, 0019, 0056, 0032, 0747 |
| Realistic | 0154, 0180, 0030, 0178, 0019, 0056, 0032 |
| Runco | 0017, 0030, 0603 |
| SSS | 0180, 0019 |
| Sampo | 0030, 0032, 0052 |
| Samsung | 0060, 0030, 0178, 0019, 0056, 0032 |
| Sansei | 0451 |
| Sansui | 0463 |
| Sanyo | 0154, 0146 |
| Scimitsu | 0019 |
| Scotch | 0178 |
| Scott | 0236, 0180, 0178, 0019, 0179 |
| Sears | 0047, 0054, 0154, 0156, 0178, 0179, 0056, 0146, 0171, 0747 |
| Semivox | 0180 |
| Semp | 0156 |
| Sharp | 0093, 0157, 0386, 0688 |
| Shogun | 0019 |
| Signature | 0016 |
| Simpson | 0186 |
| Sony | 0000, 0111 |
| Soundesign | 0180, 0178, 0179, 0186 |
| Squareview | 0171 |
| Starlite | 0180 |
| Supreme | 0000 |
| Sylvania | 0054, 0030, 0381 |
| Symphonic | 0180, 0171 |
| TMK | 0178, 0056, 0177 |
| TNCi | 0017 |
| Tandy | 0093 |
| Tatung | 0055 |
| Technics | 0051, 0250 |
| Technol Ace | 0179 |
| Techwood | 0051, 0056 |
| Teknika | 0054, 0180, 0150, 0060, 0019, 0179, 0056, 0016, 0092, 0186 |
| Telefunken | 0056 |
| Toshiba | 0154, 0156, 0060, 1256 |
| Trical | 0157 |
| Universal | 0027 |
| Vector Research | 0030 |
| Victor | 0053 |
| Vidikron | 0054 |
| Vidtech | 0178, 0019 |
| Wards | 0054, 0030, 0178, 0021, 0019, 0179, 0056, 0016, 0027, 0111 |
| White Westinghouse | 0463, 0623, 0624 |
| Yamaha | 0030, 0019 |
| Zenith | 0017, 0463, 0016, 0092, 0624 |
Setup Codes for VCRs:
| Admiral | 0048, 0209 |
| Adventura | 0000 |
| Aiko | 0278 |
| Aiwa | 0037, 0000 |
| Akai | 0041 |
| America Action | 0278 |
| American High | 0035 |
| Asha | 0240 |
| Audiovox | 0037 |
| Beaumark | 0240 |
| Bell & Howell | 0104 |
| Broksonic | 0184, 0121, 0209, 0002, 0479 |
| CCE | 0072, 0278 |
| Calix | 0037 |
| Canon | 0035 |
| Carver | 0081 |
| Cineral | 0278 |
| Citizen | 0037, 0278 |
| Colt | 0072 |
| Craig | 0037, 0047, 0240, 0072 |
| Curtis Mathes | 0060, 0035, 0041, 0162, 0760 |
| Cybernex | 0240 |
| Daewoo | 0045, 0278 |
| Denon | 0042 |
| Dynatech | 0000 |
| Electrohome | 0037 |
| Electrophonic | 0037 |
| Emerex | 0032 |
| Emerson | 0037, 0184, 0000, 0121, 0043, 0209, 0002, 0278, 0479 |
| Fisher | 0047, 0104 |
| Fuji | 0035, 0033 |
| Funai | 0000 |
| GE | 0060, 0035, 0048, 0240, 0760 |
| Garrard | 0000 |
| Go Video | 0432 |
| GoldStar | 0037, 0038 |
| Gradiente | 0000 |
| HI-Q | 0047 |
| Harley Davidson | 0000 |
| Harman/Kardon | 0081, 0038 |
| Harwood | 0072 |
| Headquarter | 0046 |
| Hitachi | 0000, 0042, 0041 |
| Hughes Network Sys | 0042 |
| JVC | 0067, 0041 |
| Jensen | 0041 |
| KEC | 0037, 0278 |
| KLH | 0072 |
| Kenwood | 0067, 0041, 0038 |
| Kodak | 0035, 0037 |
| LXI | 0037 |
| Lloyd's | 0000 |
| Logik | 0072 |
| MEI | 0035 |
| MGA | 0240, 0043 |
| MGN Technology | 0240 |
| MTC | 0240, 0000 |
| Magnasonic | 0278 |
| Magnavox | 0035, 0039, 0081, 0000, 0149 |
| Magnin | 0240 |
| Marantz | 0035, 0081 |
| Marta | 0037 |
| Matsushita | 0035, 0162 |
| Memorex | 0035, 0037, 0048, 0039, 0047, 0240, 0000, 0104, 0209, 0162, 0046, 0479, 1162 |
| Minolta | 0042 |
| Mitsubishi | 0048, 0067, 0043 |
| Motorola | 0035, 0048 |
| Multitech | 0000, 0072 |
| NEC | 0104, 0067, 0041, 0038 |
| Nikko | 0037 |
| Noblex | 0240 |
| Olympus | 0035 |
| Optimus | 0037, 0048, 0104, 0162, 0432, 1162 |
| Orion | 0184, 0209, 0002, 0479 |
| Panasonic | 0035, 0162, 0225, 0002, 1162 |
| Penney | 0035, 0037, 0240, 0042, 0038 |
| Pentax | 0042 |
| Philco | 0035, 0209, 0479 |
| Philips | 0035, 0081, 0003 |
| Pilot | 0037 |
| Pioneer | 0067 |
| Polk Audio | 0081 |
| Profitronic | 0240 |
| Proscan | 0060, 0760 |
| Protec | 0072 |
| Pulsar | 0039 |
| Quarter | 0046 |
| Quartz | 0046 |
| Quasar | 0035, 0162, 1162 |
| RCA | 0060, 0035, 0048, 0240, 0042, 0149, 0760 |
| Radio Shack | 0000 |
| Radix | 0037 |
| Randex | 0037 |
| Realistic | 0035, 0037, 0048, 0047, 0000, 0104, 0046 |
| ReplayTV | 0001, 0616 |
| Runco | 0039 |
| STS | 0042 |
| Samsung | 0240, 0045 |
| Sanky | 0048, 0039 |
| Sansui | 0000, 0067, 0209, 0041, 0479 |
| Sanyo | 0047, 0240, 0104, 0046 |
| Scott | 0184, 0045, 0121, 0043 |
| Sears | 0035, 0037, 0047, 0000, 0042, 0104, 0046 |
| Semp | 0045 |
| Sharp | 0048 |
| Shintom | 0072 |
| Shogun | 0240 |
| Singer | 0072 |
| Sony | 0035, 0032, 0000, 0033, 0004 |
| Sylvania | 0035, 0081, 0000, 0043 |
| Symphonic | 0000 |
| TMK | 0240 |
| Tatung | 0041 |
| Teac | 0000, 0041 |
| Technics | 0035, 0162 |
| Teknika | 0035, 0037, 0000 |
| Thomas | 0000 |
| Tivo | 0003, 0636 |
| Toshiba | 0045, 0043 |
| Totevision | 0037, 0240 |
| Unitech | 0240 |
| Vector | 0045 |
| Vector Research | 0038 |
| Video Concepts | 0045 |
| Videosonic | 0240 |
| Wards | 0060, 0035, 0048, 0047, 0081, 0240, 0000, 0042, 0072, 0149, 0760 |
| White Westinghouse | 0209, 0072, 0278 |
| XR-1000 | 0035, 0000, 0072 |
| Yamaha | 0038 |
| Zenith | 0039, 0000, 0209, 0033, 0479 |
Setup Codes for TV/VCR Combos:
| Broksonic | 0002, 0479 (for TV use 0463) |
| Citizen | 0278 |
| Colt | 0072 |
| Curtis Mathes | 0035 (for TV use 0051) |
| Daewoo | 0278 (for TV use 0624) |
| Emerson | 0002, 0278 (for TV use 0624), 0479 (for TV use 0463) |
| Funai | 0000 |
| GE | 0035 (for TV use 0051), 0048 (for TV use 0093), 0060 (for TV use 0047), 0240 |
| GoldStar | 0037 (for TV use 0056) |
| Harley Davidson | 0000 |
| Hitachi | 0000 |
| Lloyd's | 0000 |
| Magnasonic | 0278 |
| Magnavox | 0000, 0081 (for TV use 0054) |
| Magnin | 0240 |
| Memorex | 0037, 0162 (for TV use 0250), 1162, 1262 |
| MGA | 0240 |
| Mitsubishi | 0048 (for TV use 0093) |
| Optimus | 0162 (for TV use 0250), 1162 |
| Orion | 0002, 0479 (for TV use 0463) |
| Panasonic | 0035 (for TV use 0051), 0162 (for TV use 0250), 1162 |
| Penney | 0035 (for TV use 0051), 0037 (for TV use 0056), 0240 |
| Quasar | 0035 (for TV use 0051), 0162 (for TV use 0250) |
| RCA | 0035 (for TV use 0051), 0048 (for TV use 0093), 0060 (for TV use 0047), 0240 |
| Sansui | 0000, 0479 (for TV use 0463) |
| Sanyo | 0240 |
| Sears | 0000, 0037 (for TV use 0056) |
| Sharp | 0048 (for TV use 0093) |
| Sony | 0000, 0032 (for TV use 0000) |
| Sylvania | 0081 (for TV use 0054) |
| Symphonic | 0000 |
| Thomas | 0000 |
| White Westinghouse | 0278 (for TV use 0624) |
| Zenith | 0000, 0479 |
Setup Codes for PVRs (Personal Video Recorders):
| Panasonic | 0002 |
| Philips | 0003 |
| Replay TV | 0001, 0002 |
| Sony | 0004 |
| TiVo | 0003, 0004 |
Setup Codes for Cable Converters:
| General Instrument | 0476 |
| Jerrold | 0476 |
| Pioneer | 0533, 0877 |
| Scientific Atlanta | 0477, 0877 |
Setup Codes for DVD Players:
| Apex | 0672 |
| Denon | 0490 |
| Fisher | 0670 |
| GE | 0522 |
| Gradiente | 0651 |
| Hitachi | 0573, 0664 |
| Hiteker | 0672 |
| JVC | 0558, 0623 |
| Kenwood | 0534, 0682 |
| Konka | 0711, 0719, 0720, 0721 |
| Magnavox | 0503, 0675 |
| Marantz | 0539 |
| Mitsubishi | 0521 |
| Onkyo | 0503 |
| Optimus | 0571 |
| Oritron | 0651 |
| Panasonic | 0490, 0632 |
| Philips | 0503, 0539 |
| Pioneer | 0525, 0571, 0632 |
| Proscan | 0522 |
| RCA | 0522, 0571 |
| Samsung | 0573 |
| Sharp | 0630 |
| Sony | 0533 |
| Technics | 0490 |
| Theta Digital | 0571 |
| Toshiba | 0503 |
| Yamaha | 0490, 0545 |
| Zenith | 0503, 0591 |
Setup Codes for Stereo Receivers:
| ADC | 0531 |
| Aiwa | 0121, 1089, 1405 |
| Capetronic | 0531 |
| Carver | 0042, 1089, 1189 |
| Casio | 0195 |
| Clarinette | 0195 |
| Denon | 1104, 1160 |
| Fisher | 0042 |
| Garrard | 0463 |
| Harman/Kardon | 0110, 0891 |
| JBL | 0110 |
| JVC | 0074 |
| Kenwood | 0186, 0042, 1027, 1313, 1569, 1570 |
| LXI | 0181 |
| Lloyd's | 0195 |
| MCS | 0039 |
| Magnavox | 0531, 0195, 0391, 1089, 1189 |
| Marantz | 0039, 1089, 1189 |
| Modulaire | 0195 |
| Nakamichi | 0097 |
| Onkyo | 0135 |
| Optimus | 0531, 0999, 0186, 0042, 0181, 0738, 0801, 1023 |
| Panasonic | 0039, 1518 |
| Penney | 0195 |
| Philips | 0391, 1089, 1189, 1269 |
| Pioneer | 0531, 0014, 0150, 0998, 1023 |
| Proscan | 1254 |
| Quasar | 0039 |
| RCA | 0531, 1023, 1254 |
| Realistic | 0195, 0181 |
| Sansui | 1089 |
| Sanyo | 0801 |
| Sharp | 0186 |
| Sherwood | 0491, 0502 |
| Sony | 0474, 1058, 1158, 1258 |
| Soundesign | 0999 |
| Sunfire | 1313 |
| Teac | 0463 |
| Technics | 0039, 1308, 1309, 1518 |
| Thorens | 1189 |
| Victor | 0074 |
| Wards | 0014 |
| Yamaha | 0176, 0186, 1176 |
| Yorx | 0195 |
| Zenith | 0857 |
Setup Codes for Stereo Amplifiers:
| GE | 0078 |
| Harman/Kardon | 0892 |
| JVC | 0331 |
| Luxman | 0165 |
| Marantz | 0321, 0892 |
| Nakamichi | 0321 |
| Optimus | 0395 |
| Philips | 0892 |
| Polk Audio | 0892 |
| Realistic | 0395 |
| Sansui | 0321 |
| Sony | 0689 |
| Soundesign | 0078 |
| Victor | 0331 |
| Wards | 0078 |
| Yamaha | 0354 |
SEARCHING FOR YOUR CODE
If your TV,VCR,Cable Converter or Auxiliary device does not respond to the Cox Universal Remote Control after trying all of the codes listed for your brand, or if your brand is not listed at all, try searching for your code.
For example, to search for a code for your TV:
- Turn on your TV.
- On the remote control, press
![]() TV once. Then press and hold
TV once. Then press and hold ![]() SETUP until the
SETUP until the![]() TV key blinks twice, then release
TV key blinks twice, then release ![]() SETUP.
SETUP. - Enter
![]() 9 - 9 - 1.The TV key will blink twice.
9 - 9 - 1.The TV key will blink twice. - Aim the remote control at the the TV and slowly alternate between pressing
![]() POWER and
POWER and ![]() TV. Stop when the TV turns off.
TV. Stop when the TV turns off.
NOTE: In the search mode, the remote control will send IR codes from its library to the selected device, starting with the most popular code first. - Press
![]() SETUP once to lock in the code.
SETUP once to lock in the code. - To search for the codes of your other devices, repeat steps 1 through 5,but substitute the appropriate key (i.e.,AUX,VCR,or CABLE) for the (Auxiliary, VCR,or Cable) device you are searching for.
 TV once. Then press and hold
  SETUP until the
 POWER and
  SETUP once to lock in the code.
CHECKING THE CODES
If you have set up the Cox Universal Remote Control using the Searching For Your Code procedure (on the previous page),you may need to find out which four-digit code is operating your equipment. For example, to find out which code is operating your TV:
- Turn on your TV.
- On the remote control, press
![]() TV once.
TV once.
Then press and hold![]() SETUP until the
SETUP until the ![]() TV key blinks twice, then release
TV key blinks twice, then release ![]() SETUP.
SETUP. - Enter
![]() 9 - 9 - 0.The TV key will blink twice.
9 - 9 - 0.The TV key will blink twice. - To view the code for the first digit, press
![]() 1 once. Wait 3 seconds and count the number of times the TV key blinks (e.g.,3 blinks = 3) and write down the number in the leftmost TV Code box (see below).
1 once. Wait 3 seconds and count the number of times the TV key blinks (e.g.,3 blinks = 3) and write down the number in the leftmost TV Code box (see below).
NOTE: If a code digit is "0", the selected mode key will not blink. - Repeat step 4 three more times for remaining digits. Use
![]() 2 for the second digit,
2 for the second digit,![]() 3 for the third digit, and
3 for the third digit, and ![]() 4 for the fourth digit. Finish writing down the code in the TV Code boxes below.
4 for the fourth digit. Finish writing down the code in the TV Code boxes below. - To check for other device codes, repeat steps 1 through 5,but substitute the appropriate key (i.e.,AUX,VCR,or CABLE) for the (Auxiliary, VCR,or Cable) device you are checking. Write down the codes in the appropriate boxes below.

 TV once.
 1 once. Wait 3 seconds and count the number of times the TV key blinks (e.g.,3 blinks = 3) and write down the number in the leftmost TV Code box (see below).
 2 for the second digit,
 3 for the third digit, and
  4 for the fourth digit. Finish writing down the code in the TV Code boxes below.
PROGRAMMING ID LOCK
The Cox Universal Remote Control is preprogrammed and locked at the factory to operate the cable converter and interactive service given to you by your cable company.
However, if you have another brand or model of cable converter and interactive service that you would like to control, then you'll need to perform the following steps to unlock the cable ID Lock, enter in a new manufacturer's code, and lock the ID Lock again.
- Turn on the Cable Converter.
- On the remote control, press
![]() CABLE once. Then press and hold
CABLE once. Then press and hold ![]() SETUP until the
SETUP until the ![]() CABLE key blinks twice, then release
CABLE key blinks twice, then release ![]() SETUP.
SETUP. - Enter
![]() 9 - 8 - 2.The CABLE key will blink four times.
9 - 8 - 2.The CABLE key will blink four times. - Perform the instructions in Programming Device Control to program device control for the desired cable converter and interactive service. Upon completion, perform the remaining steps (5 and 6) to again lock the ID lock.
- On the remote control, press
![]() CABLE once. Then press and hold
CABLE once. Then press and hold ![]() SETUP until the
SETUP until the ![]() CABLE key blinks twice, then release
CABLE key blinks twice, then release ![]() SETUP.
SETUP. - Enter
![]() 9 - 8 - 2.The
9 - 8 - 2.The ![]() CABLE key will blink twice.
CABLE key will blink twice.
 CABLE once. Then press and hold
  SETUP until the
 PROGRAMMING CHANNEL CONTROL LOCK
By default, the remote control's channel-control capabilities are locked to the cable converter. The affected keys are 0~9,CH+,CH-,ENTER,and LAST.This will guarantee that you do not inadvertently change a channel on your TV or VCR.However, you can de-activate this feature to allow full access to these keys in the TV and VCR modes.
To De-Activate Channel Control Lock:
- On the remote control, press
![]() CABLE once. Then press and hold
CABLE once. Then press and hold ![]() SETUP until the
SETUP until the ![]() CABLE key blinks twice, then release
CABLE key blinks twice, then release ![]() SETUP.
SETUP. - Enter
![]() 9 - 7 - 3.The
9 - 7 - 3.The ![]() CABLE key will blink twice.
CABLE key will blink twice. - Press
![]() CH- once. The
CH- once. The ![]() CABLE key will blink four times.
CABLE key will blink four times. - Now, the remote control will provide TV and VCR channel-control capabilities while in the TV or VCR mode.
NOTE: This feature does not affect the AUX mode.
 CH- once. The
 To Re-Activate Channel Control Lock:
- On the remote control, press
![]() CABLE once. Then press and hold SETUP until the
CABLE once. Then press and hold SETUP until the ![]() CABLE key blinks twice, then release SETUP.
CABLE key blinks twice, then release SETUP. - Enter
![]() 9 - 7 - 3.The
9 - 7 - 3.The ![]() CABLE key will blink twice.
CABLE key will blink twice. - Press
![]() CH+ once. The
CH+ once. The![]() CABLE key will blink twice.
CABLE key will blink twice. - Now, regardless of what mode you select (i.e.,TV,VCR,or CABLE),only the channel control capability of your cable converter will be accessible.
NOTE: This feature does not affect the AUX mode.
 CH+ once. The
USING THE MASTER POWER KEY
The Cox Universal Remote Control is equipped with a unique feature that allows you to sequentially turn on or off all of your home entertainment devices with a single key press as follows:
- Point the remote control at the devices.
- Press and hold
![]() MASTER POWER for 3 seconds to sequentially turn on or off all home entertainment devices. Depending on what mode is currently selected, the remote control will send IR commands to the devices in the following order:
MASTER POWER for 3 seconds to sequentially turn on or off all home entertainment devices. Depending on what mode is currently selected, the remote control will send IR commands to the devices in the following order: Start Mode Device On/Off End Mode AUX Cable, TV,VCR CABLE VCR Auxiliary, Cable, TV CABLE TV VCR,Auxiliary, Cable CABLE CABLE TV,VCR,Auxiliary CABLE
 MASTER POWER for 3 seconds to sequentially turn on or off all home entertainment devices. Depending on what mode is currently selected, the remote control will send IR commands to the devices in the following order:
 For example, if TV is selected, pressing and holding MASTER POWER for 3 seconds will turn off the VCR,an auxiliary device, and the Cable converter.
NOTE: The remote control always defaults to the CABLE mode after all devices are turned off. Therefore, the initial power-on sequence will always be TV,VCR, and an auxiliary device, if no other device key is pressed first.
RE-ASSIGNING DEVICE KEYS
The Cox Universal Remote Control can be set up to control a second TV or VCR, or any combination of up to four home entertainment devices. For example, to have the unit control a TV, a Cable Converter, and two VCRs, you will need to re-assign the unused AUX key to operate the second VCR as follows:
- On the remote control, press
![]() VCR once. Then press and hold
VCR once. Then press and hold ![]() SETUP until the
SETUP until the ![]() VCR key blinks twice, then release
VCR key blinks twice, then release ![]() SETUP.
SETUP. - Enter
![]() 9 - 9 - 2.The
9 - 9 - 2.The ![]() VCR key will blink twice.
VCR key will blink twice. - Press
![]() VCR once, then press
VCR once, then press ![]() AUX once. The
AUX once. The ![]() VCR key will blink twice.
VCR key will blink twice. - The AUX key is now ready to be programmed for your second VCR.See Programming Device Control.
 VCR once. Then press and hold
  SETUP until the
  AUX once. The
 To re-assign other device keys, repeat steps 1 to 4 and substitute the key sequence using the following chart:
| To Re-Assign | Perform Key Sequence |
| TV as 2nd VCR key: | SETUP - 9 - 9 - 2 - VCR - TV |
| TV as 2nd Auxiliary key: | SETUP - 9 - 9 - 2 - AUX - TV |
| TV as 2nd Cable key: | SETUP - 9 - 9 - 2 - CABLE - TV |
| TV back to TV: | SETUP - 9 - 9 - 2 - TV - TV |
| VCR as 2nd TV key: | SETUP - 9 - 9 - 2 - TV - VCR |
| VCR as 2nd Cable key: | SETUP - 9 - 9 - 2 - CABLE - VCR |
| VCR back to VCR: | SETUP - 9 - 9 - 2 - VCR - VCR |
| AUX as 2nd TV key: | SETUP - 9 - 9 - 2 - TV - AUX |
| AUX as 2nd VCR key: | SETUP - 9 - 9 - 2 - VCR - AUX |
| AUX as 2nd Cable key: | SETUP - 9 - 9 - 2 - CABLE - AUX |
| AUX back to AUX: | SETUP - 9 - 9 - 2 - AUX - AUX |
Upon completion of a re-assignment, the selected mode key will blink twice to confirm your selection. Then, you'll need to program device control (see Programming Device Control).
CHANGING VOLUME LOCK
The Cox Universal Remote Control is set to control volume of a device through your TV while in the TV,VCR,or Cable mode. However, in the Auxiliary mode, you will still have separate control of of your auxiliary device's volume.
If your TV is not remote controllable, or if you would like the volume to be controlled by a different device, you can change the Volume Lock setting to control a volume through a non-associated mode (e.g.,through the cable in the TV mode).
To change Volume Lock to CABLE mode:
- On the remote control, press
![]() CABLE once. Then press and hold
CABLE once. Then press and hold ![]() SETUP until the
SETUP until the ![]() CABLE key blinks twice, then release
CABLE key blinks twice, then release ![]() SETUP.
SETUP. - Enter 9 - 9 - 3.The
![]() CABLE key will blink twice.
CABLE key will blink twice. - Press
![]() CABLE once. It will blink twice.
CABLE once. It will blink twice. - Now, whenever you press VOL+,VOL-,or MUTE,volume will be controlled by your Cable Converter.
 CABLE once. Then press and hold
 To change Volume Lock to TV mode:
- On the remote control, press
![]() TV once. Then press and hold SETUP until the
TV once. Then press and hold SETUP until the ![]() TV key blinks twice, then release
TV key blinks twice, then release ![]() SETUP.
SETUP. - Enter
![]() 9 - 9 - 3.The
9 - 9 - 3.The ![]() TV key will blink twice.
TV key will blink twice. - Press
![]() TV once. It will blink twice.
TV once. It will blink twice. - Now, whenever you press VOL+,VOL-,or MUTE,volume will be controlled by your TV.
 TV once. Then press and hold SETUP until the
 To change Volume Lock to VCR mode:
- On the remote control, press
![]() VCR once. Then press and hold
VCR once. Then press and hold ![]() SETUP until the
SETUP until the ![]() VCR key blinks twice, then release
VCR key blinks twice, then release ![]() SETUP.
SETUP. - Enter
![]() 9 - 9 - 3.The
9 - 9 - 3.The ![]() VCR key will blink twice.
VCR key will blink twice. - Press
![]() VCR once. It will blink twice.
VCR once. It will blink twice. - Now, whenever you press VOL+,VOL-,or MUTE,volume will be controlled by your VCR.
To change Volume Lock to AUX mode:
NOTE: Performing these steps will allow you to access the volume control of your auxiliary device in all modes.
- On the remote control, press
![]() AUX once. Then press and hold
AUX once. Then press and hold ![]() SETUP until the
SETUP until the ![]() AUX key blinks twice, then release
AUX key blinks twice, then release ![]() SETUP.
SETUP. - Enter
![]() 9 - 9 - 3.The AUX key will blink twice.
9 - 9 - 3.The AUX key will blink twice. - Press
![]() AUX once. It will blink twice.
AUX once. It will blink twice. - Now, whenever you press VOL+,VOL-,or MUTE, the volume will be controlled by your auxiliary device.
TROUBLESHOOTING
PROBLEM: Mode key does not blink when you press a key.
SOLUTION: Replace the batteries with two (2) new AA alkaline batteries.
PROBLEM: Mode key blinks when you press a key, but home entertainment device does not respond. SOLUTION: Make sure you are aiming the remote control at your home entertainment device and that you are within 15 feet of the device you are trying to control.
PROBLEM: The remote control does not control home entertainment devices or commands are not performing properly.
SOLUTION: Try all listed codes for the device brand being set up. Make sure all devices can be operated with an infrared remote control.
PROBLEM: TV/VCR combo does not respond properly.
SOLUTION: Use the VCR codes for your brand. Some combo units may require both a TV code and a VCR code for full operation.
PROBLEM: No volume on a second TV.
SOLUTION: Follow instructions in Changing Volume Lock (see previous page).
PROBLEM: CH+, CH –, and LAST do not work for your RCA TV.
SOLUTION: Due to RCA design (1983-1987), only the original remote control will operate these functions.
PROBLEM: Changing channels does not work properly.
SOLUTION: If original remote control required pressing ENTER to change channels, press ENTER on the remote control after entering a channel number.
PROBLEM: Tried "Search Method" and still could not find a working code.
SOLUTION: Try the "Search Method" again after clearing out the device key as follows: Press and hold SETUP until mode key blinks twice, then release. Next enter 9 - 9 - 2. Then press and release the mode key to be cleared twice.
PROBLEM: Remote control does not turn on Sony or Sharp TV/VCR Combo.
SOLUTION: For power on, these products require programming TV codes on the remote control. For Sony, use TV code 0000 and VCR code 0032. For Sharp, use TV code 0093 and VCR code 0048.
ADDITIONAL INFORMATION
This product does not have any user-serviceable parts. Opening the case, except for the battery cover, may cause permanent damage to your Cox Universal Remote Control.
Copyright 2001 by Universal Electronics Inc. No part of this publication may be reproduced, transmitted, transcribed, stored in any retrieval system, or translated to any language, in any form or by any means, electronic, mechanical, magnetic, optical, manual, or otherwise, without prior written permission of Universal Electronics Inc.

Documents / ResourcesDownload manual
Here you can download full pdf version of manual, it may contain additional safety instructions, warranty information, FCC rules, etc.
Advertisement


Need help?
Do you have a question about the Universal Remote Control and is the answer not in the manual?
Questions and answers