Advertisement
CHARGE ME NOW

Before using or storing, plug your Goal Zero Yeti into the wall until it is fully charged. Keep your Goal Zero Yeti plugged in when not in use. For more tips and tricks on keeping your battery healthy, see the BATTERIES 101 section.
IMPORTANT SAFETY INSTRUCTIONS

Read all instructions and cautions carefully before use to avoid personal injury or damage to the unit and any connected products
Observe all Input/Output connectors ratings: To avoid fire or electrical shock hazard, observe all ratings on unit, and products you intend to use; check manuals for more information.
Use in a ventilated area: Ensure proper ventilation while in use and do not obstruct fan openings on unit. Inadequate ventilation may cause damage to the unit. Do not stack anything on top of the unit in storage or in use.
DO NOT operate in wet conditions: In order to avoid short circuits or electric shock do not allow unit to get wet. Let unit dry completely before using.
Keep the unit clean and dry: Inspect the unit for dirt, dust, or moisture on a regular basis.
Shock or Fire Hazard: This Yeti generates the same potentially lethal AC power as a normal household wall outlet. Please use it carefully just like using a normal AC outlet on the wall.
DO NOT insert foreign objects into outputs or ventilation holes.
DO NOT attempt to replace the internal battery with anything other than the authorized replacement battery available from Goal Zero.
Any manipulation to the unit or its components will void all warranties.
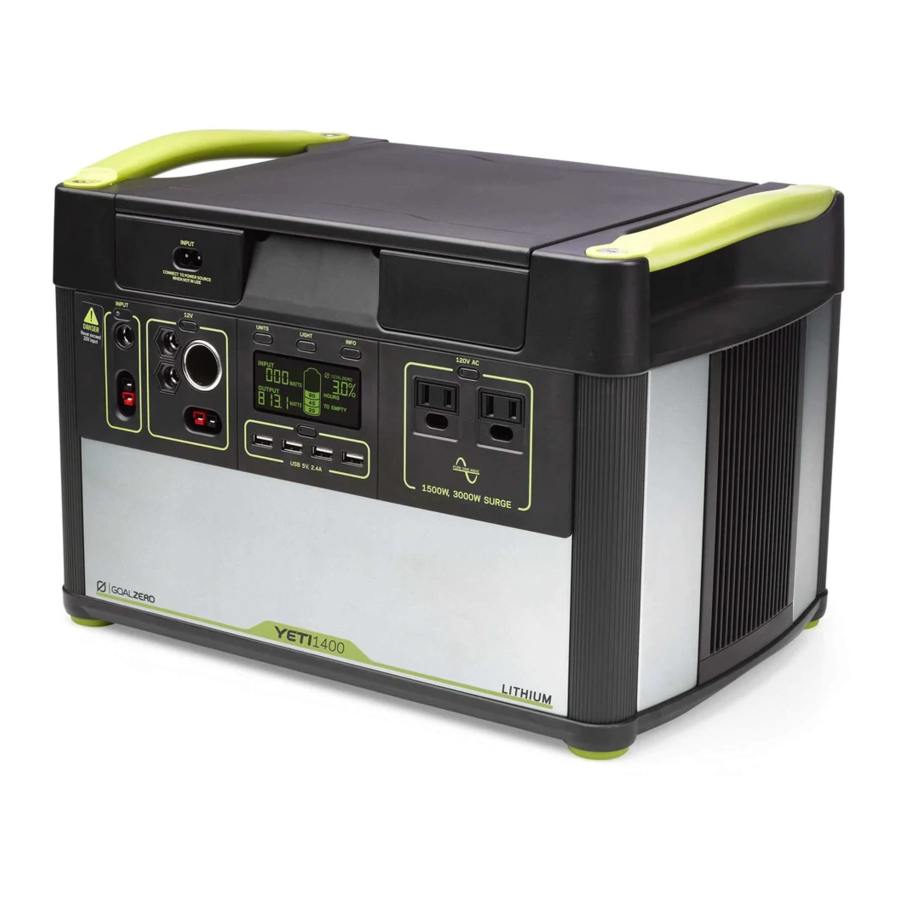
Get To Know Your Gear

- 8mm Input for Charging from Goal Zero Solar Panels, or AC
- Input for AC Charging
- Interactive Buttons and LCD Screen
- Anderson Power Pole Input for Charging from Goal Zero Solar Panels. (adapter may be required)
- 12V Outputs
- USB-C Power Delivery 5/12/20V, up to 3A (60W)
- USB 5V, up to 2.4A (12W)
- USB-C 5V, 3A (15W)
- AC Outputs
How it Works

CHARGE IT:
- Solar (Sold separately) 4.5 Hours (Based off max input)
- Hours
WHAT IT POWERS
- 12V LED 465+ Hours
- Laptop 23x
- Fridge 23+ Hours
- + MORE
CHARGE ME NOW: Before using or storing, plug your Goal Zero Yeti into the wall until it is fully charged. Keep your Goal Zero Yeti plugged in when not in use. For more tips and tricks on keeping your battery healthy, see the BATTERY 101 section.
When charging your Goal Zero Yeti you will notice a battery segment blinking in the display. This indicates the current charge status. Once your Goal Zero Yeti is fully charged, all battery segments will be lit and remain solid. As long as there is more power going into the Goal Zero Yeti than is being pulled from the output ports, the display will also indicate an estimated time until fully charged. This is an estimated time based on the power input and output numbers at that time; it will gradually adjust to a shorter or longer time as the average charge or discharge rates fluctuate.
Charging from Solar
When solar recharging your Goal Zero Yeti Lithium, take note of the voltages of the solar panels and do not exceed 22V. Individual solar panels, or solar panels chained in series in excess of 22V cannot be used with the Goal Zero Yeti Lithium and can cause serious damage to the unit. For help on chaining solar panels, call our Customer Solutions Center at 888-794-6250.
There are three different inputs you can use when charging your Goal Zero Yeti from solar, two of which are located in the "INPUT" area on the left side of the Goal Zero Yeti faceplate and a third one located inside the storage compartment under the top lid. One of the front ports and the port inside the storage compartment are round 8mm ports designed to be used with Goal Zero Solar Panels. Each input port can handle up to 120W. The Anderson Power Pole port is designed to be used with larger or higher power solar panels and can handle 360W of power, which is the total capacity for power across all input ports.
- Place your solar panel where it will get as much direct sunlight as possible.
- Insert the blue-ringed solar panel plug into one of the INPUT ports, either on the front of the Goal Zero Yeti or in the storage compartment under the top lid. You will know the Goal Zero Yeti is charging when the blue LED light next to the INPUT port lights up, and the battery segments in the LCD BATTERY DISPLAY are blinking. The Goal Zero Yeti is fully charged when all battery segments stop blinking and remain solid.
- You can also connect the Goal Zero Yeti to solar panels using the Anderson PowerPole port and the appropriate adapter, next to the charging port.
- You can chain multiple Goal Zero Solar Panels together to reduce solar recharge times. Your Goal Zero Yeti is capable of taking in 120W of solar per input, no more than 360W combined.
- You can charge your Goal Zero Yeti with solar panels, and a wall charger at the same time.
Charging from the Wall
Using the included AC Wall Charger, plug your Goal Zero Yeti into any wall outlet. You will know the Goal Zero Yeti is charging when the blue LED light next to the INPUT port turns on, and battery segments in the BATTERY DISPLAY are blinking. The Goal Zero Yeti is fully charged when all battery segments stop blinking and remain solid. The Goal Zero Yeti should recharge from the wall in about 25 hours.
- The AC wall adapter comes in two pieces. Connect the two pieces by plugging the cable into the box.
- The AC cable can be plugged into the AC adapter while it's stored inside the storage compartment with the 8mm DC barrel connector plugged into the port inside the compartment, or it can be moved out of the compartment and plugged into the front panel input port.
- You can purchase an additional wall charger from Goal Zero for faster charge times.
The Goal Zero Yeti Lithium is not compatible recharging from a 12V source, it can result in damage to the unit, cable, as well as your vehicle.
Using your Goal Zero Yeti
How to use your Goal Zero Yeti
- Press the power button located above each port you will be using. **When not using certain ports, make sure to turn them off to conserve power.
- You'll know the port is turned on when the green LED light on the button is illuminated.
- Plug in your gear for power anywhere life takes you.
- If possible, keep your Goal Zero Yeti plugged into a power source when not in use.
- You can charge your Goal Zero Yeti, and run your gear at the same time.
Best-Use Strategy
When charging gear with your Goal Zero Yeti, take note of the LCD Battery Display. If you plug in devices that have a high power requirement (a large refrigerator), the charge level of your Goal Zero Yeti can drop very quickly and you may not get exactly 1400Wh of energy. Also, especially when using the AC power output, the Goal Zero Yeti will be converting the energy from the DC power of the battery to the AC power needed by your device. Although your Goal Zero Yeti has a highly efficient inverter, there is still some energy lost in the conversion and you will not get the full rated capacity of the battery. If you're experiencing shorter runtimes, you may want to check the device's power requirements, see TROUBLESHOOTING for help.
Cold Weather Usage
Cold temperatures (below freezing) can impact the Goal Zero Yeti's battery capacity. If you'll be out living off-grid in sub-zero conditions, we recommend keeping your Goal Zero Yeti in an insulated cooler, connected to a power source (solar panels), and charging your gear. The natural heat generated by the Goal Zero Yeti contained in an insulated cooler will keep battery capacity at its highest.
LCD Display
The built-in LCD display indicates four important things:

- INPUT shows the amount of power (watts) going into the Goal Zero Yeti while charging. If charging from solar, you'll see the watts change as you reposition the panels into/out of the sunlight.
- LO will be displayed if power flow is below a measurable amount.
- OUTPUT shows the amount of power (watts) your devices are using while plugged into the Goal Zero Yeti.
- TIME TO EMPTY/FULL shows the amount of time before your Goal Zero Yeti is completely charged or empty, depending on if the net amount of power going into the Goal Zero Yeti is positive or negative.
- BATTERY LEVEL shows 5 segments, approximating 20% - 40% - 60% - 80% -100% capacity. As you use your Goal Zero Yeti, segments will disappear from the display, indicating the remaining charge. When charging your Goal Zero Yeti you will notice a battery segment blinking. This indicates the current charge status. Once your Goal Zero Yeti is fully charged, all battery segments will be lit and remain solid. As long as there is more power going into the Goal Zero Yeti than is being pulled from the output ports, the display will also indicate an estimated time until fully charged. This is an estimated time based on the power input and output numbers at that time; it will adjust to a shorter or longer time if the charge or discharge rates fluctuate. Note that when you first plug in a power source, whether it's a solar panel or a wall charger, the Yeti may take a minute to detect and adjust its charge circuitry before it starts drawing power from the source.
- The WiFi symbol indicates the Yeti's WiFi is turned on. If flashing, the Yeti is ready to connect to a device.
Front Buttons
Pressing the LIGHT button will turn the display backlight on and off.
Pressing the UNIT button will scroll through different output and power consumption settings.
Pressing the INFO button will alternate the screen between showing the detailed battery state of charge percentage and the Time to Empty/Full.
Buttons Under Lid
Pressing the WiFi button will activate the Yeti's WiFi for connection to a device. For information on connecting your device to the Yeti, see the included Yeti App Start Up Guide.
Pressing and holding the RESET button will reset the WATT HOUR output counter.

Storage and Downtime Maintenance
Having your Goal Zero Yeti connected to a power source, like a solar panel or wall plug, between adventures or while in storage keeps its battery healthy and topped off. This prolongs battery life and will ensure your Goal Zero Yeti is charged and ready to go all day, every day.
If you can't keep your Goal Zero Yeti plugged into a power source during storage, fully-charge your Goal Zero Yeti every 3 months and store it in a cool, dry place. Failure to maintain your Goal Zero Yeti by following these steps can result in battery damage which will void the product warranty.
Technical Specifications
| Charge times: | |
| Goal Zero Boulder 50 | 56-112 hrs |
| Goal Zero Boulder 100 | 28-56 hrs |
| Goal Zero Boulder 200 briefcase | 14-28 hrs |
| Battery: | |
| Cell Chemistry | Li-ion NMC |
| Pack Capacity | Up to 1425Wh (~10.8V, up to 132Ah) |
| Single Cell Equivalent Capacity | Up to 396Ah @ 3.6V |
| Lifecycles | 500 Cycles to 80% capacity |
| Shelf-life | Charge every 3-6 months |
| Management System | PWM charge controller, low battery protection |
| Ports: | |
| USB-A Port (output) | 5V, up to 2.4A (12W max), regulated |
| USB-C Port (output) | 5V, up to 3.0A (15W max), regulated |
| USB-PD Port (output) | 5V, 12V, 20V, up to 3.0A (60W max), regulated |
| 6mm Port (output, 6mm) | 12V, up to 10A (120W max) |
| 12V Car Port (output) | 12V, up to 10A (120W max) |
| 12V Power Pole port (output) | 12V, up to 20A (240W max) |
| 120V AC Inverter (output, pure sine wave) | 120VAC 60Hz, 12.5A (1500W, 3000W surge) |
| 230V AC Inverter (output, pure sine wave) UNIVERSAL OR AUSTRALIA (TYPE 1) AC PLUGS |
230VAC 50Hz, 6.5A (1500W, 3000W surge) |
| Charging Port (input, 8mm) | 14-22V, up to 10A (120W max) |
| Power Pole Charging Port (input) | 14-22V, up to 30A (360W max) |
| Expansion Module port | Covered port under the lid. To be used with Goal Zero expansion modules only. |
| WiFi: | |
| RF Certification | FCC/CE/IC/TELEC/KCC/SRRC/NCC |
| Protocols | 802.11 b/g/n (802.11n up to 150 Mbps) |
| Frequency Range | 2.4~2.5 GHz |
| General: | |
| Weight | 43.7 lbs (19.8 kg) |
| Dimensions | 10.1 x 15.3 x 10.4 in (25.7 x 38.9 x 26.4 cm) |
| Operating Usage Temp. | 32-104 F (0-40 C) |
| Certs |  |
| Warranty | 12 months |
Frequently Asked Questions
What type of battery is in my Goal Zero Yeti?
Your Goal Zero Yeti uses custom designed Lithium Ion. Here are some basic facts about Lithium Ion batteries:
- Lithium Ion batteries can store and release a lot of energy in a short period of time. The batteries in your Goal Zero Yeti are in a protective enclosure with a sophisticated battery management and protection system controlling its terminals to the outside world.
- It is critical that your battery does not get wet as moisture and water can get into the battery cells behind the protection circuitry and bypass that protection.
How do I know if my Goal Zero Yeti is charged?
To check the charge level of your Goal Zero Yeti, refer to the LCD Battery Display. When lit up, you'll see a battery outline with 5 segments, indicating the current charge level. It is OK to use your Goal Zero Yeti even when it's not fully charged.
Why is the light on the AC button blinking?
A blinking light on the AC button indicates that at the current load, the AC inverter will be shutting off soon; you should also see RESERVE MODE blinking on the display. Recharge your Goal Zero Yeti as soon as possible to continue powering your device. Once the AC inverter has shut off, the Yeti will attempt to reset itself three times. After three attempts, the AC inverter will remain off until you physically reset it by pushing the AC button or by recharging the battery a small amount.
How do I know if my device will work with the Goal Zero Yeti?
First, you'll need to determine the amount of power your device requires. This may require some research on your end, a good internet search or examining the user guide for your device should suffice.
Second, you will need to check the capacity for the individual output ports. For example, the Goal Zero Yeti's AC port is powered by an inverter that allows for 1500W of power. This means if your device is pulling more than 1500W for an extended period of time, the Goal Zero Yeti's inverter will shut off. Another number to watch for is the surge rating of your device as compared to that of the port. The Goal Zero Yeti inverter has an advanced surge management system that will maximize its compatibility with various devices, but there will still be items that will surge at a higher rate, and for a longer time, than the Goal Zero Yeti can manage, in which case the port will turn itself off.
Finally, once you know your device is compatible, you'll want to determine how long you'll be able to power your gear from the Goal Zero Yeti. Here's a quick and dirty lesson in power.
All GOAL ZERO power packs and solar generators have a number in their name, ex.
Guide10 Plus Power Pack, Goal Zero Yeti 1400. These numbers refer to the Watt Hours (Wh), or the amount of energy that can be stored in each recharger, and how you'll know if your gear is compatible with each recharger. For example, a 200Wh recharger should run a 100W light for 2 hours (200/100=2). If your gear falls within the 1400Wh capacity of the Goal Zero Yeti, you'll want to check the restrictions on each of the output ports.
Another factor in the math is how much power is being converted going from the Goal Zero Yeti battery to the device you are powering/charging. In some situations, like when running a 12V device, such as the LAL 350, directly off the 12V port, there will be no conversion and so no additional losses. In using the USB ports to charge a phone, you add a layer of conversion (12V battery in the Goal Zero Yeti is being converted to a 5V USB output), which introduces around 10% of losses. When using the inverter, there are two layers of conversion (12V to high voltage, DC to AC). The least efficient way of using the battery in the Goal Zero Yeti is to use an AC-DC adapter off the AC ports, as is the case if you use a phone wall charger to charge your phone, as it adds yet another layer of conversion in the wall adapter.
So when you're deciding on what to power from your new GOAL ZERO recharger, do some research into your device's watt consumption. For more quick tips and learning tools, check out www.GoalZero.com/learn.html
Troubleshooting
If your devices are not recharging from your Goal Zero Yeti
- Ensure the Output Port has been turned on. The green LED light on the power button should be lit up.
- If any of the lights have turned red, this indicates a trip. Push the button again to reset it. The light will turn green when it is successfully reset.
- Check the Battery Display. If it is at 20% or below, charge your Goal Zero Yeti.
- Check the LCD Display for warning icons:
OVERLOAD: Power draw exceeds port's maximum allowance. Indicated by red light in the port's button.
![]() Temperature warning. Allow unit to cool.
Temperature warning. Allow unit to cool.
![]() Battery requires attention. Contact customer support. 1-888-794-6250
Battery requires attention. Contact customer support. 1-888-794-6250 - Verify your device is suitable for use with the Goal Zero Yeti:
- All of the Goal Zero Yeti output ports have their own max power capacity. Check the Goal Zero Yeti's Tech Specs to ensure your device is compatible.
- If you are still experiencing trouble with your Goal Zero Yeti, please call our Customer Solutions Center at 1-888-794-6250 or by email at support@goalzero.com.
If you are having trouble with WiFi connection
- Press and hold the WiFi button for approximately 3 seconds to force the Yeti into connection mode. The WiFi symbol on the screen will begin to flash.
- Reconnect your device to your Yeti following the instructions in the Goal Zero Yeti App.
Education
BATTERIES 101: GOAL ZERO utilizes the latest and greatest in battery technology to accompany you on all life's adventures. From the versatile and lightweight Lithuim Ion, to the robust and powerful Lead Acid, we've compiled some helpful tips to keep your GOAL ZERO batteries working their best.
- Batteries need exercise.
The best thing for any battery is to use it. Don't leave the battery sitting without being charged for extended periods of time. If you will be storing the Goal Zero Yeti without a charger, make sure it's fully charged before you put it away. - The "Battery Memory" myth.
Thanks to old Nickel-Cadmium (NiCd) batteries, there's a myth running around that you should completely drain your batteries before plugging them in for a recharge, called "deep cycling". Although true with NiCd batteries, the typical batteries you'll find in most of your gear today, including the advanced lithium and lead-acid batteries used in your GOAL ZERO rechargers, require no such draining. In fact, you should avoid deep cycling your batteries – it does more harm than good in most cases. - The "Stadium Effect".
The stadium effect occurs when recharging your batteries. You'll notice your battery quickly filling up in the beginning, then slowing down noticeably when trying to charge up the last several percentages. Think of how quickly a stadium fills up when the doors first open – there are hundreds of open seats so it's easy to find the one you want. Eventually there are only a few open seats here and there and people have to maneuver around to find the spot they want and filling those seats takes longer. The same theory applies to recharging batteries. It's easy for energy to flow in and take up empty space in the beginning, and as time goes on and there is less space available, it takes longer for the energy to fill in the holes. - Read the manual.
Yeah, it might be a long read, but the manual is the best place to find the dos and don'ts for the battery in your specific device. Reading your manual will ensure you're taking steps to keep your batteries happy and healthy.
SOLAR 101: GOAL ZERO makes it easy to recharge your gear from the sun – we didn't invent solar power, we perfected it. Some things to keep in mind when recharging your gear with solar power:
- Solar panels don't store power from the sun, they collect it.
We teach you to COLLECT – STORE – USE, which is the best way to utilize solar power to recharge your gear. COLLECT the sun's energy with a solar panel. STORE the power in a recharger. USE the recharger to power your gear, day or night. If you're really a diehard, you can plug your gear directly into the junction box located on the back of our NOMAD Solar Panels to recharge from the sun. - Not all solar charge times are created equal.
Most solar panel manufacturers calculate their recharge times with the following equation: Device Watt Hours/Solar Panel Watts = Solar Recharge Times. So theoretically, a 13 watt solar panel would recharge a 50 watt-hour recharger in 3.84 hours (50/13 = 3.84) – and this is the number you could find in marketing material for a solar panel. However, in order to standardize results across all manufacturers, these tests are completed in laboratory settings. The truth is, on a good, sunny day, you'll receive about 50-75% of your solar panel's rated wattage, and this is how the engineers at GOAL ZERO calculate the solar recharge times you see on our packaging. - Solar works, even in overcast conditions.
Solar panels utilize IR, UV, and visible rays from the sun that can penetrate through clouds. Although the efficiency of the solar panel will decrease in cloudy conditions, you'll still be collecting valuable power from the sun. - Keep away from shade and windows.
Although you should seek out the shade on sunny days, your solar panels will collect more power when fully exposed to the sunlight. Windows also have a habit of decreasing efficiency. So keep those panels outside and in the bright sunlight. - Proper alignment works wonders.
Keeping your solar panel angled toward the sun can dramatically increase solar efficiency.
Set it up and let Mother Nature do the rest.
Warranty & Contact
LIMITED WARRANTY
GOAL ZERO LLC warrants to the original consumer purchaser that this GOAL ZERO product will be free from defects in workmanship and material under normal consumer use during the applicable warranty period identified in Paragraph 2, below, subject to the exclusions set forth in Paragraph 5, below. This warranty statement sets forth GOAL ZERO's total and exclusive warranty obligation. We will not assume, nor authorize any person to assume for us, any other liability in connection with the sales of our products.
WARRANTY PERIOD
The warranty period for GOAL ZERO battery cells (whether purchased on a stand-alone basis or as part of another product) is 180 days. The warranty period for all other GOAL ZERO products and components is one (1) year. In each case, the warranty period is measured starting on the date of purchase by the original consumer purchaser. The sales receipt from the first consumer purchase, or other reasonable documentary proof, is required in order to establish the start date of the warranty period. If you completed the online GOAL ZERO Product Registration Form within 30 days after purchasing your product, that registration can also establish the start date of the warranty period (but warranty coverage is not conditioned upon such registration).
REMEDY
GOAL ZERO will repair or replace (at GOAL ZERO's option and expense) any GOAL ZERO product that fails to operate during the applicable warranty period due to a defect in workmanship or material.
LIMITED TO ORIGINAL CONSUMER BUYER
The warranty on GOAL ZERO's products is limited to the original consumer purchaser and is not transferable to any subsequent owner.
EXCLUSIONS
GOAL ZERO's warranty does not apply to (i) any product that is misused, abused, modified, damaged by accident, or used for anything other than normal consumer use as authorized in GOAL ZERO's thencurrent product literature, or (ii) any product purchased through an online auction house. GOAL ZERO's warranty does not apply to any battery cell or product containing a battery cell unless the battery cell is fully charged by you within seven (7) days after you purchase the product and at least once every 6 months thereafter.
HOW TO RECEIVE SERVICE
To obtain warranty service, you must contact our customer service team via telephone at (888) 7946250, or via email at support@goalzero.com. If our customer service team determines that further assistance is required, they will give you a Return Material Authorization ("RMA") number and will provide you with prepaid return shipping label that you can use to mail back your non-functioning item(s). You must properly package the product, clearly marking the RMA number on the package and including proof of your purchase date with the product. We will process your return and send your repaired or replacement product to you at our expense for product being shipped to locations in North America. For product purchased or being shipped outside of North America, please contact the local distributor from whom you purchased the product or email support@goalzero.com to obtain further distributor information.
IMPLIED WARRANTIES
THE LIMITED WARRANTY STATED HEREIN IS IN LIEU OF ALL OTHER EXPRESS WARRANTIES. IN NO EVENT SHALL ANY IMPLIED WARRANTIES, INCLUDING BUT NOT LIMITED TO ANY WARRANTIES OF MERCHANTABILITY, FITNESS FOR A PARTICULAR PURPOSE OR NON-INFRINGEMENT, EXTEND BEYOND THE APPLICABLE WARRANTY PERIOD IDENTIFIED IN PARAGRAPH 2, ABOVE. Some states do not allow limitations on how long an implied warranty lasts, so the above limitation may not apply to you. This warranty gives you specific legal rights, and you may also have other rights which vary from state to state.
EXCLUSIVE REMEDY; LIMITATION OF LIABILITY
The foregoing provisions state GOAL ZERO's entire liability, and your exclusive remedy, for any breach of warranty, express or implied. IN NO EVENT WILL GOAL ZERO BE LIABLE FOR ANY CONSEQUENTIAL OR INCIDENTAL DAMAGES ARISING FROM ANY USE OR MALFUNCTION OF ANY GOAL ZERO PRODUCT, OR FROM ANY BREACH OF WARRANTY, INCLUDING DAMAGE TO OTHER DEVICES. IN NO EVENT WILL GOAL ZERO's LIABILITY FOR ANY CLAIM, WHETHER IN CONTRACT, WARRANTY, TORT (INCLUDING NEGLIGENCE AND STRICT LIABILITY) OR UNDER ANY OTHER THEORY OF LIABILITY, EXCEED THE AMOUNT PAID BY YOU FOR THE GOAL ZERO PRODUCT. Some states do not allow the exclusion or limitation of incidental or consequential damages, so the above limitation or exclusion may not apply to you.

FREE EXTENDED WARRANTY
Get an ADDITIONAL YEAR of protection for your Goal Zero Yeti Lithium Portable Power Station by simply registering your product at:
GOALZERO.com/extendedwarranty
This gives you TWO TOTAL years of worry-free product coverage. It's free and easy peace of mind for you and your new power companion.

VideosGoal Zero Yeti Lithium 1400: Test and Review Video
Documents / Resources
References
Download manual
Here you can download full pdf version of manual, it may contain additional safety instructions, warranty information, FCC rules, etc.
Download GOAL ZERO Yeti 1400 Lithium Portable Power Station Manual
Advertisement


Need help?
Do you have a question about the Yeti 1400 and is the answer not in the manual?
Questions and answers