Advertisement

IMPORTANT SAFETY INFORMATION!
- Always practice safe firearm handling
- Always hold the forend of the firearm when shooting off of this shooting rest or any rest. If it is not held, the recoil can cause the forend to jump out of the front bag, possibly causing damage to the firearm or injuring the shooter.
CONTENTS

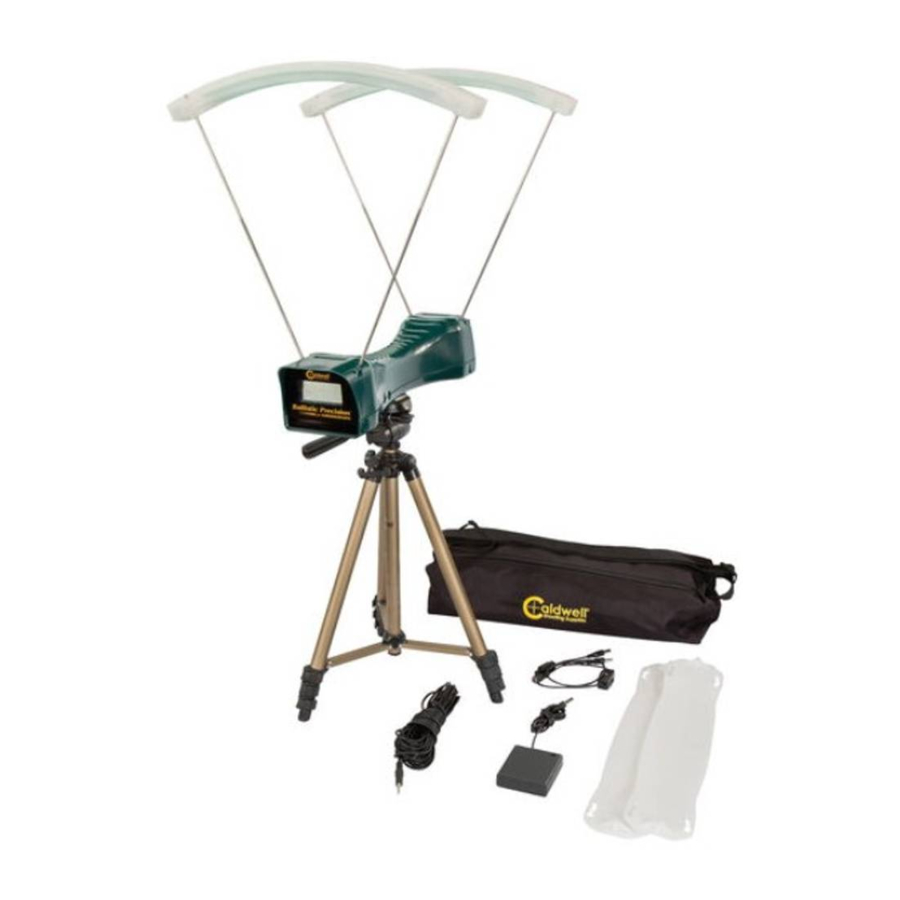
#721122 Premium Kit Contents:
1 - Chronograph
1 - Tripod
2 - Sun Shades
2 - IR LED Strips
1 - Carrying Case
1 - 15' Audio Jack Cable
1 - Battery pack
1 - LED Strip splitter cable
4 - Rods
#720001 Chronograph Contents:
1 - Chronograph
2 - Sun Shades
1 - Carrying Sack
1 - 15' Audio Jack Cable
4 - Rods
CHRONOGRAPH CONTENTS:
- Chronograph

- Sun Shades

- Carrying Sack

- 15' Audio Jack Cable

- Rods


PREMIUM KIT CONTENTS:
All Chronograph contents plus:
- Tripod

- Battery pack

- LED Strip splitter cable

- IR LED strips

- Carrying Case

- 110 Volt AC Adapter


SAFETY AND WARNINGS
READ THOROUGHLY ALL DIRECTIONS AND SAFETY INSTRUCTIONS INCLUDED IN THE PACKAGE. FAILURE TO COMPLY MAY RESULT IN AN UNSAFE FIREARM CONDITION THAT MAY CAUSE PROPERTY DAMAGE, PERSONAL INJURY OR DEATH.
TARGET MUST HAVE A SAFE BACKSTOP. ALWAYS FOLLOW ALL APPLICABLE SAFETY RULES WHILE USING THE CHRONOGRAPH, INCLUDING BUT NOT LIMITED TO:
- FIREARM AND SHOOTING SAFETY RULES
- AIRGUN, PAINTBALL GUN SAFETY RULES
- AMMUNITION RELOADING SAFETY RULES
- ARCHERY SAFETY RULES
IF YOU ARE NOT FAMILIAR WITH APPLICABLE RULES FOR YOUR APPLICATION CONSULT THE MANUFACTURER(S) OF THE FIREARM, AIRGUN, PAINTBALL GUN, BOW OR RELOADING EQUIPMENT/COMPONENT...
VELOCITY MEASUREMENTS SHOULD NOT BE USED TO CALCULATE COMBUSTION PRESSURES IN YOUR CARTRIDGE OR CHAMBER. AGAIN, DO NOT EXCEED PUBLISHED MAXIMUM POWDER LEVELS IN YOUR AMMUNITION.
DO NOT TRY TO PROTECT YOUR CHRONOGRAPH WITH ARMOR PLATING. BULLET RICOCHET FROM HITTING THIS PLATING COULD CAUSE PROPERTY DAMAGE, PERSONAL INJURY OR DEATH. CHRONOGRAPH COMPONENTS ARE REPLACEABLE.
ALL CHRONOGRAPH UNITS HAVE INHERENT UNCERTAINTY WHEN RECORDING VELOCITY MEASUREMENTS. SEVERAL UNCONTROLLABLE VARIABLES CAN AFFECT EACH MEASUREMENT AND CONTRIBUTE TO THIS UNCERTAINTY, INCLUDING SUNLIGHT INTENSITY, SUNLIGHT ORIENTATION, CLOUD COVER, WIND, SHADOWS, AND GROUND REFLECTIVITY OF CEMENT, WATER, OR SNOW, ETC. WHEN COLLECTING DATA, BE SUSPICIOUS OF ANY DATA POINTS THAT HAVE GREATER THAN 4% DIFFERENCE FROM THAT AMMO'S AVERAGE STRING VELOCITY.
SPECIAL CARE SHOULD BE TAKEN WHEN SHOOTING CERTAIN TYPES OF AMMUNITION. GAS CHECKS, WADS, SABOTS, ETC. CAN SEPARATE AND IMPACT YOUR CHRONOGRAPH CAUSING DAMAGE TO THE DEVICE.
AS WITH ANY ELECTRONIC DEVICE, WATER CAN DAMAGE CERTAIN COMPONENTS. TO PREVENT DAMAGE, DO NOT USE CHRONOGRAPH OUTSIDE WHEN IT IS RAINING WITHOUT BEING PROTECTED.
SPECIFICATIONS
- Velocity range 1 to 9000 FPS
- Power requirements: 9v battery (Not Included)
- Operating temperature: 20 – 120 degrees F
- Smart Phone Interface
ASSEMBLY
- Install a 9 volt battery
- Insert rod ends into Rod Pockets on the Chronograph housing
- Install Sun Shades on ends of rods, be sure to seat rod ends all the way into pockets on Sun Shades


OPERATION

- Place Chronograph on stable surface at the appropriate height for firing projectile through the shooting window. The Chronograph may be mounted on top of a Tripod using the ¼-20 threaded insert.
- Position the unit 10 to 15 feet in front of the muzzle of a firearm or if using with a bow, at least one full arrow length in front
- Align the Chronograph:
- Height, so that the projectile travels through the center of the shooting window
- Tilt Angle, so projectile travels parallel to the top surface of the housing
- Left/Right, so that projectile is in line with housing
- Turn the unit on by selecting feet per second (FPS) or meters per second (MPS) with the power switch
- (Optional) Connect to smart phone via included audio cable
- (Optional) Install Light Kit
- Remove Sun Shades and place LED Strip Housings on top of Rods
- Connect LED Strip Splitter Cable to each LED Strip
- Connect the Splitter Cable to either the Battery Pack or the 110 Volt AC Adapter
- Rotate the switch on the Splitter Cable to on, one visible red LED in each strip will illuminate.
NOTES (Premium kit ONLY):
Infrared (IR) LEDs provide the highest level of performance with the Chronograph sensors, IR light is not visible to the human eye so one visible red LED is included in each light strip for easy visual confirmation that the light kit is on and working.
The high output LEDs consume battery power rapidly, use high quality Alkaline or Lithium batteries. Depending on battery type and environmental conditions a set of batteries will only provide optimal light output for approximately 2 hours.
As a set of batteries loses power the red LEDs may still be partially visible even though the IR LEDs are not putting out an optimal level of light. If you notice errors or inconsistent readings, switch to 110 power or replace the batteries.
Use The 110 Volt AC adapter instead of batteries whenever possible.
READING THE DISPLAY
 Initial "ready" screen after startup sequence
 Projectile velocity reading – ready for next shot
 Duplicate reading alert (alternate flashing with shot velocity – ready for next shot
 Error Alert.
Err2: Projectile not recorded by front sensor
Err3: Projectile not recorded by rear sensor – ready for next shot
 Low battery alert – change battery
SMART PHONE CONNECTION
- Go to the appropriate application marketplace for your smartphone/ mobile device and search for "Caldwell Ballistic Precision Chronograph".
- Alternatively, http://www.battenfeldtechnologies.com/ provides direct links to the appropriate apps for the different mobile platforms supported by Caldwell.
- Once the app is installed you will see the Caldwell Ballistic Precision app icon in your smartphone home screen.

Connect 15' audio jack cable to side of Chronograph then connect other end to smartphone headphone jack.

APP FUNCTIONS
- Instant read out
- Note Log
- Temp, BP, Avg, SD, Min, Max, Spread, Shot/sec
- Save, email and text Shot Groups
- Imperial/Metric Units
- Zip Code location
TIPS

- Understand the flight of your bullet will be lower than your sight picture. Most scopes are mounted 1.5" higher than the centerline of the barrel. Always aim higher than the middle of the shooting area.
- Avoid low light conditions, such sunrise and sunset. During these times the extreme low angle of the sun can cause added variation due to reflections and low levels of light. Use of optional light kit will improve function in these conditions.
- Clean Lenses. Remove build-up of dust on the sensors. Use a Q-tip or canned air to clean the lenses, being especially careful not to scratch them.
- Ensure chronograph is level. This will make sure that the projectile height as it passes over each sensor opening is the same.
- Use a stable platform for the chronograph. A table will also work and so will a dedicated metal stand. A tripod works well to position and align the chronograph
- Avoid shooting over reflective surfaces like snow or some types of sand. May be able to reduce reflection by laying out a large, dark colored tarp under the chronograph setup in such instances.
- You'll get the best readings with even lighting. Best case scenario is overcast skies, where the light is already diffused by clouds.
- Remove Sun Shades in heavy overcast or shaded conditions. The Sun Shades are only necessary in sunny or partly cloudy conditions, and by removing them in other conditions you'll allow more light into the chronograph.
- On sunny days place the chronograph in the shadow of a building or opaque wall. Ensure the sensors have a clear view of the sky, but the chronograph itself is in the shade. You could alternatively add sun shields to create a shadow. The goal is to eliminate direct sunlight on the chronograph, while still ensuring the sensors have a direct view of the sky. However, avoid placing the chronograph in the shade of a tree. The uneven sunlight that filters through the tree will cause more problems than it will solve.
- Avoid florescent lighting. Florescent lighting will inadvertently trigger the projectile sensors and give false readings.
- Stand one arrow length away for bows and crossbows. Shoot arrows over the projectile sensors evenly so the arrow passes the same height over both sensors. Blunt arrow tips work best.
- For shotguns stand only 5 feet away. Shotgun blast may affect the projectile readings. Watch out for flying wads that might damage the chronograph.
- Paintball guns can be fired from any distance. You should be careful that no paint splatter gets on the projectile sensors.
- Optional Light Kit Infrared (IR) LEDs provide the highest level of performance with the Chronograph sensors, IR light is not visible to the human eye so one visible red LED is included in each light strip for easy visual confirmation that the light kit is on and working.
The high output LEDs consume battery power rapidly, use high quality Alkaline or Lithium batteries. Depending on battery type and environmental conditions a set of batteries will only provide optimal light output for approximately 2 hours.
As a set of batteries loses power the red LEDs may still be partially visible even though the IR LEDs are not putting out an optimal level of light. If you notice errors or inconsistent readings, switch to 110 power or replace the batteries.
Use The 110 Volt AC adapter instead of batteries whenever possible.
STOP!
If you have a problem with this product, DON'T RETURN IT TO THE STORE WHERE YOU PURCHASED IT. Contact customer service at...

5885 West Van Horn Tavern Road / Columbia, MO 65203
573-445-9200 / Email: sales@battenfeldtechnologies.com
Or visit our website @ www.battenfeldtechnologies.com
NOT WARRANTED AGAINST MISUSE, ABUSE, OR COMMERCIAL USE.
Limited Warranty
Every Caldwell product is warranted to be free of defects in materials and workmanship for a period of one (1) year from the date of original purchase. Caldwell will, at its option, repair or replace without charge, except for transportation costs, parts that fail under normal use and service when operated and maintained in accordance with out Instructions. This warranty does not apply to normal wear or to items whose life is dependent upon their use and care. This warranty is in lieu of all other warranties, expressed or implied and releases Caldwell, its affiliates, and its vendors from all other obligations and liabilities.
5885 West Van Horn Tavern Road / Columbia, MO 65203
573-445-9200 / Email: sales@battenfeldtechnologies.com

Documents / Resources
References
Download manual
Here you can download full pdf version of manual, it may contain additional safety instructions, warranty information, FCC rules, etc.
Advertisement


Need help?
Do you have a question about the 720001 and is the answer not in the manual?
Questions and answers