Advertisement
Quick Links
Advertisement

Subscribe to Our Youtube Channel
Summary of Contents for Verlinde Stagemaker Controllers R PRM SR Series
- Page 1 STAGEMAKER CONTROLLERS INSTALLATION MAINTENANCE STAGEMAKER CONTROLLER SERIES R-FL.. PRMSR VERLINDE se réserve le droit de modifier sans préavis les caractéristiques de son matériel 06/2004 VESEGBSM CONTROL R/PR VERLINDE reserves the right to alter or amend the above information without notice...
- Page 2 STAGEMAKER CONTROLLER Herewith we, VERLINDE S.A., 2 bd de l'Industrie, BP 59, F-28501 VERNOUILLET Cedex, Frankrijk Declare that the product STAGEMAKER CONTROLLER Series SC – R and FL Series R..PRMRR SERIES R - FL..PRMSR Manufacturing date : ……… Serial No.
-
Page 3: Table Of Contents
STAGEMAKER CONTROLLER CONTENT chapter description page Introduction What to do - What not to do Guarantee Identification Functional description Trouble shooting Specifications Attachments general layout drawings • R4PRM SR • R8PRM SR • R12PRM SR Electrical diagrams • R4PRM SR •... -
Page 4: Introduction
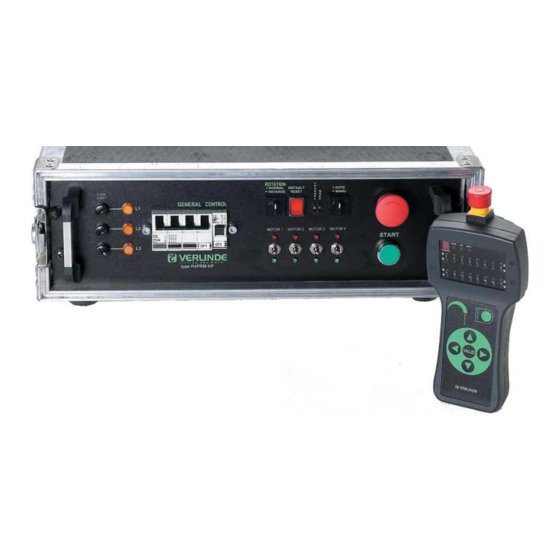
The STAGEMAKER ® controllers with radio remote series R..PRM SR and FL..PRMLV SR has been developed specifically for the control of VERLINDE STAGEMAKER ® chain hoists (motors) series SM5 and SM10 version A for direct control. The controller series R..PRM SR and FL..PRMLV SR are available with 4, 8 OR 12 channels and built into a compact suitcase, 19”... - Page 5 STAGEMAKER CONTROLLER WHAT TO DO • Mount the controller in a protective casing, (if standard casing is not supplied). • Handle the controller by its grips at the front or at side. (du t, • Store the controller in its normal operating position away from aggressive atmospheres humidity...).
-
Page 6: What To Do - What Not To Do
WHAT NOT TO DO • Never connect a STAGEMAKER controller to a power source other than specified on the unit. • Do not set down the controller without having an adapted support, to avoid damaging the components on the rear •... -
Page 7: Guarantee
STAGEMAKER CONTROLLER GUARANTEE Our STAGEMAKER controller series R..PRM SR and For the duration of the guarantee, the vendor FL..PRMLV SR are guaranteed for one year from the undertakes to replace or repair, free of charge, the parts, in his workshop, that are acknowledged to be date of delivery. -
Page 8: Identification
STAGEMAKER CONTROLLER IDENTIFICATION: Type codes Type No. of Subscription Housing Hoist channels connection R4PRM SR Direct control + remote 19" 3U rack in flight case multi-plug rear side R8PRM SR Direct control + remote 19" 3U rack in flight case multi-plug rear side R12PRM SR Direct control + remote... -
Page 9: Functional Description
STAGEMAKER CONTROLLER FUNCTIONAL DESCRIPTION Cable connections: • Connect an external power source with the main CE power plug. Be sure that the nature of this source corresponds to the supplied equipment, such as mentioned aside of the plug. • Connect the chain hoists through fan-out or multi cables with the controller series R..PRM SR’s outlets. - Page 10 STAGEMAKER CONTROLLER Group mode selection: Since the radio remote handheld has 16 channels as a standard, it is possible to use different configurations of controllers. For that purpose the controllers have a mode selector. The setting of this selector should be in accordance to under mentioned table.
- Page 11 STAGEMAKER CONTROLLER REMOTE OPERATING INSTRUCTION reset motion Up ▲ ▲ select confirm S C D deselect ▼ motion Down ▼ Starting procedure: The controller has to be in the standby mode with selector switch set to “auto” Pull out the red emergency stop button on the remote Push simultaneous on S and C Communication is valid if the channel indicator shows the same channel number as selected on the controller.
- Page 12 STAGEMAKER CONTROLLER Hoist selection - add: Select hoist by pressing on S once (both LED’s up/down lit) and press ▲ or ▼ once for selection of motion. The corresponding LED remains lit. Press C for confirmation, the corresponding LED will light. Repeat this for all hoists that are to be added;...
- Page 13 M O T O R 6 M O T O R 7 M O T O R 8 S T A R T VERLINDE type R8P HARTING M O T O R 1 - 4 M O T O R 1 - 8...
- Page 14 STAGEMAKER CONTROLLER FL model CONTROLLERS 1. Motor cables 10 or 20 M: code No. 52292663 or 52292664 2. Control cables 10 or 20 M: code No. 5229853 or 5229854 MOTOR 1 MOTOR 2 MOTOR 3 MOTOR 4 16-6h 16-6h 16-6h 16-6h 3P+PE IP44 3P+ PE IP44...
- Page 15 STAGEMAKER CONTROLLER CABLE SELECTION TABLE The table hereunder gives an indication of the maximum length of cables between controller and hoist (motor). They are calculated in accordance to NE 60 204 and worse case consideration 1.5mm² or 1.5²mm² + 2.5mm² sections 400V/50Hz 230V/50Hz L max (m)
- Page 16 STAGEMAKER CONTROLLER Accessories for R..PRM SR controllers Code Function Length Section Plugs Symbol drawing (mm²) elec. dwg 52292663 Motor extension cable 4G2.5 CEE 3P+T SMCA-04P-04P-100 Male – Female 52292664 Motor extension cable SMCA-04P-04P-200 52292667 Splitter (fan-out) 4x1.5 16P+T – CEE SMCA-16P-04P-005- 3P+T male –...
- Page 17 STAGEMAKER CONTROLLER 10 CABLE CONNECTION DATA Controllers R.. and FL.. single motor Controllers R.. multi cable, extension cable with CEE plugs for power cable for 4 motors Wires Colour Pin n° Wires Wire n° Pin n° L1 / U1 brown L2 / V1 blue L3 / W1...
-
Page 18: Trouble Shooting
STAGEMAKER CONTROLLER 11 TROUBLE SHOOTING If your controller doesn’t work, check; • the power source all three lamps should blink • the fuses switch bar in upper mode • thermal protection red default lights • if the emergency button is pressed turn anticlockwise and pull •...
Need help?
Do you have a question about the Stagemaker Controllers R PRM SR Series and is the answer not in the manual?
Questions and answers