Table of Contents
Advertisement
Available languages
Available languages
Quick Links
Advertisement
Table of Contents

Related Manuals for AYA ATV3F


Summary of Contents for AYA ATV3F
- Page 1 ATV3F Table vitrocéramique Ceramic Hob...
-
Page 3: Instructions D'installation
TABLE DES MATIERES CONSIGNES DE SECURITE IMPORTANTES -13- DESCRIPTION DE L’APPAREIL UTILISATION DE L’APPAREIL -14- CONSEILS DE CUISSON -20- REGLAGE DU NIVEAU DE PUISSANCE -21- -22- ENTRETIEN ET NETTOYAGE -23- GUIDE DE DEPANNAGE INSTRUCTIONS D’INSTALLATION -24-... -
Page 4: Consignes De Securite Importantes
FAITES UN GESTE ECOCITOYEN EN TRIANT VOS EMBALLAGES CARTON À LA FIN DE VIE DE VOTRE PRODUIT, PENSEZ À LE RAPPORTER DANS UN POINT DE COLLECTE OU DÉPOSER LE À LA DÉCHETERIE PROCHE DE VOTRE DOMICILE CET APPAREIL EST DESTINE A UN USAGE DOMESTIQUE UNIQUEMENT! Veuillez lire attentivement toutes les instructions avant la première utilisation et... - Page 5 effectués par un électricien qualifié. Un non-respect de ces instructions peut conduire à un choc électrique ou la mort. 1.1.2 Risque de coupure Soyez prudent! Les rebords du panneau sont tranchants. Une utilisation sans soin peut conduire à des blessures ou des coupures. 1.1.3 Précautions de sécurité...
-
Page 6: Utilisation Et Maintenance
1.2 UTILISATION ET MAINTENANCE 1.2.1 Risque de choc électrique pas une table de cuisson cassée ou fissurée. Si la surface de la table de cuisson est fissurée ou endommagée, éteignez-la immédiatement de la source de courant (un commutateur mural) et contactez un technicien qualifié. - Page 7 1.2.3 Risque de surface chaude Pendant l'utilisation, les parties accessibles de l'appareil pourront devenir assez chaudes pour causer des brûlures. Ne laissez pas votre corps, des vêtements ou tout autre élément ustensile approprié entrer en contact avec la plaque à induction jusqu'à...
-
Page 8: Précautions De Sécurité
1.2.5 Précautions de sécurité Ne laissez jamais l'appareil sans surveillance lors Une cuisson excessive peut causer des fumées et des résidus graisseux qui pourraient s'enflammer. appareil comme un espace de stockage ou une surface de travail. objets au-dessus de l'appareil. Ne laissez pas objets magnétisables (par exemple, une carte de crédit, une carte mémoire... - Page 9 Ne laissez pas les enfants seuls ou sans surveillance dans la zone où l'appareil est utilisé. N'autorisez pas les personnes à utiliser l'appareil sans surveillance sauf si des instructions appropriées leur ont été données, leur permettant d'utiliser l'appareil de façon sûre et de comprendre les dangers d'une utilisation incorrecte.
- Page 10 Il est recomma être utilisé si le câble est endommagé. Ne faites pas fonctionner votre table de cuisson ou par un système de commande à distance séparée. Cet appareil est conçu uniquement pour une similaires, comme dans: - Les cuisines de magasins, de bureaux et autres environnements professionnels;...
- Page 11 Cet appareil peut être utilisé par des enfants à partir de 8 ans et par des personnes ayant des capacités physiques, sensorielles ou mentales placées sous surveillance ou qu'elles aient reçu ilisation de comprennent les dangers encourus. Les enfants effectués par des enfants, sans surveillance. Gardez l'appareil et son cordon d'alimentation hors de la portée des enfants de moins de 8 ans.
- Page 12 Il est recommandé de connecter cet appareil sur un circuit électrique dédié. Après l'installation de l'appareil, n'installez pas d'autres appareils électriques sur le même circuit pour éviter un surcourant (l'ampérage). Lorsque le disjoncteur se déclenche ou le fusible tombe en panne d'une manière répétée, un circuit dédié...
- Page 13 MISE EN GARDE: Lorsque la table de cuisson est en fonctionnement, ne jamais toucher son fond pour éviter tout choc électrique intattendu. Afin d'éviter tout contact accidentel ou que les enfants puissent jouer avec cet appareil, assurez-vous qu'un insert en bois soit fixé sous la table de cuisson.
-
Page 14: Vue De Dessus
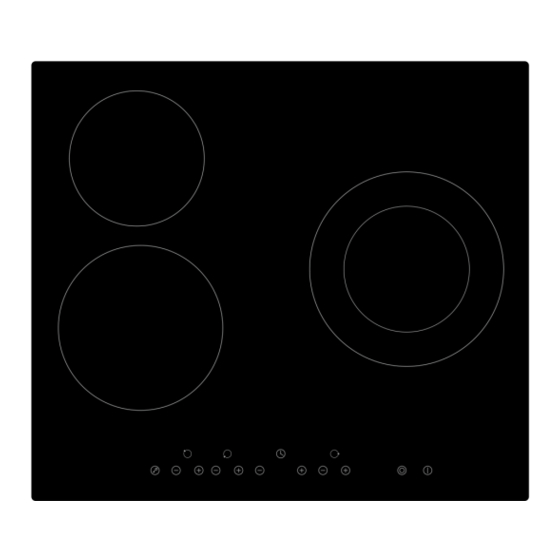
2.1 VUE DE DESSUS 1. Zone de cuisson 1800W max. 2. Zone de cuisson 1200W max. 3. Double zone de cuisson 1000W ou 2200W max. 4. Surface vitrée 5. Touche « MARCHE/ARRÊT» 6. Bandeau de commande 2.2 BANDEAU DE COMMANDE 1. -
Page 15: Specifications Techniques
Lisez ce manuel et faites une particulière attention à la section « CONSIGNES DE SECURITE ». Retirez le film de protection qui peut être encore sur votre table de cuisson vitrocéramique. 2.6 SPECIFICATIONS TECHNIQUES Modèle : ATV3F Nombre de zone de cuisson: 3 zones Alimentation électrique :... -
Page 16: Comment Utiliser
3.2 SELECTION DE LA BONNE BATTERIE DE CUISINE telés. Assurez-vous que le fond de votre récipient est adapté au diamètre de la zone de cuisson soit bien positionné au centre de la surface vitrée. Pour déplacer le récipient, ne glissez pas le récipient sur la table de cuisson vitrocéramique mais soulevez- le. - Page 17 3.3.2 Lorsque vous avez terminé la cuisson Décrémentez la puissance de la zone de cuisson en appuyant touche « -- » appuyez simultanément sur les touches « » et « » de la zone concernée. Assurez- fiche « 0 ». Appuyez sur la touche «...
- Page 18 Désactivication de la fonction double zone de cuisson « » Appuyez sur la touche encore une fois, la fonction de la double zone de cuisson sera désactivée. « 6 » Le voyant lumineux va afficher 3.3.4 Verrouillage des touches modifications involontaires. Par exemple, les enfants p touche «...
- Page 19 a) Utilisation de la minuterie comme minuteur de rappel Si vous ne choisissez pas une zone de cuisson : Assurez-vous que la table de cuisson soit en fonctionnement. Remarque : vous pouvez utiliser la minuterie même si aucune zone de cuisson n'est sélectionnée. Ajustez la valeur de la minuterie en appuyant sur les touches «...
- Page 20 b) Réglage de la minuterie pour éteindre une zone de cuisson Sélectionner une zone de cuisson Sélectionnez la zone de cuisson à programmer en appuyant ses touches « » et « » correspondantes. Ajustez la valeur de la minuterie en appuyant sur les touches «...
-
Page 21: Conseils De Cuisson
3.3.8Coupure automatique puissance définie et est noté dans le tableau ci-dessous : Niveau de puissance Temps de fonctionnement par défaut (heure) 4. CONSEILS DE CUISSON AVERTISSEMENT : Soyez prudent pendant la friture, de l'huile et de la matière grasse se réchauffent très rapidement. - Page 22 4.1.3 Pour faire sauter 1. Choisissez un wok à fond plat adapté au plaques vitrocéramique ou une grande poêle à frire. 2. Préparez tous les ingrédients et l'équipement nécessaires. La cuisson doit être rapide. Si vous préparez une grande quantité d'aliments, faites de petites portions. 3.
-
Page 23: Entretien Et Nettoyage
6. ENTRETIEN ET NETTOYAGE Quoi Comment Important ! Les saletés 1. Débranchez la table de cuisson de 1. Lorsque la table de cuisson est quotidiennes sur le l'alimentation électrique. éteinte, il n'y aura pas d'indication verre (les 2. Utilisez un nettoyeur de cuisson «surface chaude», mais la zone de empreintes quand le verre est encore tiède... -
Page 24: Guide De Depannage
7. GUIDE DE DEPANNAGE PROBLEME CAUSES POSSIBLES SOLUTIONS La table de cuisson ne Assurez-vous que la table de cuisson soit bien branchée et alimentée. Vérifiez électrique de votre logement est bien en fonctionnement. Si le problème persiste, contactez un électricien qualifié. Les touches sensitives Les touches sont bloquées Le verrouillage des touches est... - Page 25 8.1 Sélection de l'équipement Découpez la surface de travail selon les dimensions indiquées dans le schéma. Un espace minimum de 5 cm doit être laissé autour du trou pour l'installation et l'utilisation. hautes températures pour éviter les déformations importantes causées par la chaleur dégagée par la table, comme illustré...
- Page 26 MISE EN GARDE: Assurez-vous d'avoir une ventilation adéquate Assurez-vous que la table de cuisson soit bien ventilée; et que l'entrée d'air et la sortie d'air ne soient pas obstruées. Afin d'éviter tout contact accidentel avec le fond de la table de cuisson ou tout risque de choc électrique inattendu pendant le travail, il est nécessaire de mettre insert en bois fixés avec des vis, à...
- Page 27 Ajustez le positionnement des supports pour l'adapter à l'épaisseur de la surface de fixation. Table de cuisson Table de cuisson Plan de travail Plan de travail Support Support Les supports ne doivent en aucun cas toucher les surfaces intérieures du plan de travail après l'installation (voir l'image).
- Page 28 8.4 Branchement de la table de cuisson à l'alimentation électrique L'alimentation électrique doit être branchée en respectant les standards en vigueur, ou avec un dispositif à coupure unipolaire. La méthode de branchement est montrée ci-dessous: 400V~ 220-240 V~ 220-240 V~ 220-240 V~ 220-240 V~ 220-240 V~...
- Page 29 ENLEVEMENT DES APPAREILS MENAGERS USAGES La directive Européenne 2012/19/EU sur les Déchets des Equipements Electriques et Electroniques (DEEE), exige que les appareils ménagers usagés ne soient pas jetés dans le flux normal des déchets municipaux. Les appareils usagés doivent être collectés séparément afin d'optimiser le taux de récupération et le recyclage des matériaux qui les composent et Elimination : Ne pas réduire l'impact sur la santé...
- Page 30 FORWARD RODUCT INTRODUCTION PERATION OF PRODUCT -10- -16- COOK ING GUIDELINESS -17- EAT SETTINGS -17- CARE AND CLEANING -18- HINTS AND TIPS -19- INSTALLATION...
-
Page 31: Safety Warnings
1. Foreword 1.1 Safety Warnings Your safety is important to us. Please read this information before using your cooktop. 1.2 Installation 1.2.1 Electrical Shock Hazard Disconnect the appliance from the mains electricity supply before carrying out any work or maintenance on it. Connection to a good earth wiring system is essential and mandatory. -
Page 32: Health Hazard
In order to avoid a hazard, this appliance must be installed according to these instructions for installation. This appliance is to be properly installed and earthed only by a suitably qualified person. This appliance should be connected to a circuit which incorporates an isolating switch providing full disconnection from the power supply. - Page 33 Failure to follow this advice may result in death. 1.3.3 Hot Surface Hazard During use, accessible parts of this appliance will become hot enough to cause burns. Do not let your body, clothing or any item other than suitable cookware contact the Ceramic glass until the surface is cool.
- Page 34 Never leave any objects or utensils on the appliance. Do not place or leave any magnetisable objects (e.g. credit cards, memory cards) or electronic devices (e.g. computers, MP3 players) near the appliance, as they may be affected by its electromagnetic field. Never use your appliance for warming or heating the room.
- Page 35 Do not use a steam cleaner to clean your cooktop. Do not place or drop heavy objects on your cooktop. Do not stand on your cooktop. Do not use pans with jagged edges or drag pans across the Ceramic glass surface as this can scratch the glass.
- Page 36 This appliance can be used by children aged from 8 years and above and persons with reduced physical, sensory or mental capabilities or lack of experience and knowledge if they have been given supervision or instruction concerning use of the appliance in a safe way and understand the hazards involved.
-
Page 37: Product Introduction
2. Product Introduction 2.1 Top View 1. Max. 1800 W zone 2. Max. 1200 W zone 3. Max. 1000 / 2200 W zone 4. Glass plate 5. ON / OFF 6. Control panel 2.2 Control Panel 1. ON/OFF control 2. Power regulating controls 3. -
Page 38: Operation Of Product
2.5 Before using your New Ceramic Hob Remove any protective film that may still be on your ceramic hob. 2.6 Technical Specification Cooking Hob ATV3F Cooking Zones 3 Zones Supply Voltage 220-240V~ 50/60Hz... -
Page 39: Choosing The Right Cookware
3.2 Choosing the right Cookware Do not use cookware with jagged edges or a curved base. Make sure that the base of your pan is smooth, sits flat against the glass, and is the same size as the cooking zone. Always centre your pan on the cooking zone. Always lift pans off the ceramic hob do not slide, or they may scratch the glass. - Page 40 3.3.2 Finish cooking Turn the cooking zone off 0 or touching - and + control together. Turn the whole cooktop off by touching the ON/OFF control. Beware of hot surfaces H will show which cooking zone is hot to touch. It will disappear when the surface has cooled down to a safe temperature.
- Page 41 Deactivate the Double zone Touching dual zone control again, the dual zone function is deactivated. 3.3.4 Locking the controls You can lock the controls to prevent unintended use (for example children accidentally turning the cooking zones on). When the controls are locked, all the controls except the ON/OFF control are disabled. To lock the controls Touch the lock control...
- Page 42 a) Using the Timer as a Minute Minder If you are not selecting any cooking zone Make sure the cooktop is turned on. Note: you can use the minute minder even selecting any cooking zone. Adjust the timer setting by touch the - + control.
- Page 43 b) Setting the timer to turn one cooking zone off Set one zone Touch the of the corresponding cooking zone you want to set the timer for. Set the time by touching the or control of the timer . Touching the - and + timer is cancelled, and the -- will show in the minute display.
-
Page 44: Cooking Guidelines
3.3.8 Default working times Another safety feature of the hob is automatic shutdown. This occurs whenever you forget to switch off a cooking zone. The default shutdown times are shown in the table below: Power level Default working timer (hour) 4. -
Page 45: Heat Settings
5. Heat Settings The settings below are guidelines only. The exact setting will depend on several factors, including your cookware and the amount you are cooking. Experiment with the Ceramic hob to find the settings that best suit you. Heat setting Suitability delicate warming for small amounts of food 1 - 2... -
Page 46: Hints And Tips
Boilovers, melts, Remove these immediately with a Remove stains left by melts and fish slice, palette knife or razor sugary food or spillovers as soon hot sugary spills on blade scraper suitable for Ceramic as possible. If left to cool on the the glass glass cooktops, but beware of hot glass, they may be difficult to... -
Page 47: Selection Of Installation Equipment
Some pans make This may be caused by the This is normal for cookware and crackling or clicking construction of your cookware does not indicate a fault. noises. (layers of different metals vibrating differently). 8. Installation 8.1 Selection of installation equipment Cut out the work surface according to the sizes shown in the drawing. - Page 48 Min.30mm A(mm) B(mm) C(mm) D 50 mini 20 mini Air intake Air exit 5mm WARNING: Ensuring Adequate Ventilation Make sure the ceramic hob is well ventilated and that air inlet and outlet are not blocked. In order to avoid accidental touch with the overheating bottom of the hob, or getting unexpectable electric shock during working, it is necessary to put a wooden insert, fixed by screws, at a minimum distance of 50mm from the bottom of the hob.
-
Page 49: Before Locating The Fixing Brackets
8.2 Before locating the fixing brackets The unit should be placed on a stable, smooth surface (use the packaging). Do not apply force onto the controls protruding from the hob. Fix the hob on the work surface by screw four brackets on the bottom of hob (see picture) after installation. - Page 50 8.4 Connecting the hob to the mains power supply The power supply should be connected in compliance with the relevant standard, or a single-pole circuit breaker. The method of connection is shown below. 400V~ 220-240 V~ 220-240 V~ 220-240 V~ 220-240 V~ 220-240 V~ N1/N2...
- Page 51 This appliance is labeled in compliance with European directive 2012/19/EU for Waste Electrical and Electronic Equipment (WEEE). By ensuring that this appliance is disposed of correctly, you will help prevent any possible damage to the environment and to human health, which might otherwise be cause d if it were disposed of in the wrong way.
- Page 52 BUT INTERNATIONAL 1, AVENUE S P INO Z A 77184 EMERAINVILLE, FRANCE...
Need help?
Do you have a question about the ATV3F and is the answer not in the manual?
Questions and answers