
Related Manuals for PenBits PK004

Summary of Contents for PenBits PK004
- Page 1 ASSEMBLY INSTRUCTIONS PK004 SPRUNG BOGIE KIT HELJAN KESTREL PenBits Model Railways www.penbits.co.uk c/o 12 Fieldside, Long Wittenham, ABINGDON, Oxon, OX14 4QB...
-
Page 3: Table Of Contents
Heljan Kestrel: Preparing the Locomotive Modifying the Heljan Bogie Drive Heljan Six-wheel (A1A) Drive Units: Fitting Wheelsets Springs, Bogie Assembly and Rolling Test Class 47 Brake Detail Class 47: Cosmetic Sideframes Pickups and Power Final Assembly (c) PenBits Model Railways, All Rights Reserved 27/09/2021... -
Page 4: General Notes
The instructions are available on line in both HTML and pdf formats. The HTML versions have one page for each major section, whilst the pdf versions have a single file for each kit. Structure (c) PenBits Model Railways, All Rights Reserved 27/09/2021... -
Page 5: Printing
Any remnants of the tag may be cleaned up using a flat file. We have tried to avoid putting tags on mating faces, but there are some instances where they need to be removed (c) PenBits Model Railways, All Rights Reserved 27/09/2021... -
Page 6: Slots
In places which can't be reached by a file, e.g. in acute corners of the etch, the cusp may be pared away with a sharp knife. (c) PenBits Model Railways, All Rights Reserved 27/09/2021... -
Page 7: Folds
Green Label flux may be rinsed away with water; a little added citric acid will neutralize it. Liquid or paste fluxes can be washed away either with a proprietary flux cleaner or a 50/50 mix of methylated spirits and water. (c) PenBits Model Railways, All Rights Reserved 27/09/2021... -
Page 8: Spring Winding
Keeping the coil on the armature, you can stretch or compress the spring axially to get the coil spacing you need. (c) PenBits Model Railways, All Rights Reserved 27/09/2021... - Page 9 Trim off the waste at the ends of the spring. File the ends of the spring flat, using the free end of the armature to support it. Reset the armature in the chuck to the desired length of the spring. (c) PenBits Model Railways, All Rights Reserved 27/09/2021...
-
Page 10: Warranties
However, as the fitting of the kit by the user is out of our direct control, we can make no warranty, expressed or implied, as to the performance and continued serviceability of the locomotive following modification. (c) PenBits Model Railways, All Rights Reserved 27/09/2021... -
Page 11: Bearing Carriers
Put the subframes in their containers safely to one side for now. Test fit the axle bearings on the 2mm replacement axles. They should be a free running fit. Remove any burrs or swarf from the front and rear faces of the bearings. (c) PenBits Model Railways, All Rights Reserved 27/09/2021... - Page 12 This will help minimise any unwanted distortion in the fret. Note that Fold 3 is a jig fold, made along the tags at the base of the carriers. (c) PenBits Model Railways, All Rights Reserved 27/09/2021...
- Page 13 Stick a length of double-sided tape, large enough to take one of the carrier frames, onto a clean, flat, heatproof working surface. Ensure the tape is firmly smoothed down (c) PenBits Model Railways, All Rights Reserved 27/09/2021...
- Page 14 Unfold Fold 3 and separate the individual bearing carrier assemblies from the frame. Take care, as the top parts of the carriers are quite fragile at this stage: it may be (c) PenBits Model Railways, All Rights Reserved 27/09/2021...
- Page 15 Keep the bearing clamped in the vice while soldering; this will act as a heat sink and prevent melting of the joint between the bearing and carrier. (c) PenBits Model Railways, All Rights Reserved 27/09/2021...
- Page 16 That completes the bearing carrier assemblies. To finish off, clean them up to remove any flux residues, and put the carriers and subframes safely away in their respective containers. (c) PenBits Model Railways, All Rights Reserved 27/09/2021...
-
Page 17: Subframes
Check that they are all at the same height by inverting the subframes and resting the tops of the spring seats against a flat surface. End Stretchers (c) PenBits Model Railways, All Rights Reserved 27/09/2021... -
Page 18: End Plates
If you are using 'American' pickup, i.e. a live bogie frame, you may wish to modify the coupling mount to insulate the AJ coupling. End Plates Do not fit the end plates from fret F001 - these are for the Bachmann loco only. (c) PenBits Model Railways, All Rights Reserved 27/09/2021... - Page 19 Heljan Class 47 / Kestrel Subframes 19/48 The photo shows a completed subframe - it also has the optional brake detail which can be fitted at a later stage. (c) PenBits Model Railways, All Rights Reserved 27/09/2021...
-
Page 20: Class 47 Bogie Bolster
Check that the nut is central between the stiffeners and flat to the face of the bolster top. Run generous fillets of solder around the (c) PenBits Model Railways, All Rights Reserved 27/09/2021... - Page 21 Keep solder clear of the places where the inner and outer bolster frames will fit. (c) PenBits Model Railways, All Rights Reserved 27/09/2021...
- Page 22 Bolster Frame. Ensure that the spring holes in the Inner Bolster Frames are free of solder. Similarly fold up and fit the two Outer Bolster Frames. (c) PenBits Model Railways, All Rights Reserved 27/09/2021...
- Page 23 (c) PenBits Model Railways, All Rights Reserved 27/09/2021...
- Page 24 Clean up the bolster assembly to remove all flux residues. If you wish to chemically blacken the bolster, do it at this stage. Do the four bolster detail etches at the same time, they'll be fitted later. (c) PenBits Model Railways, All Rights Reserved 27/09/2021...
-
Page 25: Heljan Kestrel: Preparing The Locomotive
'yoke' to be unclipped from the drive unit. (c) PenBits Model Railways, All Rights Reserved 27/09/2021... - Page 26 Use the tapered broaches again; it will probably be necessary to remove some material from the inside vertical faces of the pivot stiffener to create a 3.2mm pivot hole. (c) PenBits Model Railways, All Rights Reserved 27/09/2021...
- Page 27 M2 screw and 5.5mm washer. Ensure that the bolster can rotate with the chassis sole plates resting on its shoulders. (c) PenBits Model Railways, All Rights Reserved 27/09/2021...
-
Page 28: Modifying The Heljan Bogie Drive
Use a relatively beefy screwdriver to unclip the four clips on one side of the undertray, working from one end to the other. The tray may then be lifted away. (c) PenBits Model Railways, All Rights Reserved 27/09/2021... - Page 29 Take a little of the thickness off the outer ends of the undertray moulding. (c) PenBits Model Railways, All Rights Reserved 27/09/2021...
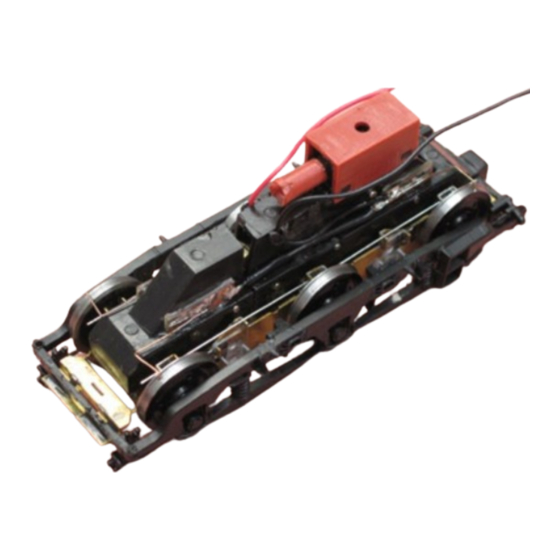
- Page 30 Modifying the Heljan bogie drive 30/48 Enlarge the central axle slot to give at least 1mm clearance around the central axle. This photo shows completed modifications to the drive unit. (c) PenBits Model Railways, All Rights Reserved 27/09/2021...
-
Page 31: Heljan Six-Wheel (A1A) Drive Units: Fitting Wheelsets
Take off an extra 0.5mm on the wheels for the two centre axles, subject to not going beyond the line of the inner wheel rim. (c) PenBits Model Railways, All Rights Reserved 27/09/2021... - Page 32 Lubricate the bearings with a light machine oil and ensure that the oil is taken in to all the axle-bearing interfaces. That completes the assembly of the wheelsets. (c) PenBits Model Railways, All Rights Reserved 27/09/2021...
-
Page 33: Springs, Bogie Assembly And Rolling Test
...and clip the shorter arms into the spring retaining ears. Put the bolsters safely to one side. Return to the primary suspension wires and check that the epoxy resin beads have set hard. (c) PenBits Model Railways, All Rights Reserved 27/09/2021... - Page 34 ... and locate the bearings in the tops of their mainframe slots. (c) PenBits Model Railways, All Rights Reserved 27/09/2021...
- Page 35 You now have a rolling bogie with fully functioning equalized primary suspension. Do a hand-powered rolling test to check for any tight bearings, wobbly wheels etc. It is easiest to correct such things at this stage. (c) PenBits Model Railways, All Rights Reserved 27/09/2021...
- Page 36 Remove the springs from the bearing carriers and return all components to their storage trays. (c) PenBits Model Railways, All Rights Reserved 27/09/2021...
-
Page 37: Class 47 Brake Detail
It is perhaps as well to tin all components with a thin film of solder now, to avoid bringing excess solder on the iron to the components when assembling. (c) PenBits Model Railways, All Rights Reserved 27/09/2021... - Page 38 Trim and clean up the ends of the wire; flush to the back of the bracket, and with a little protruding from the front of the nut to represent the end of the crank pivot bolt. (c) PenBits Model Railways, All Rights Reserved 27/09/2021...
- Page 39 Solder in the wire. Finish it flush with the rear of the boss, and projecting about 1mm from the front. Fold over, 180°, the boss at the inner end of the pull rod. Do NOT solder here at this stage. (c) PenBits Model Railways, All Rights Reserved 27/09/2021...
- Page 40 This inside intermediate/central brake shoes etch looks when folding is complete. All the detail features are now facing outwards, the same way. (c) PenBits Model Railways, All Rights Reserved 27/09/2021...
- Page 41 Solder up the plain end of the rod to the intermediate hanger and trim off the ends of the wire flush. (c) PenBits Model Railways, All Rights Reserved 27/09/2021...
- Page 42 Bachmann brake gear does nicely, otherwise small pieces of plastic strip and rod, brought together with some filler, can do the job. Finally, reassemble the wheelsets and bogie bolsters into the subframes, and check all clearances. (c) PenBits Model Railways, All Rights Reserved 27/09/2021...
-
Page 43: Class 47: Cosmetic Sideframes
Heljan sideframes in any circumstances, for kits PK002, PK003, PK004 and PK012, all using the subframe stretchers from etch F003. If you are fitting the Bachmann moulded bogie frames and brake gear for kit PK001, using the subframe... - Page 44 Make sure that the detail etches are securely home in their slots, and that the half- etched 180° foldback is glued back flat against the outer face of the detail. Test-fit the bolster into the bogie frames to check clearances. (c) PenBits Model Railways, All Rights Reserved 27/09/2021...
-
Page 45: Pickups And Power
They act on the outer wheelsets only, as there is limited space to fit pickups to the centre wheels. (c) PenBits Model Railways, All Rights Reserved 27/09/2021... - Page 46 (c) PenBits Model Railways, All Rights Reserved 27/09/2021...
-
Page 47: Final Assembly
Thread the spring through the slots in the ears of the bearing carrier of the outer axle. Thread a second spring through the hole in the other ear of the central bearing carrier. (c) PenBits Model Railways, All Rights Reserved 27/09/2021... - Page 48 Use a screwdriver to spring the springs outwards and downwards on to the outer faces of the secondary suspension seats. Push the springs downwards so that they slide over the secondary and then the primary suspension seats … (c) PenBits Model Railways, All Rights Reserved 27/09/2021...
- Page 49 IMPORTANT NOTE: If you need to remove the body subsequently, please DO NOT at any stage attempt to pull the chassis from the loco by pulling on the bogies, as this may damage the secondary spring mountings. (c) PenBits Model Railways, All Rights Reserved 27/09/2021...
Need help?
Do you have a question about the PK004 and is the answer not in the manual?
Questions and answers