Table of Contents
Advertisement
Quick Links
Advertisement
Table of Contents

Summary of Contents for Humasis HUBI-QUAN PRO
- Page 1 Rev. 03/2016-07-28 Code No. KM/I-2153...
-
Page 2: Table Of Contents
Table of Contents 1. Introduction 1.1 System Description 1.2 Warning, Precautions and Limitations 1.3 Specification 2. Installation 2.1 Unpacking 2.2 Contents and Part Listing 2.3 Setup 2.4 Display Description 3. Set Parameters 3.1 System Settings 3.2 User Settings 3.3 Test Settings 3.4 QC Test Settings 3.5 Device Settings 3.5.1 Device Settings... -
Page 3: Introduction
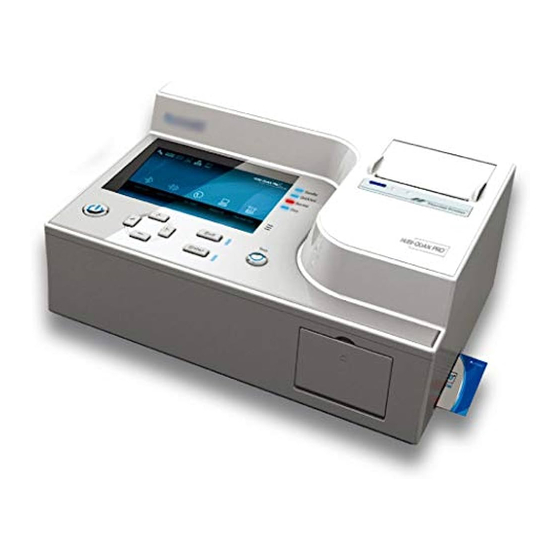
1. Introduction 1.1 System Description HUBI-QUAN Pro is blood analysis instrument which can detect quantitative analysis of target in blood by utilizing CMOS image sensor to analyze test image of disposable device. HUBI-QUAN PRO can be used as Point-Of-Care device. It is applied with photodiode sensor system for specimen type analysis, CMOS sensor for making quantitative analysis on analysis line, and for automatic revision system using RFID system. -
Page 4: Warning, Precautions And Limitations
11. IQC Device is very sensitive with light. Keep the device in the black opaque case when it is not is use. 12. Do not move HUBI-QUAN Pro when the test is being on process. Use only UBI-QUAN Pro power adaptor. For the distinguishing purpose, Identification card is attached to the bar code. -
Page 5: Specification
ID Card port 1(13.5MHz RFID card) Options External Barcode Reader Fast ID Input the user, the patients, etc. HUBI-QUAN Pro Data Management Program LIS connectable Data Management Program Test Device Specifications Read the product manual for detail of test device. - Page 6 1. TFT LCD Screen Describe different operation Menu, Test status, Test results 2. POWER button Turn On/Off HUBI-QUAN Pro 3. Arrow Buttons Movement of categories in Menu 4. ENTER Button Selecting and deselecting a category in Menu 5. EXIT Button Move back the previous menu or cancel the selected action 6.
-
Page 7: Installation
2. Installation 2.1 Unpacking HUBI-QUAN Pro and accompanying items are in the box. HUBI-Cartridge and QC Control materials are not included. 2.2 Contents and Part Listing The complete HUBI-QUAN Pro carton (Cat. No. LSR-2000) contains the following items: - HUBI-QUAN Pro (Cat. No. HBP1001) - IQC Device (Cat. -
Page 8: Setup
2.3 Setup Open the external wrap of HUBI-QUAN Pro, and take out HUBI-QUAN Pro from the box and the protection vinyl bag. Place HUBI-QUAN Pro on the appropriate installation place, and take out Power Converter and Power Cord from the box. - Page 9 Inert the Supervisor ID card from the HUBI-QUAN Pro box to the card slot which is located on the right side of HUBI-QUAN PRO. Once press button after inserting ID card, it will identify the ID and show main menu.
- Page 10 Close HUBI-QUAN Pro System ① Press the Power Button. ② Select ‘Shut down by and press to close the system.
-
Page 11: Display Description
2.4 Display Description 1. Equipment Status Icons It is the basic icon of HUBI-QUAN Pro. On every screen, there are five Equipment Status Icons, which turn red when the equipment is in abnormal status or white when the equipment is normal status. - Page 12 Step 1(User ID Icon) Step 2(Test device Icon) Step 3(Specimen Icon) Step 4(Test progress icon) Step 5(Test result icon) 2. Test Detail Screen Step 1 On the right upper corner of the Test Menu (RUN TEST, QUCIK TEST) Screen, there are five Test Process Icons.
-
Page 13: Set Parameters
3. Set Parameters SET PARAMETERS function allows the user to set the parameter with keyboard. PARAMETERS function is could be only accessed through Supervisor ID Card authorization. Use the left/right arrow and to select a menu from the menu screen on PARAMETERS screen. Press moves back to the previous menu. -
Page 14: System Settings
3.1 System Settings Update Insert USB storing ‘UPDATE File’ to USB port on the back of HUBI-QUAN Pro. Use button to select UPDATE and press button. System Configuration Set the four set up categories in SET CONFIGURATION menu by keyboard or mouse. When every setting is completed, press button to SAVE, and it will move back want to the SYSTEM SETTINGS screen. -
Page 15: User Settings
3.2 User Settings Organization It is the function to input the organization's information by external keyboard. Go to ‘USER SETTING’ and press to save once the information is typed in. <USER SETTINGS > <Organization registration> Set User Select SET USER from ‘USER SETTING’ and press . - Page 16 ② Select USE on Keyboard or Barcode after entering the user information to login the registering new. <Registering New USER screen > ③ To change or delete the existing ID, select the ID with button then press to give an option either “EDIT”...
-
Page 17: Test Settings
3.3 Test Settings Select “TEST SETTINGS” from the menu, which then shows the setting menu screen. Press to select the test condition, and press to save the selected menu. <TEST SETTINGS Screen> <TEST SETTINGS Menu Screen> Menu Default Option Description Activate or deactivate User Log-in function. -
Page 18: Qc Test Settings
3.4 QC Test Settings 1. Select “QC test setting” menu, then press button. 2. Use on setting menu and on selected menu for adjusting test condition. 3. Once press button after finishing all test condition setting, the setting will be saved. If saving is not wanted, press button to move back to previous menu. -
Page 19: Device Settings
“No” to cancel deletion. ③ Download New device file from Humasis and copy and insert the file in USB memory. Insert USB Memory to USB Port where is behind of HUBI-QUAN Pro. Press ‘New’ and fine the file on a window. Press button to save. - Page 20 ③ USE button to edit the information of device. ④ Press button to save the information after editing completely. 1. Select Marker 4. Set Performance Value 3. Ref. Range <Device Setting detail example> 2. Quantitative or Qualitative - Select Marker to select the marker between enabled and disable marker and press button to check /uncheck.
-
Page 21: New Device Registration
3.5.2 New Device Registration ① Download New test file from Humasis what if test the new product.(03300ini) After receiving test file, copy and insert the file in USB memory. ② Insert supervisor card to card insertion where located on side of HUBI-QUAN Pro, then turn on it. - Page 22 ⑤ Use to select New and Press button. ⑥ Find the suitable file (xxx.ddb) and press button. ⑦ Check Test name and ref. Range. Move to ref. Range and then press button.
-
Page 23: Operation
② IQC Device must be carried out during the set period of time. (Except when IQC Setting is set as “Use System”.) ③ HUBI-QUAN Pro shows a warning message, turning to Red light’ at QC ICON, when QC is not carried out before the test. - Page 24 1. Select “RUN TEST” on the menu screen and press 2. Display Patient's ID screen. 3. Input the Pat. ID and press . Test Serial No. is prepared at this point and the tray will open automatically. How to input Pat. ID ①...
- Page 25 5. Press, and the tray moves into the device. Specimen insertion error When the device tray is malfunctioning the screen shows an error message, and the device recognition icon is flicker with error. Press to open the tray and move back to the Pat. ID.
- Page 26 9. Press to print out the test result. 10. Move back to the Pat. ID. Screen automatically and wait for next test.
-
Page 27: Quick Test
4.2 Quick Test Quick Test allows continuous testing of bulk quantity of specimens. It has a similar test procedure with Run Test. The difference is the time reduced by processing the specimen insertion and the test procedure on the exterior separately. - Page 28 4. Press to start the test NOTE : “TEST No. 160822-0003” of the top example means that it is 3th test on August, 22, 2016. 5. Display Test Progress on the screen. Test Progress Description ① Test Progress Icon is lighted up into blue during the test, lighted up into red when an error occurs.
- Page 29 8. Press to print out the test result. 9. Move back to Pat. ID. Screen automatically and wait for next test.
- Page 30 4.3 QC Test 4.3.1 IQC Test 1. . Use to select IQC Test, and press to open the tray. 2. Open IQC Device from the package, insert it in the tray, and press to proceed with the test. 3. Test results from the IQC Device are displayed on the screen. Press...
- Page 31 4.3.2 IQC Test Failure and Re-Calibration If IQC Test fails, this window displays on the screen. Press to do re-calibration. 2. Insert IQC Device #1 1 to the try. Press 3. After finishing IQC Device #1, insert IQC Device #2 to the try. Press...
- Page 32 4. After finishing IQC Device #2, insert IQC Device #3 to the try. Press 5. Once completing, press to save. If the re-calibration is failed, start the procedure from the beginning, IQC Device #1,#2 and #3. In case of failing re- calibration continually, contact to Humasis Co., Ltd .
- Page 33 4.3.3 QC Sample Test 1. Select “QC TEST” from the main menu and press 2. Us to select QC Sample Test and press . The device tray will open at this point. 3. Take out QC Coding Device from the separate QC Control package. Put it in the tray and press 4.
- Page 34 5. Use to select either low level or high level. (In case of selecting 2 levels at QC setting, low level is started firstly.) Insert the test device into the try and follow the manual of QC sample package. QC Test ICON ①...
- Page 35 8. Press button to approve the result. QC Test (Low/High) setting ① Start Low level of QC test. ② Once Test Procedure is completed, start High Level of QC Test. Test Procedure is started from Step 5. ③ If QC Test sets as Single or Double, the tray is open after finishing the procedure.
-
Page 36: Results
4.4 RESULTS RESULTS Menu allows the user to check and print previous test results of HUBI-QUAN Pro. The test results can be retrieved on different conditions in RESULTS Menu. Menu Structure Description SYSTEM System : Serial No., Reg. Date, Run time... -
Page 37: Last Record
4.4.2 LAST RECORD LAST RECORD displays the latest test results . 1. Press from LAST RECORD menu. 2. Check Test Results. 3. Press to print result with the thermal printer. It will automatically move to RESULTS list screen afterwards. Press to go back to the RESULTS list screen without printing. - Page 38 2. Set Search Condition. How to set Search Patient ID to set Patient ID setting. Select “All” to include all IDs in the search. Use external keyboard or barcode scanner to input wanted patient ID at “search”. Device Setting to set Device Setting. Select “All ”to include all the test devices in the search.
-
Page 39: Qc Results
4.4.4 QC RESULTS QC Test results can be retrieved with Date, Display, and Type. Set the conditions for searching QC Results and press Then, it will move to the search result screen as following setting search condition. Press to go back to the previous screen. IQC TEST Search ①... -
Page 40: Troubleshooting
5. Troubleshooting Message/Symptom Cause Treatment Can't Find Device File There is no device or RFID Tag Insert the cartridge or check whether Press [ENTER] to do new device. RFID Tag is attached or not. There are two or more devices or Remove RFID Tag except that need to RFID Tags test. - Page 41 If the same error is occurred, request A/S. If press the button but it doesn’t The button is defective. Request A/S. work. Windows program error. HUBI-QUAN Pro uses Windows as the OS. Sometimes it stops due to error of Windows. If wait, proceed with operation well.
-
Page 42: Maintenance
Cleaning HUBI-QUAN Pro require only minimum maintenance, cleaning exterior sufficient is enough for maintenance. If foreign substance has entered the machine, follow the following procedure to clean it. How to Clean 1. - Page 43 7. Frequency Asked Questions(FAQs) Question Answer & Action HUBI-QUAN Pro uses Windows as the OS. Sometimes it stops due to If press the button but it error of Windows. If wait, proceed with operation well. doesn’t work. If you press the button too much, it may cause malfunction.
- Page 44 Rm. 504 SHINWON VISION TOWER, 88 Jeonpa-ro, Dongan-gu, Anyang-si, Gyeonggi-do, KOREA www.humasis.com Tel : +82-31-478-8590...
Need help?
Do you have a question about the HUBI-QUAN PRO and is the answer not in the manual?
Questions and answers