Table of Contents
Advertisement
Advertisement
Table of Contents

Summary of Contents for FORELIBRA MA Series
- Page 1 MA series Moisture Analyzer User’s Manual...
-
Page 3: Table Of Contents
Contents Safety notes ......................3 Specifications ......................4 Technical specifications .......................4 Delivery content ...........................4 Optional Accessories ........................4 System description ....................5 Device ............................5 Display ............................6 Function key ..........................6 Preparation ......................7 Preparation of sample .........................7 Tools for sample preparation .......................7 Disposable aluminium sample pan ....................7 Spreading of the sample ......................7 Glass fibre filter circle ......................... -
Page 4: Safety Notes
Thank you for purchasing a moisture balance from our company. 1. Safety notes Please read this manual carefully and completely before you use the device for the first time. The device may only be used by qualified personnel and repaired by our company. Damage or injuries caused by non-observance of the manual are excluded from our liability and not covered by our warranty. -
Page 5: Specifications
2. Specifications 2.1 Technical specifications Model MA110 Weighing range 110 g Readability 0.001 g Heating element Halogen lamp / round / approx. Ø 90 mm +40…+199 °C Drying temperature adjustable 1…99 min adjustable Drying time (time mode) 0…100 % Measurement range moisture Readability moisture 0.01 % Memory... -
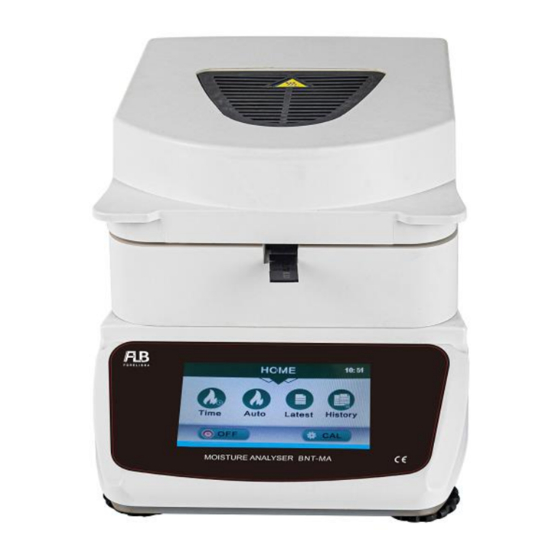
Page 6: System Description
3. System description 3.1 Device 1. Heat protection 4. Wind shield plate 5. Sample pan 2. Wind shield 3. Insertion aid Assemble the parts as illustrated above. Start with the heat protection plate (1). The notch in the side wall of the wind shield (2) must be placed in a way that it faces the user. -
Page 7: Display
3.2 Display 3.3 Function keys Time: Time dry Auto: Auto dry Latest: the last test recoard History: recoard CAL: do the calibration... -
Page 8: Preparation
4. Preparation 4.1 Preparation of sample You should always prepare only one sample for measurement to avoid that it loses moisture to the environment or absorbs air humidity. In case several samples have to be taken at the same time, they should be put into airtight containers to make sure their characteristics do not change when stored. -
Page 9: Glass Fibre Filter Circle
Solids: Spread powdery and grained samples evenly on the sample pan. Crush coarse-grained samples using a mortar or similar device. Avoid any heat supply when crushing the sample as this will cause moisture loss. Liquids: For liquids, pastes or melting samples, it is recommended to use the glass fibre filt 4.5 Glass fibre filter circle Glass fibre filter circles ensure that liquid samples are evenly spread on the sample pan and prevent the combustion of solids. -
Page 10: Operation
5. Operation 5.1 Turn on The moisture balance saves the drying parameters last used after switching off and back on. These are shown in the display. 5.2 Drying modes 5.2.1 Auto dry Touch the Auto dry button, then enter function, chose the dry temperature, the touch start. -
Page 11: Time Dry
5.2.2 Time dry Touch the Time dry button, then enter function, chose the dry temperature and the drying time, the touch start. ATTENTION: The maximum measuring / drying time you can set is 99 minutes. 5.2.3 stop mode When drying, if you need stop the device heat. You can touch the stop button. ATTENTION: Depending on the temperature, combustion of the sample can easily occur in this measurement / stop ,mode. -
Page 12: Adjustment / Calibration
This can be easily reproduced by a rule of three. ATTENTION: The moisture analysers of the MA series have a higher weighing resolution than the one indicated. The moisture balance uses the higher resolution which is invisible to the user for calculation. -
Page 13: Muti-Point Cal
5.3.2 Muti-point CAL When the other capacity accurate is not correct, then do the muti-point CAL, when the screen display each capacity, then put on same mass weight on the pan. 5.3.3 Clock CAL When the clock is not correct, then do clock CAL. 5.4 Print out results (optional) You can print out the measurement results by using the optional T58Z printer. -
Page 14: Troubleshooting
Print-out: 6 Troubleshooting Error Error cause Possible solution message Put more than 1 g of the sample on -Err 1- Sample weight below 1 g the scales and start the measurement. Temperature setting below -Err 2- Restart the scales. +40° C Measuring time setting -Err 3- Restart the scales. -
Page 15: Maintence
9 Maintenance 9.1 often use moisture meter, moisture analyzer should be brought electricity to reduce the preheating time in a row. The moisture analyzer in a relatively stable state, if the moisture analyzer long without the electricity should be closed. 9.2 the moisture analyzer should be kept clean, watch the dust content across the moisture meter, such as scale and shell often with gentle detergent and soft cloth to wipe clean, must not with alcohol, gasoline strong dissolution agent such as scrub.
Need help?
Do you have a question about the MA Series and is the answer not in the manual?
Questions and answers