Advertisement
Quick Links
Advertisement

Related Manuals for Logitech ADAPTIVE GAMING KIT


Summary of Contents for Logitech ADAPTIVE GAMING KIT
- Page 1 ADAPTIVE GAMING KIT SETUP GUIDE 設定指南 설치 가이드 设置指南...
- Page 2 ENGLISH 简体中文 繁體中文 한국어...
- Page 3 ADAPTIVE GAMING KIT INSTRUCTIONS • Two Integral hook and loop Game Boards - Attachment point for controls Rigid hook and loop Game Board – – Flexible hook and loop Game Board Connect them to form a larger surface – 3 ENGLISH...
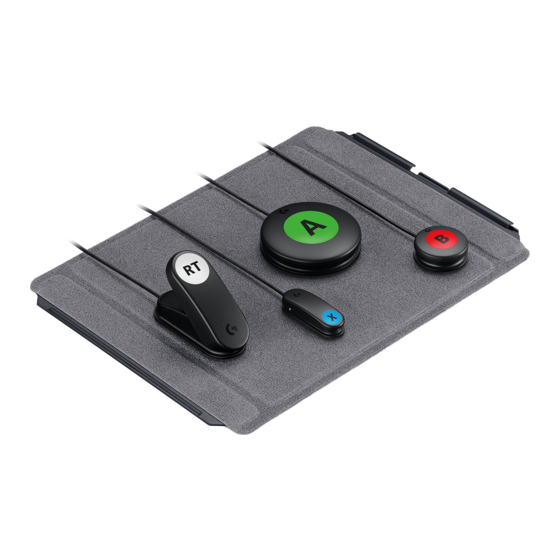
- Page 4 • 4 different type of buttons and controls Small buttons – – Large buttons – Variable trigger Light touch buttons – • Buttons also have threaded points for permanent attachment, marked with metric size (screws not included) • Fastener labels- peel and stick onto corresponding buttons to attached to Game Board surfaces 4 ENGLISH...
- Page 5 • Adaptive Gaming Kit Labels Labels are exact size to match button types – – Labels for connector end – Pre-labeled with Xbox controller symbols Blank labels for custom naming – • Hook and loop ties and fasteners – Bundle and manage cables –...
- Page 6 CONNECTING CONTROLS All controls connect to the Xbox Adaptive Controller in the same way: The back edge of the Xbox Adaptive Controller has ports that match all the functions of an Xbox controller Plug the button you want to use into the port of the function you want to control Variable trigger buttons are special They should only be used in LT (Left Trigger) and RT(Right Trigger) ports...
- Page 7 LABELS • Attach hook labels to button bottoms so they will attach to the loop surfaces or ties • Attach Xbox symbol labels to the top of buttons - They are sized to match • Matching tabs can be attached to cable end to help with connecting to XAC 7 ENGLISH...
- Page 8 CONTROL SET UP EXAMPLES The Adaptive Gaming Kit is designed to provide flexibility and configurability to meet different needs Using the hook and loop system attached the buttons to the included Game Boards or ties QUESTIONS? logitechG com/support/adaptivegaming 8 ENGLISH...
- Page 9 自适应游戏套件说明 • 两个集成的魔术贴游戏板 - 控件连接点 – 坚固的魔术贴游戏板 – 灵活的魔术贴游戏板 – 相互连接以构成更大的表面 9 简体中文...
- Page 10 • 4 种不同类型的按钮和控件 – 小按钮 – 大按钮 – 可调扳机 – 轻触按钮 • 按钮还具有用于固定连接的螺纹点, 标有公制尺寸 (不包括螺丝) 。 • 固定器标签 - 撕下并粘贴在相应按钮上, 附于游戏 板表面。 10 简体中文...
- Page 11 • 自适应游戏套件标签 – 标签尺寸精准适配按钮类型 – 接头端标签 – 预标记有 Xbox 控制器符号 – 可自定义命名的空白标签 • 魔术贴和固定器 – 捆绑和管理线缆 – 将控件附于其他区域 11 简体中文...
- Page 12 连接控件 所有控件均通过以下方式连接到 Xbox 自适应控制器: Xbox 自适应控制器的后侧边缘具有与 Xbox 控制器所有功能相 匹配的端口。 将要使用的按钮插入欲控制功能的端口。 可调扳机的按钮是特殊的。 只能用于 LT (左扳机) 和 RT (右扳机) 端口。 12 简体中文...
- Page 13 标签 • 将魔术贴标签粘贴到按钮底部, 这样可使其粘贴到表面或扎带上。 • 将 Xbox 符号标签粘贴到按钮顶部, 尺寸精准匹配。 • 可以将匹配的标签连接至线缆末端, 便于连接 XAC。 13 简体中文...
- Page 14 控制设置示例 自适应游戏套件旨在提供灵活性和可配置性, 以满足不同的需求。 使用魔术贴系统将按钮连接到随附的游戏板或扎带上。 问题? logitechG com/support/adaptivegaming 14 简体中文...
- Page 15 可調整式遊戲套件指示說明 • 兩個整合黏扣遊戲板 - 控制鍵連接點 – 堅固的黏扣遊戲板 – 彈性的黏扣遊戲板 – 連接在一起可形成更大的表面 15 繁體中文...
- Page 16 • 4 種不同類型的按鈕和控制鍵 – 小按鈕 – 大按鈕 – 可變觸發鍵 – 輕觸按鈕 • 按鈕也具有標示有公制尺寸 , 供永久連接使用的螺紋點 。 • 固定器標籤 - 撕下然後黏貼在連接到遊戲板表面的 相應按鈕上 。 16 繁體中文...
- Page 17 • 可調整式遊戲套件標籤 – 標籤具有與按鈕類型相符的精確尺寸 – 用於接頭端點的標籤 – 已貼上 Xbox 控制器符號的標籤 – 可自訂名稱的空白標籤 • 黏扣繫結與固定器 – 紮串整理連接線 – 將控制鍵連接到其他區域 17 繁體中文...
- Page 18 連接控制鍵 所有控制鍵以相同的方式連接到 Xbox 可調整控制器 : Xbox 可調整控制器的背面擁有與 Xbox 控制器所有功能相同的連 接埠 。 將您要使用的按鈕插入要控制之功能的連接埠 。 可變觸發鍵按鈕情況特別 。 它們只應使用於 LT (左觸發鍵) 和 RT(右 觸發鍵) 連接埠 。 18 繁體中文...
- Page 19 標籤 • 將黏扣標籤貼到按鈕底部 , 使其連接或繫結到黏扣表面 。 • 將 Xbox 符號標籤貼到按鈕上端 - 標籤尺寸與按鈕相符 。 • 對應標示條可以接在連接線末端以有助於連接到 XAC 。 19 繁體中文...
- Page 20 控制鍵設定範例 可調整遊戲套件是設計來提供可因應不同需求的彈性和組態 。使用按鈕 上的黏扣系統將其連接或固定到隨附的遊戲板上 。 有問題 ? logitechG com/support/adaptivegaming 20 繁體中文...
- Page 21 적응형 게이밍 키트 설명서 2개의 통합 후크 및 루프 게임 보드 - 컨트롤 부착 지점 • 견고한 후크 및 루프 게임 보드 – 유연한 후크 및 루프 게임 보드 – 더 넓은 표면을 형성하기 위해 연결 – 21 한국어...
- Page 22 4가지 유형의 버튼 및 컨트롤 • 소형 버튼 – 대형 버튼 – 가변 트리거 – 라이트 터치 버튼 – 또한 영구 부착용 스레드 포인트는 미터법 단위로 • 표시되어 있습니다(스크류 미포함) 라벨 부착- 게임 보드 표면에 부착된 해당 버튼에 라벨을 • 벗겨서...
- Page 23 적응형 게이밍 키트 라벨 • 버튼 유형에 맞는 정확한 크기의 라벨 제공 – 커넥터 끝에 붙이는 라벨 – Xbox 컨트롤러 심볼이 미리 라벨링됨 – 커스텀 네이밍을 위한 빈 라벨 – 후크 및 루프 타이 및 고정 장치 • 케이블 번들 및 관리 –...
- Page 24 컨트롤 연결 모든 컨트롤은 다음과 같은 방법으로 Xbox Adaptive Controller에 연결됩니다 Xbox Adaptive Controller의 후면 가장자리에는 Xbox 컨트롤러의 모든 기능과 일치하는 포트가 있습니다 사용할 버튼을 제어하려는 기능의 포트에 연결합니다 가변 트리거 버튼은 특수합니다 LT(좌측 트리거) 및 RT(우측 트리거) 포트에서만 사용해야 합니다 24 한국어...
- Page 25 라벨 루프 표면 또는 타이에 부착할 수 있도록 버튼 하단에 후크 • 라벨을 부착합니다 Xbox 심볼 라벨을 버튼 상단에 부착 - 라벨은 버튼과 크기가 • 일치합니다 연결 탭을 케이블 끝에 연결하여 XAC에 연결할 수 있습니다 • 25 한국어...
- Page 26 컨트롤 설정 예시 적응형 게이밍 키트는 다양한 요구를 충족하기 위해 유연성과 구성을 제공하도록 설계되었습니다 후크 및 루프 시스템을 사용하여 포함된 게임 보드 또는 타이에 버튼을 부착할 수 있습니다 질문이 있으십니까? logitechG com/support/adaptivegaming 26 한국어...
- Page 27 © 2019 年羅技 。羅技 、Logitech G 和其個別標誌為 Logitech Europe S A 及/或其附屬公司在美國和其他國家的商標或註 of Logitech Europe S A and/or its affiliates in the U S and other countries Microsoft, Xbox, Xbox One, Xbox “Sphere” 冊商標。Microsoft、 Xbox、 Xbox One 、 Xbox “Sphere” Design 是 Microsoft 公司集團的註冊商標。所有其他商標均是其各...
Need help?
Do you have a question about the ADAPTIVE GAMING KIT and is the answer not in the manual?
Questions and answers