Table of Contents
Advertisement
Quick Links
Cos'è VERO LT
? / What is VERO LT
R
E' un cronometro indipendente che funziona su piste dotate di banda magnetica o antenna
attiva; quando il sensore passa sopra la banda, o all' antenna, esso provvede a dare l'impulso
di start / stop al cronometro. La rilevazione da banda magnetica è molto accurata, affidabile,
facile da usare ed economica, ma per le moto ed auto non è garantita (a differenza dei kart e
minimoto) a causa della loro maggiore distanza da terra. Per i sensori myWER la massima
distanza da terra è di circa: 15cm per il modello standard e 20cm per il modello HS.
It is an independent lap timer that works on tracks equipped with magnetic strips or active
detection loop; when the sensor passes over the strip, or detection loop, it provides the start /
stop pulse on the lap timer. Magnetic strip detection is very accurate, reliable, easy to use and
economical, but for motorcycles and cars it is not guaranteed (unlike of karts and minimoto)
due to their greater distance from the track. For in myWER sensors the maximum track
distance is approximately: 15cm for the standard model and 20cm for the HS model.
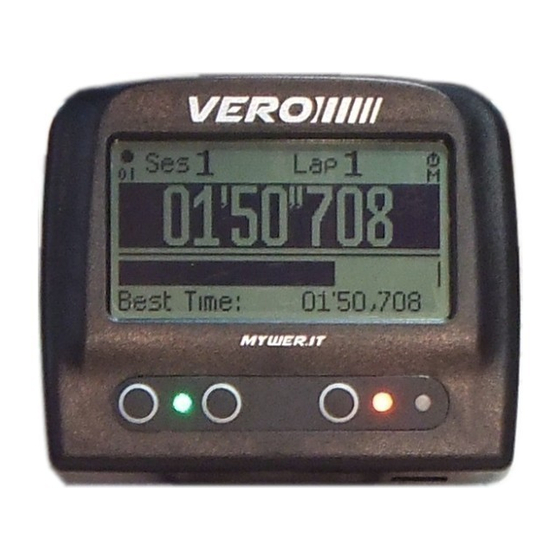
Numero sessione
1
Session number
Cronometro / Lap Timer
Tempo giro / differenza
4
Lap time / gap
time
Barra prestazione
5
Performance bar
Tasto sinistro *
6
Left button *
Led verde
7
Green led
Tasto centrale **
8
Central button **
Connettore Binder o JST
18
Binder or JST connector
Sensore magnetico / Magnetic sensor
Sensore radioelettrico / Radioelectric sensor
Installazione cronometro / Lap Timer installation
Il cronometro si fissa tramite dado a galletto o con dado autobloccante M6 forniti in dotazione
(non stringerli in modo eccessivo !), prima di fissarlo assicurarsi che il contorno del coperchio
posteriore non urti nulla circostante. Le due rondelle in gomma vanno posizionate sopra e sotto
il supporto (es. la razza del volante, ecc.). Il cronometro ha un grado di protezione pari a IP55
per cui è in grado di sopportare un getto d'acqua a bassa pressione ma non è a tenuta stagna.
Install the lap timer with one of the two different nuts M6 supplied (do not overtighten them !),
before fixing it make sure that the outline does not impact any element. Mounting two rubber
above and below the support (eg the steering wheel, etc.). The lap timer is IP55 for which it is
able to withstand a jet of water at low pressure but is not waterproof.
Installazione sensore / Sensor installation
Il sensore, magnetico o radioelettrico, si fissa tramite velcro o viti (non forniti in dotazione) e
va installato sopra, o sotto, il veicolo affinchè sia il più possibile vicino alla strada. La freccia
mostra il senso di marcia e va tassativamente rispettato. Dopo aver collegato il sensore al
cronometro eseguire il test per accertarsi del corretto posizionamento: accendere il cronometro,
avvicinare il veicolo alla banda magnetica od all'antenna attiva: il led verde
Install the magnetic. or radioelectric, sensor with velcro tape or screws (not supplied), must
be installed above, or belowe, the vehicle as close as possible to the track. The arrow shows the
direction and must be strictly respected.After connecting the sensor to the lap timer run the test
to ensure correct positioning: turn on lap timer and bring the vehicle closer to the magnetic strip
or to the active antenna: the green led
19
must turn on.
myWER si riserva il diritto di modificare senza preavviso le informazioni e le immagini qui contenute
myWER reserves the right to change without notice information and image contained herein
figure non in scala
pictures not in scale
?
Accensione cronometro / Lap timer ignition
R
Il cronometro ha due diverse modalità di accensione/spegnimento: manuale "M" o automatica
"A" e sono indicate dall'icona
cronometro, se "A" il cronometro si accende/spegne in presenza o assenza di vibrazioni.
The lap timer has two differente on/off settings mode: manual "M" and automatic "A" and are
indicated by the icon
presence or absence of vibrations the lap timer automatically turns on/off.
Configurazione cronometro / Lap timer setup
20
Numero settore
17
Sector number
Numero giro
16
Lap Number
Stato retroilluminazione
15
21
B a c k l i g h t s t a t u s
Modalità accensione
14
I g n i t i o n
m o d e
Miglior tempo
13
B e s t t i m e
Tasto destro
10
Right button
Led di controllo
19
C h e c k
l e d
oppure / else
19
si deve illuminare.
DANNI E RESPONSABILITA': poiché i prodotti sono utilizzati sotto la sola direzione e responsabilità del Cliente
quest' ultimo supporterà i danni che i prodotti potrebbero subire o provocare. Non è concessa alcuna indennità
per privazione di utilizzo; myWER by LetMar non può essere considerata responsabile delle conseguenze dirette
Rev.01 27_08_19 - www.mywer.it
o indirette del loro utilizzo o non utilizzo. Gli obblighi di myWER by LetMar sono di mezzo e non di risultato.
14
. Se "M" pigiare il tasto
10
per accendere/spegnere il
14
. If "M" press button
to switch the lap timer turns on/off, if "A" when
10
Per accedere al menù di configurazione serve accendere, o riavviare,
20
il cronometro. Attendere la schermata
e tenere pigiato il tasto
10 ;dopo parecchi secondi comparirà la schermata 22. Per muoversi
10
nel menù usare il tasto
6
e, per confermare la selezione, premere
il tasto
8
. Per uscire selezionare, e confermare, la voce "EXIT".
To enter the setup menu you need to turn on, or restart, the lap timer.
20
Wait for screen 21 and keep button 10 pressed; after a several seconds,
10
screen 22 will appear. Press button
21
6
6
to move in the menu and
press button 8 to confirm the selection. Select and confirm the
8
"EXIT" item to exit setup.
Per selezionare, modificare e confermare usare i tasti 6 e 8
Imposta regole: seleziona "
SET RULES
", poi conferma:
Sec.: tempo minimo del giro espresso in secondi (originale 20")
Band.: numero bande o loops presenti sul circuito (originale "1")
Pass.: numero del passaggio da cui iniziare il tempo (originale "1")
SAVE - EXIT: salva le impostazioni ed esce, EXIT: esce senza salvare
For selection, modification and confirmation use button 6 and 8
Set rules: select "
SET RULES
", then confirm:
Sec.: minimum lap time expressed in seconds (default 20")
Band.: number of strips or loops present on the circuit (default "1")
Pass.: pass number from which to start time (default "1")
SAVE - EXIT: saves the settings and exit, EXIT: exits without saving
Per selezionare, modificare e confermare usare i tasti 6 e 8
Imposta sessione: seleziona "
SET SES.
", poi conferma:
Min.: tempo cambio sessione espresso in minuti e decimi (originale 3')
Canc Mem.: azzera memoria ad ogni cambio sessione (originale "N")
SAVE - EXIT: salva le impostazioni ed esce
EXIT: esce senza salvare
For selection, modification and confirmation use button 6 and 8
Set session: select "
SET SES.
", then confirm:
Min.: session change expressed in minutes and tenths (default 3')
Canc Mem.: clear memory at each session change (default "N")
SAVE - EXIT: saves the settings and exit
EXIT: exits without saving
Per selezionare e confermare usare i tasti
6
e
8
Imposta accensione: seleziona "
SET ON/OFF
", poi conferma:
MANUAL: accens./spegnim. solo con tasto
10
(originale)
AUTO: accensione/spegnimento automatico su vibrazione
EXIT: esce senza salvare
For selection and confirmation use button
and
6
8
Set ignition: select "
SET ON/OFF
", then confirm:
MANUAL: turn on/off only with button
10
(default)
AUTO: turn on/off automatic on presence/absence vibration
EXIT: exits without saving
Per selezionare e confermare usare i tasti
Imposta accensione: seleziona "
SPOT ON: all'accensione è mostrato lo spot iniziale (originale)
SPOT OFF: all'accensione non è mostrato lo spot iniziale
EXIT: esce senza salvare
For selection and confirmation use button
Set ignition: select "
SPOT ON: at the switched on initial splash is shown (default)
SPOT OFF: at the switched on initial splash is not shown
EXIT: exits without saving
21
Per selezionare e confermare usare i tasti
Imposta accensione: seleziona "
LIGHT OFF: la retroilluminazione è spenta (originale)
LIGHT 1-2-3/3: selezionare uno dei tre livelli
EXIT: esce senza salvare
For selection and confirmation use button
Set ignition: select "
LIGHT OFF: the backlight is off (default)
LIGHT 1-2-3/3: select one of the three levels
EXIT: exits without saving
6
8
6
8
6
8
6
8
Funzionamento cronometro / Lap timer operation
Al passaggio sul traguardo il cronometro mostra immediatamente il tempo sul giro: se
inferiore al giro precedente si accenderà il led verde, viceversa si accenderà il led rosso.
Poco dopo verrà mostrata la differenza (gap) tra il giro appena concluso e il giro precedente
dopodichè tornerà ad essere mostrato il tempo sul giro (il gap appare a colori invertiti ed è
anticipato dal segno "-" o "+") . Contemporaneamente la barra di prestazione inizia la sua
corsa a ritroso e scandisce un tempo uguale al giro precedente. In basso invece viene
visualizzato il Best Time di sessione o, se installato il modulo, gli RpM e gli RpM massimi.
Numero giro, ed eventualmente numero sessione, vengono aggiornati automaticamente.
When passing the finish line lap timer immediately shows the lap time: if less than the
previous lap,
the green led will light up otherwise the led will light up red. Shortly
afterwards the difference (gap) between the last lap and the previous lap will be shown,
after which the lap time will be shown again (the gap appears a inverted colors and is
preceded by the sign "-" or "+"). Simultaneously the performance bar begins its run
backwards and marks a time equal to the previous lap. At the bottom instead it comes the
session Best Time is displayed or, if the module is installed, the maximum RpM and RpM.
Lap number and session number are updated automatically.
DAMAGES AND LIABILITY: as the products are used under the sole direction and responsibility of the
Customer this last one will support the damages that the products could suffer or provoke. No compensation
is granted for lack of use; myWER by LetMar cannot be held responsible for the direct consequences
or indirect of their use or non-use. MyWER by LetMar's obligations are in the middle and not the result.
6
e
8
SET SPOT
", poi conferma:
and
6
8
SET SPOT
", then confirm:
6
e
8
SET LIGHT
", poi conferma:
6
and
8
SET LIGHT
", then confirm:
Advertisement
Table of Contents

Summary of Contents for VERO LT R3 CE
- Page 1 Cos’è VERO LT ? / What is VERO LT Accensione cronometro / Lap timer ignition Per selezionare e confermare usare i tasti Imposta accensione: seleziona " SET SPOT ", poi conferma: E' un cronometro indipendente che funziona su piste dotate di banda magnetica o antenna Il cronometro ha due diverse modalità...
- Page 2 Wait for screen 20 . Take, and keep pressed, the button 10 first and then key 6 and wait for leds 7 and 11 to light up. Manuale uso LT R3 CE / User manual LT R3 CE # SPECIAL RENTAL: ELECTRIC ENGINE #...
Need help?
Do you have a question about the LT R3 CE and is the answer not in the manual?
Questions and answers