
Subscribe to Our Youtube Channel
Related Manuals for scil Element AIM

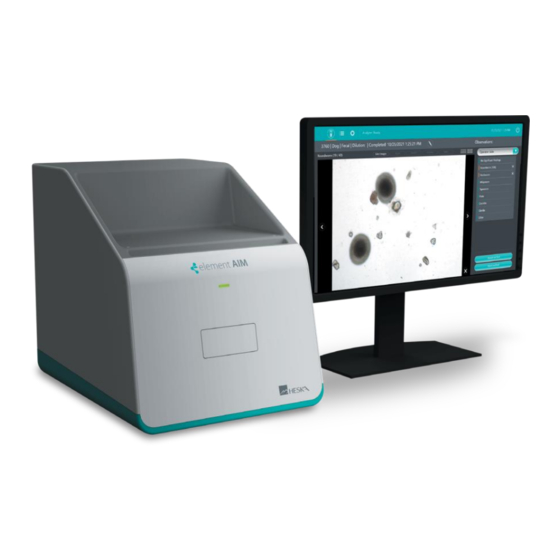
Summary of Contents for scil Element AIM
- Page 1 User Manual Element AIM Automated Artificial Intelligence Microscopy For veterinary use...
-
Page 2: Using This Manual
Manual Introduction This manual contains the following sections. Preface: General introductory information and explanations of: • Using this manual • Contents overview • Definitions and abbreviations • Symbols Safety: Explains the safety labels and precautions. • Intended use • User profile •... -
Page 3: Table Of Contents
Product Liability Information ..........................Warnings ................................Safety Instructions on the Analyzer ........................Declaration of Conformity ............................Disposal ................................. SECTION 2: ELEMENT AIM ANALYZER OVERVIEW Product Overview ..............................2.1.1 Analyzer Identification ..........................Technical Specifications ............................SECTION 3: TRANSPORT, UNPACKING, PACKING AND INSTALLATION Package Contents .............................. - Page 4 4.2.3 Cartridge Filling Procedure for Fecal Samples.................... Running a Test ............................... 4.3.1 Running a Urine Sediment Analysis ......................4.3.2 Running a Fecal Sample ..........................Confirming and Reviewing Results ........................Settings .................................. 4.5.1 General Settings ............................4.5.2 Administrator Settings ..........................SECTION 5: MAINTENANCE AND CLEANING Cleaning Outside Surfaces ............................
-
Page 5: Definitions, Acronyms And Abbreviations
Please observe all safety instructions. Intended Use The Element AIM is used for analysis of veterinary species’ urine and fecal samples in specifically designed and approved cartridges. The analyzer is exclusively intended for use indoors. All country-specific safety requirements for operating electrical equipment in the laboratory must be observed. -
Page 6: Product Liability Information
The analyzer is used with accessories or consumables that are not supplied or recommended by Scil animal care. • The analyzer is repaired or maintained by persons not authorized by Scil animal care. • Any unauthorized changes are made to the analyzer. -
Page 7: Safety Instructions On The Analyzer
Safety Instructions on the Analyzer Indicates the need for the user to consult the instructions before use. Indicates the need for the user to consult the instructions for use for important cautionary information such as, warnings and precautions. Indicating risk of entanglement around cartridge loading door and port. -
Page 8: Declaration Of Conformity
Plug the analyzer into a different outlet so that the analyzer and the receiver are on different branch circuits. Scil has reviewed their analyzer product for compliance with REACH - Registration, Evaluation, Authorisation and Restriction of Chemicals (Regulation no. 1907 /2006 of the European Parliament and Council) and the presence of the two hundred and eleven (211) SVHC substances in the EU SVHC Candidate list as of 20th January 2021. -
Page 9: Disposal
EU that this instrument should not be disposed of in a landfill or with municipal or household waste. Please contact Scil or your local dealer for further information regarding proper procedures for discarding electrical and electronic equipment. -
Page 10: Section 2: Element Aim Analyzer Overview
Section 2: Element AIM Analyzer Overview 2.1Product Overview The Element AIM brings the convenience of automation and the learning capabilities of artificial intelligence to urine sediment and fecal flotation analysis for veterinary patients. Leveraging a unique and proprietary cartridge design, custom onboard centrifuge, state-of-the-art nano... -
Page 11: Technical Specifications
Manufacturer Heska Corporation Manufacturer Address 3760 Rocky Mountain Ave, Loveland, CO 80538, United States Model Name Element AIM Automated AI Microscopy Analyzer Model Number A003014 Power Supply External 24 V DC Adaptor 85 – 264 V AC Adaptor Input Voltage Range... -
Page 12: Package Contents
Section 3: Transport, Unpacking and Installation 3.1 Package Contents Item Quantity Element AIM Veterinary Analyzer Power Adaptor IEC Power Cord USB 3.1 GEN 2 USB-C Male to Male cable (1 m) Analyzer Documentation Dust Cleaning Cartridge Element AIM Computer Element AIM Monitor WARNING The analyzer weighs 65 lbs (29.5 kg). -
Page 13: Electrical Requirements
• Only use earth/grounded outlets with a protective earth conductor. • Only use the AC adaptor and main/power cord supplied or authorized by Scil. Do not use a mains supply cord of inadequate rating. • The main power switch and outlet connecting to the AC adaptor must be easily accessible during operation and should be located outside the safety zone. -
Page 14: Moving The Analyzer
Do not open the package and do not remove any contents unless expressly and specifically instructed to do so by Scil . In situations where express consent has been given by Scil, open the package. Remove top layers of foam package and accessories box. Ensure all parts are included. -
Page 15: Removing Shipping Locks
3.6 Removing Shipping Locks Place analyzer on its side on a protected surface. Remove and retain the five dust caps shown in step 6. (Caps will be reinserted at the end of the lock removal procedure.) Remove hex socket fastener (3 mm Allen wrench). Screw in hex IMPORTANT Do not try to remove the outer lock (red) before the fastener –... -
Page 16: Connections And Operating Controls
3.7 Connections and Operating Controls 3.7.1 Computer and Analyzer Connections Connect monitor to the computer. Connect supplied USB cable between the USB port on the back of the analyzer to a spare USB-C port on the computer. Mains Connection 3.7.2 Check that the mains power supply voltage and frequency match the requirements on the AC adaptor name plate. - Page 17 To prepare the analyzer for storage and/or shipment, please follow these guidelines. For shipment, the analyzer must be packed in Scil approved shipping container. For further assistance, please call Heska’s Technical Support Services at 800.464.3752, option 3. 3.8.1 Shipping lock Installation instructions Turn off power switch and remove power cable and USB-C cable from the back of the analyzer.
- Page 18 IMPORTANT Ensure the lock is installed prior to the internal fastener – can result in analyzer damage if not. Screw the hex socket screw (3 mm Allen wrench) Torque to 1.8 Nm into the red anodized lock installed in the previous step.
-
Page 19: Section 4: Analyzer Operation
Section 4: Analyzer Operation Materials • Element AIM Disposable Cartridges • Element AIM Fecal Prep Device Kit • Urine or fecal sample to be analyzed Cartridge Fill Procedure 4.2.1 Equipment • Sample to be analyzed – urine or processed fecal preparation. - Page 20 connection with Luer fitting. To minimize risk of bubbles, ensure cartridge filler port is horizontal with or below height of filter. Slowly depress syringe plunger while observing sample filling cartridge chamber. Continue filling until the filter just starts to become wet, darkening in color. NOTE: •...
- Page 21 Remove protective film just prior to loading cartridge in the analyzer. NOTE: Hold the cartridge by the handle only. DO NOT TOUCH top or bottom films. Touching Film ✓ Grip Tab Touching Film When test has been completed dispose of cartridge in a biohazard waste container or appropriate waste receptacle as locally regulated for potentially biohazardous materials.
- Page 22 Cap tube and and a counter balance into centrifuge and spin at 650 xg (~1500 rpm) for 5 minutes. Remove Element AIM cartridge for foil packaging. Attach fecal preparation device tubing to the cartridge. Remove fecal float tube from centrifuge and remove cap.
- Page 23 biohazardous materials. Insert cartridge cap in filler port and press down until a click is felt and cap is secured. Remove protective film just prior to loading cartridge in the analyzer. Use previous section for reference. NOTE: Hold the cartridge by the handle only. DO NOT TOUCH top or bottom films.
- Page 24 Fill a syringe with at least 0.55 ml of urine. Load the Element AIM cartridge as described below: a) Connect the syringe to the port on the AIM cartridge b) Inject ~0.5 ml of urine into the AIM cartridge, filling until the window is full of sample and the filter is discolored.
- Page 25 Remove syringe and cap the port securely. d) Remove protective plastic film from the cartridge. Touch OPEN ANALYZER DOOR and insert the cartridge into the analyzer once the door has opened. Once the cartridge has been detected, the cartridge will be pulled into the analyzer and the door will close automatically.
- Page 26 Perform a fecal floatation as described in Section 4.2.3 Cartridge Filling Procedure for Fecal Samples. Load the Element AIM cartridge as described below: Connect the fecal prep device to the port on the AIM cartridge. Twist the cap of the fecal preparation device to inject ~0.5 ml of your fecal float sample into the...
- Page 27 Touch EJECT CARTRIDGE and the analyzer door will open automatically. Remove the Element AIM cartridge. Once removed, the analyzer door will close automatically. The Results screen will appear for the user to confirm.
- Page 28 To examine images closer, double click on the images of interest. The user can then zoom in/out further using their fingers to examine the image. To toggle through images within the category, use . Touch to return to the main the results screen. Objects of Interest identified by the artificial intelligence will be automatically be identified on the result panel located on right side of the screen.
- Page 29 To add an item to the results panel, click on the Object of Interest. For Bacteria, Casts and Crystals, select the specific Type using the drop down menus. For any additional finding a classification of Other can be used. The user can then type in their findings To Reject the report, touch REJECT AND END and then YES to confirm.
- Page 30 To save any edits that have been made, touch END REPORT AND UPDATE and then touch SEND AND END and then DONE to finalize the report. Settings 4.5.1 General Settings General • Manage deleted studies • Enable/Disable the use or keyboard and mouse •...
- Page 31 4.5.2 Administrator Setting To access locked Administrator Settings, touch Administrator Icon and enter Admin User name and Password Analyzer Management • Manage Image uploads • Update display settings • Initiate cleaning procedures for optics (See section 5.2.2) Users and Logins •...
- Page 32 Section 5: Maintenance and Cleaning WARNING The analyzer contains no user servicing or maintenance that requires removal of the covers. Removal of the covers exposes the user to the possibility of electric shock and/or mechanical injury. Unauthorized removal of the covers will void the analyzer warranty. Cleaning Outside Surfaces The following cleaning fluid formulations are approved to use for periodic cleaning of the outer surfaces of the analyzer.
- Page 33 When door opens, insert optics cleaning cartridge until it clicks into the detent. Secure straw in air cannister outlet and administer 3 shorts blasts of compressed air to remove answer moisture or debris from within the straw. NOTE : Do not invert cannister as this may lead to the introduction of moisture into the analyzer. Insert straw into left port and administer three short (1 second) blasts of compressed air.
- Page 34 Section 6: Troubleshooting Troubleshooting and Error Handling Error Code Error Description Possible Cause Possible Solution PC is unable to connect to the Check instrument power, check USB connection No Connection to Scp instrument. and retry. PC lost connection to the instrument. Restart software to reconnect.
Need help?
Do you have a question about the Element AIM and is the answer not in the manual?
Questions and answers