Table of Contents
Advertisement
Quick Links
Advertisement
Table of Contents

Subscribe to Our Youtube Channel
Related Manuals for Symbol iPOS TX


Summary of Contents for Symbol iPOS TX
- Page 1 TX Product Reference Guide...
- Page 3 TX Product Reference Guide 72-61856-01 Revision A July 2003...
- Page 4 The software is provided strictly on an “as is” basis. All software, including firmware, furnished to the user is on a licensed basis. Symbol grants to the user a non-transferable and non-exclusive license to use each software or firmware program delivered hereunder (licensed program).
-
Page 5: Table Of Contents
Installing the iPOS TX System........ - Page 6 TX Function Test Menu ........
-
Page 7: About This Guide
About This Guide Introduction The iPOS TX Product Reference Guide provides instructions for installing and configuring the iPOS TX Transaction System. Chapter Descriptions • Chapter 1, Getting Started, provides an overview of the iPOS TX system. • Chapter 2, Setting Up the iPOS TX... -
Page 8: Notational Conventions
Service Information If you have a problem with your equipment, contact the Symbol Support Center. If your problem cannot be resolved over the phone, you may need to return your equipment for servicing. If that is necessary, you will be given special directions. - Page 9 About This Guide United Kingdom Asia/Pacific Symbol Technologies Symbol Technologies Asia, Inc (Singapore Branch) Symbol Place 230 Victoria Street #05-07/09 Winnersh Triangle, Berkshire RG41 5TP Bugis Junction Office Tower United Kingdom Singapore 188024 0800 328 2424 (Inside UK) Tel : +65-6796-9600...
- Page 10 TX Product Reference Guide Germany/Deutchland Italy/Italia Symbol Technologies GmbH Symbol Technologies Italia S.R.L. Waldstrasse 66 Via Cristoforo Columbo, 49 D-63128 Dietzenbach, Germany 20090 Trezzano S/N Navigilo 6074-49020 (Inside Germany) Milano, Italy +49-6074-49020 (Outside Germany) 2-484441 (Inside Italy) +39-02-484441 (Outside Italy) Latin America Sales Support Mexico/México...
- Page 11 Support E-Mail: Sweden.Support@se.symbol.com Customer support is available 24 hours a day, 7 days a week. If you purchased your Symbol product from a Symbol Business Partner, contact that Business Partner for service. For the latest version of this guide go to:http://www.symbol.com/manuals.
- Page 12 TX Product Reference Guide...
-
Page 13: Chapter 1. Getting Started
Chapter 1 Getting Started Introduction The iPOS TX offers the most advanced payment functions to meet merchants’ transaction requirements. The device completely integrates credit, debit, EBT, and smart card to streamline point-of-sale transactions and back-end operations. The iPOS TX features: •... -
Page 14: Parts Of The Ipos Tx
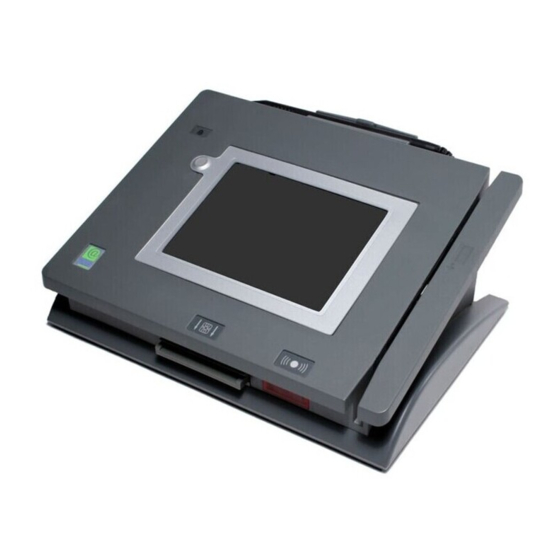
TX Product Reference Guide Parts of the iPOS TX Stylus Magnetic Touchpad Stripe Reader USB Port 15-Pin RS-232/ RS-485 Port Figure 1-1. Parts of the iPOS TX... -
Page 15: Pos Host Interface
Online Reference System, available at http://devzone.symbol.com/. Integrated Security The iPOS TX conforms to ANSI X9.24 and X9.8 standards, and uses DES or triple DES PIN encryption, accommodates an EMV Level 1 certified Smart Card Reader, and illuminates an LED security icon on the tamper-resistant casing when performing secured functions, such as receiving a PIN for a debit purchase. - Page 16 TX Product Reference Guide...
-
Page 17: Chapter 2. Setting Up The Ipos Tx System
Chapter 2 Setting Up the iPOS TX System Introduction This chapter provides information on installing the iPOS TX, including: • connecting to a POS host device • installing peripherals • installing and replacing the screen guard • mounting the terminal on a counter or tabletop. -
Page 18: Installing The Ipos Tx System
TX Product Reference Guide Installing the iPOS TX System The following items are required to install the iPOS TX system, and are provided with the terminal: Table 2-1. Connection Items Connection Cables/Parts Required Page Number Host via RS-232 HDB15/DB9 serial cable... - Page 19 4. Insert the connector on the AC power adapter cable into the port on the back of the serial cable’s 9-pin connector (DB9). 5. Connect the end of the AC adapter to a standard 120V, 60 Hz AC power outlet. 6. Power on the host device. The iPOS TX autoconfigures to RS-232. iPOS TX POS Host Device...
-
Page 20: Rs-485 Installation
TX. 3. Plug the SDL connector into one of the following ports on the POS host device: 4B, 9A, 9B, or 9E. 4. Turn on the host device. The iPOS TX autoconfigures to RS-485. iPOS TX POS Host Device... -
Page 21: Usb Installation
4. If using the HDB15/DB9 serial cable, plug the 15-pin connector of the cable into the serial port of the iPOS TX, and the 9-pin connector into the host. Insert the connector on the AC power adapter cable into the port on the back of the serial cable’s 9-pin connector (DB9). - Page 22 2. Insert the Type B connector of the USB cable into the USB port on the back of the iPOS TX. 3. Insert the Type A connector of the USB cable into the USB port on the host device. 4. Turn on the host device. The iPOS TX autoconfigures to USB. iPOS TX POS Host Device USB Cable Figure 2-4.
-
Page 23: Connecting Peripherals
Setting Up the iPOS TX System Connecting Peripherals To connect a peripheral device to the iPOS TX, use the Y-cable (HDB15/Dual DB9) that splits at the HDB15 connector: 1. Plug the cable’s 15-pin connector (HDB15) into the serial port on the back of the iPOS TX. -
Page 24: Installing The Screen Guard
TX Product Reference Guide Installing the Screen Guard The screen guard protects the iPOS TX's screen from typical wear such as scratches and spills. To install the screen guard: 1. Disconnect power from the iPOS TX. 2. Clean the surface of the terminal and touchscreen using a cloth dampened with non-abrasive glass cleaner. -
Page 25: Replacing The Screen Guard
TX. This maintenance extends the operation of the iPOS TX: Caution If liquid is spilled on the iPOS TX, wipe up all liquid before replacing the screen guard. Using a small, flat blade screwdriver (e.g., a jeweler screwdriver), lift the round tab of the screen guard, and gently pull off from left to right to remove. - Page 26 TX Product Reference Guide 2-10...
-
Page 27: Chapter 3. Configuring The Ipos Tx
Chapter 3 Configuring the iPOS TX Overview The iPOS TX includes a setup program that configures terminal settings, such as screen brightness, calibration, and date and time. It also tests certain terminal functions such as MSR, audio, and LCD. -
Page 28: Ipos Tx Setup Mode
TX Product Reference Guide iPOS TX Setup Mode Upon powerup, the iPOS TX displays the following screen. Progress Indication Bar Figure 3-1. iPOS TX Startup Screen Tap the screen before the progress indication bar completes to access Setup Mode, which allows customizing settings, or do not tap the screen to use the default settings or previously configured settings. -
Page 29: Security Activation
Configuring the iPOS TX Security Activation If the security module is not initialized, the Security Activation screen appears. If this screen appears, return the iPOS TX to Symbol Technologies for activation. Figure 3-2. Security Activation Screen Main Setup Screen After entering the Setup password, the Configurations/Settings screen appears. - Page 30 Tap the Host button to select the Host Settings screen. • Tap Download to access download mode. • Tap the Reset button to reset the iPOS TX, which restores the default settings. • Tap Version to view system version information. •...
- Page 31 Configuring the iPOS TX Security Module Key Manager Tap Security on the Configurations/Settings screen to access the Security Module Key Manager screen. Figure 3-4. Security Module Key Manager Screen This screen sets new keys to the device security module, which are loaded using a download manager.
- Page 32 TX Product Reference Guide Changing Screen Brightness Tap Brightness on the Configurations/Settings screen to access the Change LCD Brightness screen. Figure 3-5. Change LCD Brightness Screen To increase brightness, tap the right-arrows button; to decrease brightness, tap the left- arrows button.
- Page 33 (The default password is password.) 2. Enter the new password. The password must be between 6 and 12 characters long. Tap the enter/return key. 3. Enter the new password again to confirm. The iPOS TX returns to the Configurations/Settings screen.
- Page 34 TX Product Reference Guide Setting System Date and Time Tap Time/Date on the Configurations/Settings screen to access the Date/Time Settings screen. Figure 3-7. Date/Time Settings Screen Enter the date and time using the drop-down menus, and tap Save to save the value and return to the Configurations/Settings screen.
- Page 35 To calibrate the touchpad, tap the center of the target each time it moves on the screen. As the screen indicates, tap the screen within 30 seconds to save the new settings, or wait 30 seconds to discard the new calibration settings. The iPOS TX returns to the Configurations/ Settings screen.
- Page 36 TX Product Reference Guide Host Settings Tap Host on the Configurations/Settings screen to set the communication address of the RS-485 port. Figure 3-9. Host Settings Screen Select the port address from the drop-down menu and tap Save. Available addresses are 64, 65, 68, and 69.
- Page 37 • Wait a while and boot - the iPOS TX waits five seconds for a new image to download, then it boots from the current flash image. After selecting a mode, tap OK. The iPOS TX downloads the new files in the manner selected.
- Page 38 TX Product Reference Guide Loading TX New NK.Bin Instructions The following items are required to download a new CE image onto the iPOS TX: • TX_XX.zip, a file containing NkDnld.bat, Nk.bin, and Nkdownload.exe. This file is available at http://devzone.symbol.com/ •...
- Page 39 Viewing System Information Tap Version on the Configurations/Settings screen to display system version information, including class ID of the system board, system build version number, and applications and system components installed on the iPOS TX. Figure 3-11. System Version Information Screen 3-13...
-
Page 40: Ipos Tx Function Test Menu
TX Function Test Menu Tap FunctionTest on the Configurations/Settings screen to test terminal functions. Figure 3-12. Function Test Screen This screen contains nine buttons for testing the following functional areas of the iPOS TX: • Magnetic Stripe Reader •... -
Page 41: Testing Msr Function
Clear erases track information. • Done exits the MSR Test screen. Testing Audio Function Tap Audio on the Function Test screen to test the sound output of the iPOS TX. The terminal plays an audio clip if functioning properly. 3-15... -
Page 42: Testing Display Function
TX Product Reference Guide Testing Display Function Tap Lcd on the Function Test screen to test the display of text, graphics, colors, and the backlight. Figure 3-14. LCD Test Screen Tap the following buttons to run LCD testing: •... -
Page 43: Testing Communication Ports
Figure 3-15. Communication Test Screen The iPOS TX communicates through COM1, COM2, IrDA, and USB ports. Select the port from the ComType drop-down menu, and set the baud rate from the Baud drop-down menu. Baud rates available for COM1 are 9600, 19200, 38400, 57600, or 115200. -
Page 44: Testing Security Module
TX Product Reference Guide Testing Security Module Tap Security on the Function Test screen to test if the security module is functioning properly. Figure 3-16. Encryption Test Screen Select an encryption type from the Encryption Type drop-down menu: •... -
Page 45: Testing Smart Card Reader
Configuring the iPOS TX Testing Smart Card Reader Tap Smartcard on the Function Test screen to test the Smart Card reader. Figure 3-17. Smartcard Test Screen To test the Smart Card reader: 1. Tap Connect to connect to the Smart Card reader. The version number of the reader appears in the Result data text box and a message appears stating that a card is present (if a card is inserted in the reader). -
Page 46: Testing The Touchpad
TX Product Reference Guide Testing the Touchpad Tap Touchpad on the Function Test screen to view the Touchpad Test screen. Figure 3-18. Touchpad Test Screen Tap the touchpad at various points. The screen displays the X, Y coordinates of the last point tapped. -
Page 47: Testing The Signature Pad
Tap Signature on the Function Test screen to test if the signature pad is working properly. Figure 3-19. Signature Test Screen Sign the pad using the stylus. The iPOS TX counts the number of points used for the signature and displays this value. The signature data is stored in the internal buffer; tap Redraw to re-display the signature. -
Page 48: Software Development Suite (Optional)
The JPOS library and standards provide Java drivers for transaction functionality that allows the host to interact with the iPOS TX. This is only supported for script mode. For more information, see the JPOS for iPOS TX Online Reference System, available at http://devzone.symbol.com/. -
Page 49: Posvisual
Configuring the iPOS TX tookit for the iPOS TX, and is used to develop script running on the client device or host applications such as debit, credit, signature capture, PIN entry, advertising, and surveys. For more information, see the posDesigner Online Reference System, available at http://devzone.symbol.com/. - Page 50 TX Product Reference Guide 3-24...
-
Page 51: Appendix A. Technical Specifications
Appendix A Technical Specifications Table A-1. iPOS TX Specifications Item Description Physical Characteristics Dimensions 9.5 in. L x 6.7 in. W x 4.7 in. H/ 241.3 mm L x 170.2 mm W x 119.4 mm H Weight 1 lb 11 oz/0.8 kg... - Page 52 TX Product Reference Guide Table A-1. iPOS TX Specifications (continued) Item Description Magnetic Stripe Reader Bi-directional 3 track reader Smart Card Reader ISO 7816 – 1, 2, 3, 4; synchronous and T=0, T=1 asynchronous cards; EMV level 1 certified IrDA (infrared port) Data rate up to 115.2 kbps...
-
Page 53: Index
RS-232 ......2-3 contacting Symbol ....vi RS-485 . - Page 54 USB ..... . . 2-5, 2-6 parts of iPOS TX ..... 1-2 password setting .
- Page 55 Index USB ..... . . 2-5, 2-6 display ......3-16 setup mode .
- Page 56 TX Product Reference Guide Index-4...
- Page 57 We’d like to know what you think about this Manual. Please take a moment to fill out this questionnaire and fax this form to: (631) 738-3318, or mail to: Symbol Technologies, Inc. One Symbol Plaza M/S B-4 Holtsville, NY 11742-1300 Attention: Technical Publications Manager IMPORTANT: If you need product support, please call the appropriate customer support number provided.
- Page 60 TX Product Reference Guide 72-61856-01 Revision A - July 2003 Symbol Technologies, Inc. One Symbol Plaza, Holtsville N.Y. 11742-1300 http://www.symbol.com/manuals...
Need help?
Do you have a question about the iPOS TX and is the answer not in the manual?
Questions and answers