Table of Contents
Advertisement
Quick Links
Tools Required:
You will need a #2 Philips or Robertson screwdriver, a straight edge, a measuring tape and a pencil.
(silicone caulking for roof is optional and not supplied) A helper is advised in the assembly of this product.
Package Contents
(A-F) Side Boards...14
(G-H) Back Boards...16
(I) Front Stiles...2
(J-J1) Door Boards...14
(K) Roof Boards...15
(L) Roof End Caps...2
(M) Floor Boards...14
(N) Floor Edge...2
(O) Side Cleat...6
(P) Door Cleat ...4
(Q) Roof Cleat...2
(R) Back Bevel Cleat...1
(S) Back Straight Cleat...2
(T) Front Bevel Rail...1
(U) Front Straight Rail...1
(V) Cross Cleat...2
(W) Shelf Frames (side)...6
(X) Shelf Frames (front)...2
(Y) Shelf Lath...16
(Z) Shelf Strut...1
--Door Handles (2)...4pcs.
--Door Latch...2
--Spacer Block...1
--Corner Braces...6
--Foot...2
Hardware:
•
1 1/4" Screw...318
•
1 3/4" Screw....67
•
Nails...32
•
Hinges...6
NOTE: Construction of this product uses "shiplap" joinery for its superior strength and moisture shedding
design.
To properly use this type of joinery in the steps below it is important that the lip on one board overlaps the lip
on the next board and that all boards are fitted snuggly together. You will find some boards only have 1 lip -
these outer boards ensure a proper fit and finish along corners and edges.
Before proceeding lay out all parts as in diagram above
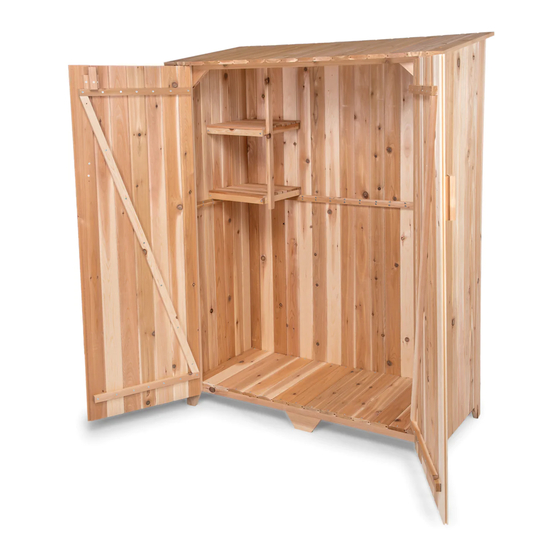
Garden Hutch
(GH50 Unassembled Kit)
:
Advertisement
Table of Contents

Summary of Contents for All Things Cedar Garden Hutch GH50
- Page 1 Garden Hutch (GH50 Unassembled Kit) Tools Required: You will need a #2 Philips or Robertson screwdriver, a straight edge, a measuring tape and a pencil. (silicone caulking for roof is optional and not supplied) A helper is advised in the assembly of this product. Package Contents (A-F) Side Boards…14 (G-H) Back Boards…16...
- Page 2 STEP 1. Build Side Walls • Lay out side boards (A-F) good face down and make angled tops uniform as shown in diagram. • Place a side cleat (O) across top of boards and make cleat flush or even with angled tops.
- Page 3 STEP 4. Build Roof • Lay out roof boards (K) finished side down with roof caps (L) on ends. • Take care to keep all boards tight and even along edges. • Center a roof cleat (Q) across roof boards and approx. 3 inches in from ends of boards.
- Page 4 1 ¼ inch screws. Hutch must be mounted on a flat and level surface. Failure to do so may cause misalignment of door and/or impact overall hutch integrity. ♥ ♥ Thank you for choosing All Things Cedar...
Need help?
Do you have a question about the Garden Hutch GH50 and is the answer not in the manual?
Questions and answers