Table of Contents
Advertisement
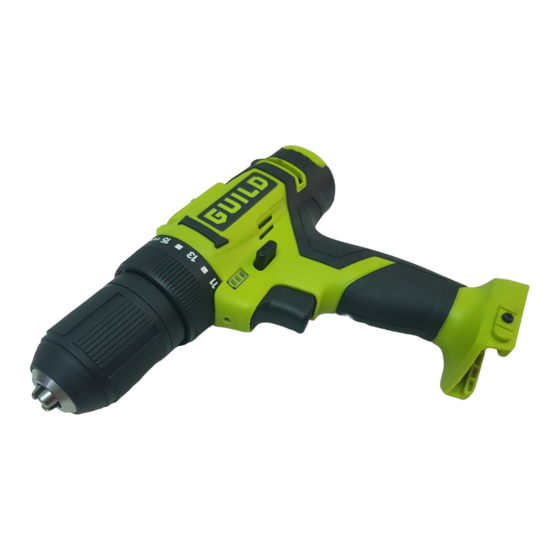
GUILD
18V Lithium-Ion Drill Driver
Instruction Manual
Important
- Please read these instructions fully before operating or maintaining your Guild drill driver
These instructions contain important information that will help you get the best from your Guild
drill driver, ensuring it remains safe to operate.
If you need help or have damaged or missing parts, call the Customer Helpline on 0333 3201989
After Sales Support
UK/Ireland 0333 3201989
Help@guildpowertools.co.uk
CDT218G
Advertisement
Table of Contents

Related Manuals for Guild CDT218G


Summary of Contents for Guild CDT218G
- Page 1 Important - Please read these instructions fully before operating or maintaining your Guild drill driver These instructions contain important information that will help you get the best from your Guild drill driver, ensuring it remains safe to operate. If you need help or have damaged or missing parts, call the Customer Helpline on 0333 3201989...
-
Page 2: Table Of Contents
Contents Safety Information.....................3 In The Box........................8 Accessories.......................8 Operating Instructions....................9 Maintenance......................14 Trouble Shooting.....................15 Technical Data......................16 Environmental Protection..................18 Guarantee........................18 Customer Helpline 0333 3201989... -
Page 3: Safety Information
Safety Information Important - Please read these instructions fully before starting assembly Warning Symbols The following warning symbols appear throughout this assembly manual and indicate the appropriate safety measures you should take when assembling and operating the drill driver. To reduce the risk of injury, Please read the instruction manual Warning Wear ear protection Wear eye protection... - Page 4 Safety Information Important - Please read these instructions fully before starting assembly General Power Tool Safety Warnings WARNING! Read all safety warnings and all instructions. Failure to follow the warnings and instructions may result in electric shock, fire and/or serious injury. Save all warnings and instructions for future reference.
- Page 5 Safety Information Important - Please read these instructions fully before starting assembly General Power Tool Safety Warnings d) Remove any adjusting key or wrench before turning the power tool on. A wrench or a key left attached to a rotating part of the power tool may result in personal injury. e) Do not overreach.
- Page 6 Safety Information Important - Please read these instructions fully before starting assembly General Power Tool Safety Warnings d) Under abusive conditions, liquid may be ejected from the battery; avoid contact. If contact accidentally occurs, flush with water. If liquid contacts eyes, additionally seek medical help.
- Page 7 Safety Information Important - Please read these instructions fully before starting assembly General Safety Warnings the air temperature is between 18ºC and 24ºC. Do not charge the battery pack in air temperatures below 4ºC, or above 40ºC. This is important as it can prevent serious damage to the battery pack.
-
Page 8: In The Box
In The Box Parts Keyless chuck Belt clip Torque adjustment ring Battery pack release button Two-speed gear control On/off switch Forward/Reverse rotation control Sight light Soft grip handle Battery capacity indication Battery pack Accessories Li-ion battery pack 1hr Charger Double ended bit Belt clip Customer Helpline 0333 3201989... -
Page 9: Operating Instructions
Operating Instructions Intended Use This tool is intended for driving in and loosening screws as well as for drilling in wood, metal and plastic. NOTE: Before using the tool, read the instruction book carefully. 1. CHARGING PROCEDURE BEFORE PUTTING INTO OPERATION CHARGING THE TOOL OR BATTERY PACK (SEE FIG A) NOTE: a) Do not use any charger other than that specifically provided for use with the equipment. - Page 10 Operating Instructions 2. INSTALLING AND REMOVING THE BATTERY PACK (SEE FIG B) a) TO REMOVE THE BATTERY PACK Press the Battery Pack Release Button (8) firmly first and then slide the Battery Pack out from your tool. b) TO INSTALL THE BATTERY PACK Slide the fully charged Battery Pack onto the tool with sufficient force until it clicks into position.
- Page 11 Operating Instructions 4. SWITCH LOCK (SEE FIG C) The switch trigger can be locked in the OFF position. This helps to reduce the possibility of accidental starting when not in use. To lock the switch trigger, place the rotation control (b) in the center position. 5.
- Page 12 Operating Instructions 9. TORQUE ADJUSTMENT (SEE FIG E) (Screw driving force of your drill driver) The torque is adjusted by rotating the torque adjustment ring. The torque is greater when the torque adjustment ring is set on a higher setting. The torque is less when the torque adjustment ring is set on a lower setting.
- Page 13 Operating Instructions 11. Battery Capacity Indication Your tool is equipped with Battery Capacity Indication (11). Press the On/Off Switch (9) halfway or fully, the Battery Capacity Indication (11) will light up to show the amount of charge left in the battery. Fuel Gauge Capacity 3 lights...
-
Page 14: Maintenance
Operating Instructions 17. DISPOSAL OF AN EXHAUSTED BATTERY PACK To preserve natural resources, please recycle or dispose of the battery pack properly. This battery pack contains Lithium batteries. Consult your local waste authority for information regarding available recycling and/or disposal options. Discharge your battery pack by operating your drill, then remove the battery pack from the drill housing and cover the battery pack connections with heavy-duty adhesive tape to prevent short circuit and energy discharge. -
Page 15: Trouble Shooting
Trouble Shooting 1. WHY DOES THE DRILL NOT TURN ON WHEN YOU PRESS THE SWITCH? The forward/reverse rotation control, which is on top of the trigger, is positioned in the lock function. Unlock the forward/reverse rotation control by putting it into the required rotation position. -
Page 16: Technical Data
Technical Data Technical Data Table Voltage 18 V No load speed 0-400/0-1450/min Number of clutch positions 18+1 Max torque 30 N.m Chuck capacity 13 mm Charger Protection class Charging time 100-240V~50/60Hz Charger Input Charger Output 10.8--20V 1500mA Steel 10mm Max. drilling capacity Wood 25mm... - Page 17 Technical Data Vibration Information WARNING: The vibration emission value during actual use of the power tool can differ from the declared value depending on the ways in which the tool is used dependant on the following examples and other variations on how the tool is used: How the tool is used and the materials being cut or drilled.
-
Page 18: Environmental Protection
Environmental Protection Waste electrical products should not be disposed of with household waste. Please recycle where facilities exist. Check with your Local Authority or retailer for recycling advice. Guarantee This product is selected for DOMESTIC USE ONLY and not for business use. This product is guaranteed against manufacturing defects for a period of 24 months.
Need help?
Do you have a question about the CDT218G and is the answer not in the manual?
Questions and answers