
Summary of Contents for Loocam C1
- Page 1 User Manual Wire-Free Battery Powered Security Camera For more information about this camera, please visit our official website: www.loocam.com...
-
Page 2: What's In The Box
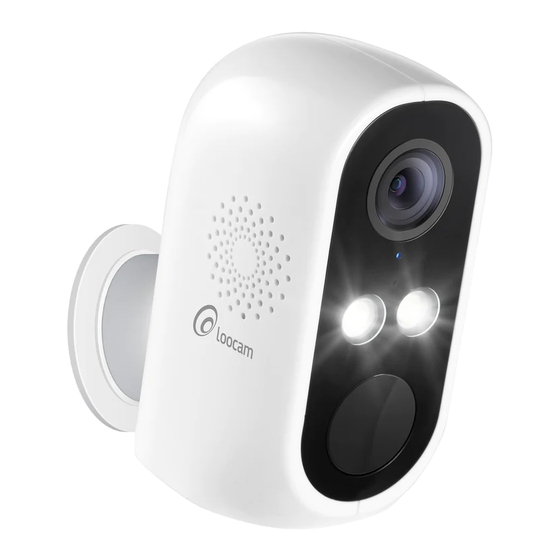
01 / What's in the Box Battery Camera *1 USB Cable *1 Mounting Screw Bag *1 Adhesive Pad *2 Magnetic Bracket *1 Bracket *1 Quick Start Guide *1 Reset Pin *1... - Page 3 02 / Gallery & Specs IR-LEDs HD Lens Status Light Wall Mount Microphone Alarm Magnetic Chuck Spotlight Power Switch PIR Sensor Reset Hole Micro SD Card Slot Speaker DC 5V Power Port Charging Indicator Part Description Power Supply DC 5V Press and hold for 4 seconds to Power Switch turn ON/OFF...
- Page 4 03/ Install CloudEdge App Search "CloudEdge" in App Store or Google Play Store, or scan the QR code below to download and install on your smartphone. Note: Please authorize the following settings when running the app for the first time. Allow "CloudEdge"...
- Page 5 04/ Add Device 4.1 Insert a Micro SD Card Please insert a Micro SD card to record and replay the motion detection video. *MicroSD Card sold seperately (Up to 128GB) NOTE: Please insert the Micro SD card before powering on, otherwise the Micro SD card cannot be read. Insert a Micro SD Card 4.2 Turn On the Camera Press the power button for 3-4 seconds to turn on the...
- Page 6 4.3 Connect to WiFi Keep the camera, phone and router within range of 30 inches and connect to the wireless network. NOTE: The camera currently only supports 2.4GHz wireless network. Camera Router Smartphone Run CloudEdge App, tap “+” and select “BATTERY CAMERA”, tap NEXT.
- Page 7 Follow the instructions on the APP. Face the QR code towards the camera lens at a range of 5-8 inches.
- Page 8 Upon successful scan, a tone can be heard. Tap "Next" to start connecting the camera to WiFi. Once connected, you will be redirect to confirmation screen.
- Page 9 05 / About CloudEdge App 5.1 Installation Tips Installation guide prompt will pop up when entering live view for the first time. Recommend to use the guide if the camera is not yet installed.
- Page 10 Place the camera and smartphone at the location where the camera is to be installed and tap "Next"...
- Page 11 The APP will start diagnosing the strength of the WiFi signal at the location. If the signal is weak, please select a new location with stronger signal.
- Page 12 Recommend to follow the installation tips below. Tap "Done" to finish.
- Page 13 5.2 App Interface Add device Camera time Live view Cloud Subscription Service (green when activate) Alert History (red dot indicates new motion detected) Device Share Device Name Device Type My device list Message Personal homepage...
- Page 14 Device Settings Standard Definition/ High Definition Full screen Bit Rate Battery capacity Network Signal Strength Live view functions Screenshot Record video Hold to talk View screenshot and recorded footage Turn on/off PIR motion detection...
- Page 15 Click to play/pause Video progress bar Zoom in/out timeline Specific date selection Screenshot Alert Records View screenshot and recorded footage Record Video...
- Page 16 06 / PIR Alert 6.1 Alert Settings PIR motion detection is on by default. Sensitivity is set as low. PIR detection distance: 26ft. Setting as follows: Settings → Motion Detection...
- Page 17 (2) Motion Detection (Turn on -> monitor and receive alert) Alarm Interval (turn off / 2 minutes/5 minutes/10 minutes) Alarm only when people are detected (select Day Detection or Night Detection)
- Page 18 Alarm Plan (open → set the alarm time, the device only triggers an alarm event within the set time period)
- Page 19 Audio warning and strobe light (open → select Audio warning/White light warning/Audio warning and strobe light → adjust alarm volume) NOTE: Audio warning and strobe light only works at night.
- Page 20 07 / Alert Push Notification and Playback Battery camera is not designed for 24/7 all day recording. The camera will activate to record images/videos and push alert notification when PIR motion sensor is being triggered. View live or replay captured events via CloudEdge App. When PIR motion sensor is triggered: Alert Message Notification Note: Enable CloudEdge App notification in phone settings.
-
Page 21: Camera Installation
08 / Camera Installation You can place it on any flat surface: table, chair, TV cabinet etc.. Install with Wall Mount Bracket Unscrew the baseplate, drill 3 holes in the wall according to the hole distance of the base, and insert the plastic wall plug. - Page 22 8.3 Install with Magnetic bracket installation Tear off the double-sided adhesive protective film and paste it on the bottom surface of the bracket, then remove the protective film on the other side, and fix the bracket to the installation position. Press the bracket for three minutes to achieve the best results.
-
Page 23: Installation Tips
09 / Installation Tips 9.1 Follow the tips below to reduce false alarms NOTE: Install your camera in a location with a clear, unblocked field of view and with a good wireless signal to your wireless router. Install your cameras a maximum of 300ft from the wireless router. - Page 24 Please keep your dated purchase receipt which is required for limited warranty requests. For more details on warranty, please visit www.loocam.com. If you have any questions in regards to your new Loocam security product, please email us loocare@loocam.com. Trademarks ©Loocam Technology LLC, California.
Need help?
Do you have a question about the C1 and is the answer not in the manual?
Questions and answers