
Summary of Contents for Looki DoorEye Plus
- Page 1 Looki DoorEye Plus Quick guide The camera picture shown in this manual is for illustration purpose only. Actual product may vary due to product enhancement.
-
Page 2: Table Of Contents
Content/Inhoud/Inhalt/Contenuto/Contenu/Contenido ENGLISH Included In The Package Product Structure Chime Description Installation Instructions Mode 1: Battery Installation Mode 2: AC Installation Connect Download The App Add Device Functions Introduction How To Use The Chime Technical Parameters Chime Pairing Important Information DUTCH Inbegrepen in het pakket Structuur van het product Chime... - Page 3 GERMAN Im Paket enthalten Produktstruktur Glockenspiel Beschreibung Einbauanleitung Modus 1: Einbau der Batterie Modus 2: AC-Installation Verbinden Sie Die App herunterladen Gerät hinzufügen Funktionen Einführung Verwendung des Glockenspiels Technische Parameter Innere Glocke-Paarung Wichtige Informationen ITALIAN Incluso nel pacchetto Struttura del prodotto Chime Descrizione Istruzioni per l'installazione...
- Page 4 FRENCH Inclus dans le paquet Structure du produit Carillon Description Instructions d'installation Mode 1 : Installation de la batterie Mode 2 : Installation du CA Connectez-vous à Télécharger l'application Ajouter un dispositif Introduction aux fonctions Comment utiliser le carillon Paramètres techniques Appariement des carillons Informations importantes SPANISH...
-
Page 5: Included In The Package
Included In The Package 1. Looki DoorEye 2. Chime 3. Pin Plus 4. USB cable 5. Double-sided 6. Instruction tape manual 7. Screwdriver 8. Screws(3 kinds) 9. Battery B x 2 A x 2 D x 1 10. N/C Plate 11. -
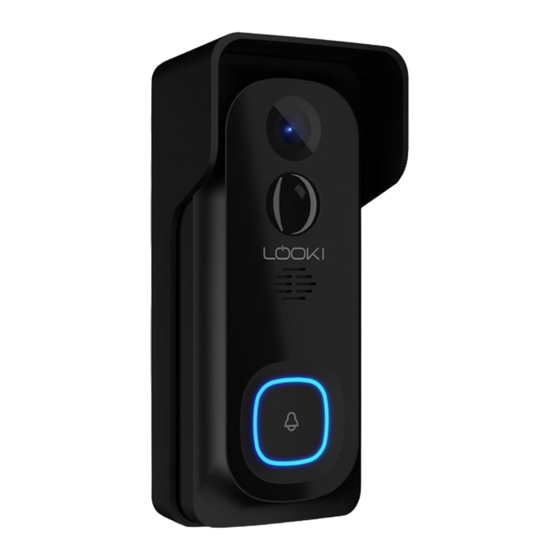
Page 6: Product Structure
Product Structure Lens External Speaker power port Doorbell button & Status light SD card slot Charging indicator Microphone Micro USB Reset Note: Ensure the battery is inserted correctly into the battery compartment to prevent short circuit. Chime Indicator light Speaker Volume button Ringtone button Pairing button... -
Page 7: Description
Description Power Port AC 12~24V Doorbell Press the button to activate the doorbell button Status light • Red light solids on: The camera or internet has encountered a problem. • Red light blinking: Wait for the camera to connect to WiFi (flickers slowly) Connect to WiFi (flickers quickly)). -
Page 8: Installation Instructions
Installation Instructions Kindly consider the suitable mode of power for your home before installing the doorbell. Mode 1 Battery Installation tape tape Mark screws position 2. Drill holes on the 3. Fix the mounting on the wall using the wall with an electric bracket with the mounting bracket as drill, then insert the... -
Page 9: Connect
tape tape 4. Fix the mounting bracket on 5. Install the doorbell 6. Secure with a screw the wall with the provided into the mounting and tighten with a screws or tape (No need for bracket. screwdriver. screws if using tape). Connect Download The App LookiLife App is available for both iOS and Android OS. -
Page 10: Faq
Q: The camera cannot be previewed properly. A: Check if the network is weak. If yes, place the router close to the smart doorbell for better reception. If it still cannot preview, reset the camera and add again. Q: After resetting the device, why is the camera still in the device list? A: Resetting the device only resets the camera’s network configura- tion, not the App configuration. -
Page 11: Functions Introduction
Functions Introduction Remote wake-up The camera will enter sleep mode to save power during periods of inactivity. Please activate this function to wake up the camera and preview the environment on your phone. Full-duplex audio You can see and hear anyone in your home on the mobile App from the camera. -
Page 12: How To Use The Chime
How To Use The Chime Pairing button: Press " " button for 5 seconds to restore factory settings; Short press the " " button for 1-2 seconds to pair with doorbell. Volume button: Click the " " button to adjust the volume, and continuously click to adjust the volume in a loop. -
Page 13: Important Information
2. Press the button on the smart doorbell to pair; the door chime will sound, and the indicator light will flash. 3. When the connection is successful, the indicator light of the chime will turn off, and it will sing a ringtone. Important Information 1. -
Page 14: Inbegrepen In Het Pakket
Inbegrepen in het pakket 1. Looki DoorEye 2. Chime 3. Pin Plus 4. USB-kabel 5. Dubbelzijdige 6. Gebruiksaanwi- tape jzing 7. Schroevendraai- 8. Schroeven (3 9. Batterij soorten) B x 2 A x 2 D x 1 10. N/C Plaat 11. -
Page 15: Structuur Van Het Product
Structuur van het product Lens Externe voeding- Spreker spoort Deurbel knop & status licht SD-kaart- sleuf Oplaadindi- cator Microfoon Micro USB Reset Let op: Zorg ervoor dat de batterij correct in het batterijvak is geplaatst om kortsluiting te voorkomen. Chime Indicatorlampje Spreker Volumeknop... -
Page 16: Beschrijving
Beschrijving Stroompoort AC 12~24V Deurbel knop Druk op de knop om de deurbel te activeren Statuslampje • Rood licht brandt: Er is een probleem met de camera of het internet. • Rood lampje knippert: Wacht tot de camera verbinding maakt met WiFi (flikkert langzaam) Verbinding maken met WiFi (flikkert snel)). -
Page 17: Installatie-Instructies
Installatie-instructies Overweeg de geschikte stroomvoorziening voor uw huis voordat u de deurbel installeert. Modus 1 Batterij-installatie tape tape Markeer de 2. Boor gaten in de muur 3. Bevestig de schroefpositie op de met een elektrische montagebeugel met muur met behulp van boor en breng dan de de bijgeleverde de montagebeugel... -
Page 18: Connect
tape tape 4. Bevestig de montagebeugel 5. Installeer de 6. Zet vast met een aan de muur met de deurbel in de schroef en draai vast bijgeleverde schroeven of montagebeugel. met een tape (geen schroeven nodig schroevendraaier. bij gebruik van tape). Connect Download de app De LookiLife App is beschikbaar voor zowel iOS als Android OS. -
Page 19: Faq
V: De camera kan niet goed worden afgelezen. A: Controleer of het netwerk zwak is. Zo ja, plaats de router dan dicht bij de slimme deurbel voor een betere ontvangst. Als het nog steeds niet kan previewen, reset de camera en voeg opnieuw toe. V: Waarom staat de camera na het resetten van het toestel nog steeds in de lijst met toestellen? A: Het resetten van het apparaat reset alleen de netwerkconfiguratie... -
Page 20: Functies Inleiding
Functies Inleiding Wekken op afstand De camera schakelt over naar de slaapstand om stroom te besparen tijdens perioden van inactiviteit. Activeer deze functie om de camera wakker te maken en de omgeving op uw telefoon te bekijken. Full-duplex audio U kunt iedereen in uw huis zien en horen via de mobiele App van de camera. -
Page 21: Hoe De Chime Te Gebruiken
Hoe de Chime te gebruiken Koppelingsknop: Druk gedurende 5 seconden op de " " toets om de fabrieksinstellingen te herstellen; Druk kort op de " " knop gedurende 1-2 seconden om te koppelen met de deurbel. Volumeknop: Klik op de " "... -
Page 22: Belangrijke Informatie
2. Druk op de knop op de slimme deurbel om te koppelen; de deurbel zal klinken en het indicatorlampje zal knipperen. 3. Als de verbinding tot stand is gebracht, gaat het indicatielampje van de gong uit en klinkt er een beltoon. Belangrijke informatie 1. -
Page 23: Im Paket Enthalten
Im Paket enthalten 1. Looki DoorEye 2. Innere Glocke 3. Stift Plus 4. USB-kabel 5. Doppelseitiges 6. Gebrauchsan- Klebeband weisung 7. Schraubenzieher 8. Schrauben (3 9. Batterie Arten) B x 2 A x 2 D x 1 10. N/C Platte 11. -
Page 24: Produktstruktur
Produktstruktur Objektiv Externer Stroman- Sprecher schluss Türklingeltaste & Statusleuchte SD-Karten schlitz Ladeindika- Mikrofon Micro USB Zurücksetzen Anmerkung: Achten Sie darauf, dass die Batterie richtig in das Batteriefach eingelegt ist, um einen Kurzschluss zu vermeiden. Glockenspiel Anzeigelampe Sprecher Lautstärketaste Rufton-Taste Pairing-Taste... -
Page 25: Beschreibung
Beschreibung Stromanschluss AC 12~24V Türklingel-Taste Drücken Sie die Taste, um die Türklingel zu aktivieren Statusleuchte • Rotes Licht leuchtet: Bei der Kamera oder dem Internet ist ein Problem aufgetreten. • Rotes Licht blinkt: Warten, bis die Kamera eine Verbindung zum WiFi herstellt (flackert langsam) Mit dem WiFi verbinden (flackert schnell)). -
Page 26: Einbauanleitung
Einbauanleitung Überlegen Sie bitte vor der Installation der Türklingel, welche Stromart für Ihr Haus geeignet ist. Modus 1 Einbau der Batterie Klebeband Klebeband Markieren Sie die 2. Bohren Sie mit einer 3. Befestigen Sie die Position der Schrauben elektrischen Halterung mit den an der Wand, indem Bohrmaschine Löcher in mitgelieferten... -
Page 27: Verbinden Sie
tape tape 4. Befestigen Sie die Halterung mit 5. Montieren Sie 6. Sichern Sie sie mit den mitgelieferten Schrauben die Türklingel in einer Schraube und oder Klebeband an der Wand (bei der Halterung. ziehen Sie sie mit Verwendung von Klebeband sind einem keine Schrauben erforderlich). -
Page 28: Faq
F: Die Kamera kann nicht richtig in der Vorschau angezeigt werden. A: Prüfen Sie, ob das Netz schwach ist. Wenn ja, platzieren Sie den Router in der Nähe der intelligenten Türklingel, um den Empfang zu verbessern. Wenn die Vorschau immer noch nicht funktioniert, setzen Sie die Kamera zurück und fügen Sie sie erneut hinzu. -
Page 29: Funktionen Einführung
Funktionen Einführung Ferngesteuertes Aufwachen Die Kamera wechselt in den Ruhezustand, um Strom zu sparen, wenn sie nicht benutzt wird. Bitte aktivieren Sie diese Funktion, um die Kamera aufzuwecken und eine Vorschau der Umgebung auf Ihrem Telefon anzuzeigen. Vollduplex-Audio Mit der mobilen App können Sie alle Personen in Ihrem Haus über die Kamera sehen und hören. -
Page 30: Verwendung Des Glockenspiels
Verwendung der inneren Glocke Pairing-Taste: Drücken Sie die Taste " " 5 Sekunden lang, um die Werkseinstellungen wiederherzustellen; Drücken Sie kurz die Taste " " für 1-2 Sekunden, um sich mit der Türklingel zu verbinden. Schaltfläche "Lautstärke": Klicken Sie auf die Schaltfläche " ", um die Lautstärke einzustellen, und klicken Sie kontinuierlich, um die Lautstärke in einer Schleife einzustellen. -
Page 31: Wichtige Informationen
2. Drücken Sie die Taste an der intelligenten Türklingel, um sie zu koppeln; der Türgong ertönt und die Anzeigeleuchte blinkt. 3. Wenn die Verbindung erfolgreich ist, erlischt die Anzeigeleuchte des Gongs und es ertönt ein Klingelton. Wichtige Informationen 1. Der Gong kann mit maximal acht Türklingeln gleichzeitig verbunden werden. -
Page 32: Incluso Nel Pacchetto
Incluso nel pacchetto 1. Looki DoorEye 2. Chime 3. Pin Plus 4. Cavo USB 5. Nastro biadesivo 6. Manuale d'istruzioni 7. Cacciavite 8. Viti (3 tipi) 9. Batteria B x 2 A x 2 D x 1 10. Piastra N/C 11. -
Page 33: Struttura Del Prodotto
Struttura del prodotto Obiettivo Porta di alimentazi- Altoparlante one esterna Pulsante del campanello e luce di stato Slot per scheda SD Indicatore di carica Microfono Micro USB Azzerare Nota: Assicurarsi che la batteria sia inserita correttamente nel vano batteria per evitare un corto circuito. Chime Indicatore luminoso Altoparlante... -
Page 34: Descrizione
Descrizione Porta di AC 12~24V alimentazione Pulsante del Premi il pulsante per attivare il campanello campanello • La luce rossa è accesa: La telecamera o internet Luce di stato ha incontrato un problema. • Luce rossa lampeggiante: Attendere che la videocamera si connetta al WiFi (lampeggia lentamente) Connettiti al WiFi (lampeggia rapidamente)). -
Page 35: Istruzioni Per L'installazione
Istruzioni per l'installazione Considerate gentilmente il modo di alimentazione adatto alla vostra casa prima di installare il campanello. Modalità 1 Installazione della batteria Nastro adesivo Nastro adesivo Segnare la posizione 2. Praticare dei fori sul muro 3. Fissare la staffa di delle viti sul muro con un trapano elettrico, montaggio con le viti... -
Page 36: Collegare
Nastro adesivo Nastro adesivo 4. Fissare la staffa di montaggio al 5. Installare il 6. Fissare con una vite e muro con le viti o il nastro adesivo campanello stringere con un in dotazione (non c'è bisogno di nella staffa di cacciavite. -
Page 37: Faq
D: Non è possibile visualizzare correttamente l'anteprima della fotocamera. A: Controlla se la rete è debole. Se sì, posiziona il router vicino al campanello intelligente per una migliore ricezione. Se ancora non può vedere l'anteprima, resettare la fotocamera e aggiungere di nuovo. D: Dopo aver resettato il dispositivo, perché... -
Page 38: Funzioni Introduzione
Funktionen Einführung Sveglia a distanza La videocamera entra in modalità sleep per risparmiare energia durante i periodi di inattività. Attiva questa funzione per risvegliare la videocamera e visualizzare l'anteprima dell'ambiente sul tuo telefono. Audio full-duplex Puoi vedere e sentire chiunque in casa tua sull'App mobile dalla telecamera. -
Page 39: Come Usare La Suoneria
Come usare la suoneria Pulsante di accoppiamento: Premere il pulsante " " per 5 secondi per ripristinare le impostazioni di fabbrica; Premere brevemente il tasto " " per 1-2 secondi per accoppiare il campanello. Pulsante del volume: Cliccare il pulsante " "... -
Page 40: Informazioni Importanti
2. Premi il pulsante sul campanello intelligente per accoppiarlo; il campanello suonerà e la spia lampeggerà. 3. Quando la connessione ha successo, la spia della suoneria si spegne e canta una suoneria. Informazioni importanti 1. La suoneria può connettersi a un massimo di otto campanelli alla volta. -
Page 41: Inclus Dans Le Paquet
Inclus dans le paquet 1. Looki DoorEye 2. Carillon 3. Broche Plus 4. Câble USB 5. Ruban adhésif 6. Manuel double-face d'instruction 7. Tournevis 8. Vis (3 sortes) 9. Batterie B x 2 A x 2 D x 1 10. Plaque N/C 11. -
Page 42: Structure Du Produit
Structure du produit Objectif Port d'alimenta- Haut-parleur tion externe Bouton de sonnette et voyant d'état Fente pour carte SD Indicateur de charge Microphone Micro USB Réinitialiser Note : Veillez à ce que la batterie soit correctement insérée dans son compartiment afin d'éviter tout court-circuit. Carillon Voyant lumineux Haut-parleur... -
Page 43: Description
Description Port AC 12~24V d'alimentation Bouton de Appuyez sur le bouton pour activer la sonnette sonnette • Lumière rouge solide allumée : La caméra ou Voyant d'état Internet a rencontré un problème. • La lumière rouge clignote : Attendre que la caméra se connecte au WiFi (clignote lentement) Se connecter au WiFi (clignote rapidement)). -
Page 44: Instructions D'installation
Instructions d'installation Avant d'installer la sonnette, réfléchissez au mode d'alimentation approprié pour votre maison. Mode 1 Installation de la batterie Ruban adhésif Ruban adhésif Marquez la position 2. Percez des trous sur le 3. Fixez le support de des vis sur le mur en mur à... -
Page 45: Connectez-Vous À
Ruban adhésif Ruban adhésif 4. Fixez le support de montage au 5. Installez la 6. Fixez avec une vis et mur à l'aide des vis ou du ruban sonnette dans le serrez avec un adhésif fournis (pas besoin de vis support de tournevis. -
Page 46: Faq
Q : L'appareil photo ne peut pas être prévisualisé correctement. R : Vérifiez si le réseau est faible. Si oui, placez le routeur à proximité de la sonnette intelligente pour une meilleure réception. Si vous ne pouvez toujours pas prévisualiser, réinitialisez la caméra et ajoutez-la à... -
Page 47: Introduction Aux Fonctions
Introduction aux fonctions Réveil à distance La caméra passe en mode veille pour économiser de l'énergie pendant les périodes d'inactivité. Veuillez activer cette fonction pour réveiller la caméra et prévisualiser l'environnement sur votre téléphone. Audio en duplex intégral Vous pouvez voir et entendre n'importe qui dans votre maison sur l'application mobile à... -
Page 48: Comment Utiliser Le Carillon
Comment utiliser le carillon Bouton de jumelage : Appuyez sur le bouton " " pendant 5 secondes pour restaurer les paramètres d'usine ; Appuyez brièvement sur le bouton " " pendant 1 à 2 secondes pour le couplage avec la sonnette. Bouton de volume : Cliquez sur le bouton "... -
Page 49: Informations Importantes
2. Appuyez sur le bouton de la sonnette intelligente pour l'appairer ; le carillon de porte retentit et le témoin lumineux clignote. 3. Lorsque la connexion est réussie, le témoin lumineux du carillon s'éteint et celui-ci émet une sonnerie. Informations importantes 1. -
Page 50: Incluido En El Paquete
Incluido en el paquete 1. LookiLife DoorEye 2. Campanilla 3. Pin Plus 4. Cable USB 5. Cinta adhesiva 6. Manual de de doble cara instrucciones 7. Destornillador 8. Tornillos (3 tipos) 9. Batería B x 2 A x 2 D x 1 10. -
Page 51: Estructura Del Producto
Estructura del producto Lente Puerto de alimentac- Altavoz ión externo Botón de timbre y luz de estado Ranura para tarjetas SD Indicador de carga Micrófono Micro USB Reiniciar Nota : Asegúrese de que la batería está correctamente insertada en el compartimento de la batería para evitar un cortocircuito. -
Page 52: Descripción
Descripción Puerto de AC 12~24V alimentación Botón del Pulse el botón para activar el timbre timbre • La luz roja está encendida: La cámara o internet Luz de estado ha encontrado un problema. • La luz roja parpadea: Espere a que la cámara se conecte al WiFi (parpadea lentamente) Conéctese al WiFi (parpadea rápidamente)). -
Page 53: Instrucciones De Instalación
Instrucciones de instalación Tenga en cuenta el modo de alimentación adecuado para su hogar antes de instalar el timbre. Modo 1 Instalación de la batería Cinta adhesiva Cinta adhesiva Marque la posición de 2. Perfore los agujeros en 3. Fije el soporte de los tornillos en la pared la pared con un taladro montaje con los... -
Page 54: Conectar
Cinta adhesiva Cinta adhesiva 4. Fije el soporte de montaje en la 5. Instale el timbre 6. Fijar con un tornillo y pared con los tornillos o la cinta en el soporte de apretar con un adhesiva suministrados (no es montaje. -
Page 55: Preguntas Frecuentes
PREGUNTAS FRECUENTES P: La cámara no se puede previsualizar correctamente. R: Comprueba si la red es débil. Si es así, coloque el router cerca del timbre inteligente para mejorar la recepción. Si sigue sin poder ver, reinicie la cámara y vuelva a añadirla. P: Después de reiniciar el dispositivo, ¿por qué... -
Page 56: Funciones Introducción
Funciones Introducción Despertar a distancia La cámara entrará en modo de reposo para ahorrar energía durante los periodos de inactividad. Por favor, active esta función para despertar la cámara y previsualizar el entorno en su teléfono. Audio full-duplex Puedes ver y escuchar a cualquier persona en tu casa en la App móvil desde la cámara. -
Page 57: Cómo Utilizar El Timbre
Cómo utilizar el timbre Botón de emparejamiento: Pulse el botón " " durante 5 segundos para restaurar la configuración de fábrica; Pulse brevemente el botón " " durante 1-2 segundos para emparejar el timbre. Botón de volumen: Haz clic en el botón " "... -
Page 58: Información Importante
2. Pulse el botón del timbre inteligente para emparejarlo; el timbre de la puerta sonará y la luz indicadora parpadeará. 3. Cuando la conexión sea exitosa, la luz indicadora del timbre se apagará y emitirá un tono de llamada. Información importante 1.