Table of Contents
Advertisement
Quick Links
Advertisement
Table of Contents

Subscribe to Our Youtube Channel
Summary of Contents for HydroMist Mist-n-Go Plus
- Page 1 1/3 HP High Pressure Misting Pump User Manual...
-
Page 2: Table Of Contents
6/21 Table of Contents 1. General Information ................. 1 2. Specifications ..................2 2.1 Components ................3 3. Installation ..................4 4. Important Information ..............6 4.1 Dangers ..................6 4.2 Warnings ..................6 4.3 Cautions ..................7 5. Control Panel Instructions ..............8 5.1 First Time Operation .............. -
Page 3: General Information
No information may be released to third parties without written permission by HydroMist USA. Descriptions and images in this document are meant for reference and as practical examples. They may be modified at any time and without prior notice. -
Page 4: Specifications
Pro Mist 35 User Manual www.HydroMistUSA.com 2. Specifications Pump Specifications Mist-n-Go Plus Model F10-04-025 Part Number Operating Maximum = 1000 psi Pressure 0.2 GPM @ 1750 RPM Flow rate #2 Nozzles (.008”/0.2mm) Nozzle |Minimum = 4 | Maximum = 16|... -
Page 5: Components
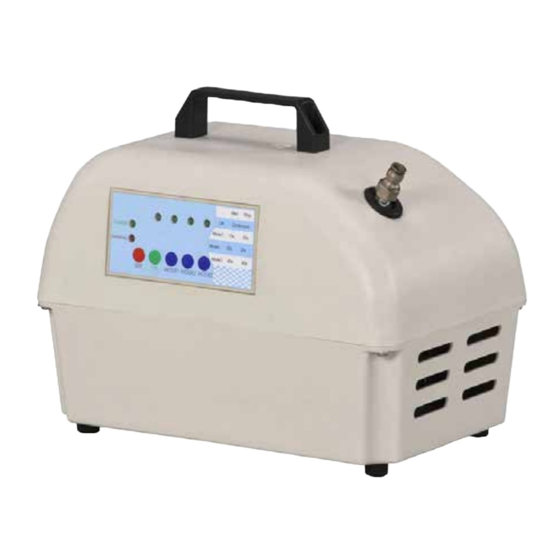
Pro Mist 35 User Manual www.HydroMistUSA.com Components Part Descriptions LED Control Panel Power Cord Carrying Handle Top Pump Cover High Pressure Outlet Bottom Pump Cover Water Inlet Purge Outlet Hose... -
Page 6: Installation
Regular garden hose may not be suitable to hold a constant pressure over time, and can swell up and leak if left under pressure. HydroMist has hoses available, made specifically for the permanent connection of the misting pump to a standard garden hose bib. - Page 7 1000 PSI of water pressure. The pump will not work with medium or low-pressure misting components or systems. Note: HydroMist recommends using stainless steel #2 nozzles which have a center hole measurement of 0.008”/0.2mm. This is our standard offering for all high-pressure misting systems to deliver the best performance in evaporative cooling.
-
Page 8: Important Information
Pro Mist 35 User Manual www.HydroMistUSA.com 4. Important Information Dangers OBSERVE THE FOLLOWING IN ORDER TO PREVENT SERIOUS INJURY OR DEATH. Do NOT use during severe storms, flooded areas, or near open 4.1.1 bodies of water. Only trained personnel may operate this machine. Children and 4.1.2 adults who are not well-trained should not operate the machine. -
Page 9: Cautions
Pro Mist 35 User Manual www.HydroMistUSA.com Cautions Do not operate in temperatures below freezing (0°C/32°F). 4.3.1 Before use, check for oil leakage. If there has been any leakage, 4.3.2 fix the leak and fill the pump oil. Only use a power source with the electrical voltage (V), 4.3.3 frequency (Hz), and current (A) rating according to the machine specifications. -
Page 10: Control Panel Instructions
Pro Mist 35 User Manual www.HydroMistUSA.com 5. Control Panel Instructions The control panel has 5 buttons and 6 LED lights. Buttons LED Lights POWER (Green) WARNING (Red) MODE 1 CONTINUOUS ON (Green) MODE 2 MODE 1 ON (Green) MODE 3 MODE 2 ON (Green) MODE 3 ON (Green) Misting Modes... -
Page 11: First Time Operation
Pro Mist 35 User Manual www.HydroMistUSA.com First Time Operation Once your pump is hooked up to a water supply, an electrical connection, and your misting system, follow these steps to purge the pump and misting system of air. 1) Remove a misting nozzle at the furthest end of your misting system. This will allow air to be forced out of the misting lines. -
Page 12: Storage
Pro Mist 35 User Manual www.HydroMistUSA.com Storage Please follow the steps below to drain water from the pump. 5.2.1 Disconnect the water supply to the pump. Run the pump on continuous mode. After water stops coming out of the pump outlet, turn the pump off. -
Page 13: Troubleshooting
Pro Mist 35 User Manual www.HydroMistUSA.com 6. Troubleshooting Before troubleshooting, disconnect the power source from the machine. FAULT CAUSE REMEDY Ÿ The misting nozzle is blocked. Ÿ Clean the nozzle. If it doesn’t work, change the nozzle. Ÿ Air is in the lines. Ÿ... - Page 14 Pro Mist 35 User Manual www.HydroMistUSA.com The pump is equipped with a thermal overload protection device. This device behaves like a circuit breaker and protects the pump from damage due to excess heat or electricity. There is a reset button to allow the user to reset the device if it activates to protect the pump.
- Page 15 Pro Mist 35 User Manual www.HydroMistUSA.com The misting pump comes preset at a maximum outlet pressure of 1000 PSI for a system with 4 misting nozzles. The larger the system, the lower the total system pressure will be. If the pump produces more than 1000 PSI it can cause a noisy operating condition.
- Page 16 Pro Mist 35 User Manual www.HydroMistUSA.com Turn the knob counterclockwise to decrease the output pressure. Turn the knob clockwise to increase the output pressure.
-
Page 17: Maintenance
Pro Mist 35 User Manual www.HydroMistUSA.com 7. Maintenance Periodic Check and Inspection Interval Items Before 50hr 100hr 200hr 300hr Operation ◆ ◆ Main Components ◆ ◆ Check All Fittings are Tight ◆ ◆ Check Water Lines for Leakage ◆ ◆ Check Pump for Oil Leakage Inspect Pump Cover for Damage ◆... -
Page 18: Procedure For Oil Change
Oil must be changed after first the 50-hour operation mark, and after every 250-300 hours of running. Use ISO 68 oil or equivalent, available from HydroMist: ISO68 Pump Oil, 21oz. bottle: Part# F02-06-001 Always power off the machine and disconnect power before performing any maintenance or inspection. - Page 19 Pro Mist 35 User Manual www.HydroMistUSA.com 7.2.7 The oil drain plug is on the bottom side of the pump. Put a catch pan or other small container under the oil drain plug and unscrew it to start draining the oil. It is recommended to use an inexpensive tray or other disposable pan that can be discarded after use.
- Page 20 Pro Mist 35 User Manual www.HydroMistUSA.com 7.2.10 Add up to 5 oz. of oil through the fill hole. 7.2.11 Tighten the oil fill plug. Wipe up any spilled oil. Visually check the pump and motor to ensure all bolts, screws and connectors are tight and in good condition.
-
Page 21: Oil Changes And Checks
Pro Mist 35 User Manual www.HydroMistUSA.com Oil Changes and Checks Question Reasoning Actions — Use an hourly schedule to maintain oil changes. Overdue or — Change oil regularly (see expired changes will cause Section 7.1). component damage due to lack of lubrication. -
Page 22: Warranty
8. Warranty HYDROMIST ONE (1) YEAR LIMITED WARRANTY All Hydromist products are warrantied for a period of one (1) year for defects in workmanship and materials under normal use and service. This warranty is extended solely to the original purchaser. - Page 23 Claims: All warranty claims must be submitted to Hydromist prior to the expiration of the warranty period. Hydromist will repair or replace any part of the fan product that is defective in material or workmanship. In order to initiate this warranty, a copy of original purchase invoice must be provided.
- Page 24 Pro Mist 35 User Manual www.HydroMistUSA.com Notes:_______________________________________________________ ____________________________________________________________ ____________________________________________________________ ____________________________________________________________ ____________________________________________________________ ____________________________________________________________ ____________________________________________________________ ____________________________________________________________ ____________________________________________________________ ____________________________________________________________ ____________________________________________________________ ____________________________________________________________ ____________________________________________________________ ____________________________________________________________ ____________________________________________________________ ____________________________________________________________ ____________________________________________________________ ____________________________________________________________ ____________________________________________________________ ____________________________________________________________ ____________________________________________________________ ____________________________________________________________ ____________________________________________________________...
Need help?
Do you have a question about the Mist-n-Go Plus and is the answer not in the manual?
Questions and answers