Table of Contents

Related Manuals for Independence paragliding NG 100

Summary of Contents for Independence paragliding NG 100
- Page 1 Owner´s manual Fassung 1.0 vom 07.01.2022 Rescue system NG 100, 120, 140 NG 100 light, 120 light, 140 light Fly market GmbH & Co. KG Am Schönebach 3 D-87637 Eisenberg Tel.: +49-8364-9833-0 Fax: +49-8364-9833-33 Mail: info@independence.aero...
-
Page 2: Table Of Contents
The manufacturer cannot be held liable for any personal injury or material damage, which may result from this rescue system in any way. 1. TECHNICAL DATA Type of rescue parachute: NG 100, NG 120, NG 140, NG 100 light, NG 120 light, NG 140 light Manufacturer: Fly market Flugsport-Zubehör GmbH & Co. KG Am Schönebach 3 D-87637 Eisenberg Tel. -
Page 3: Purpose Of Use
2. Purpose of use Manually activated rescue system for single-seat paraglider pilots in emergency situations, as well as the HG version for hangglider pilots. 3. Operating limits Maximum operating speed: 115 km/h (32 m/s) Packing interval: 12 months, after which repacking is required. This must be noted in the Repack and inspection Log book.The packing interval may be shortened by the effects of moisture, sand, salt or other environmental influences. -
Page 4: Behaviour In Case Of Damage
7. Behaviour in case of damage If damage is found during the inspection of the rescue system, the parachute must be sent to the manufacturer for assessment/repair. This also applies to damage whose effects on the airworthiness of the system cannot be clearly determined. -
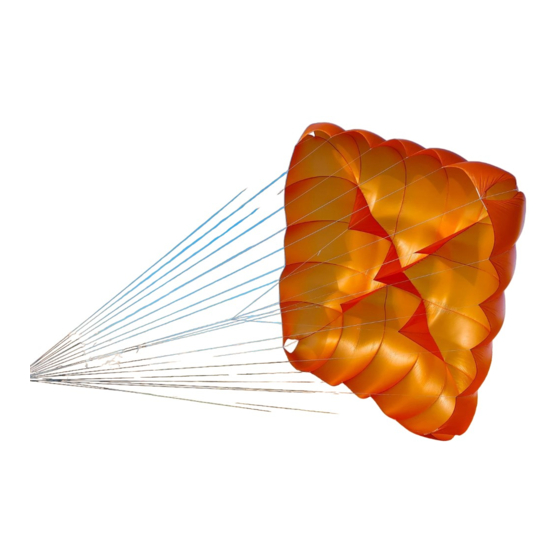
Page 5: Structure Of The Parachute
15. Structure of the parachute The parachute has a square construction and consists of 20 panels. Packing loops are attached to the top of the canopy. The canopy is made of high strength nylon fabric. The seams of the canopy are cap seams. Hem and canopy are reinforced with sewn-in tapes. -
Page 6: Packing Instructions
15. Structure of the parachute - description of packing loops On the NG series, packing loops of different lengths are attached to the top to enable easy packing. They are green at the corners, yellow at the sides, and the packing loop of the centre line is white. The overview drawings below show where the packing loops are located (required for 16. - Page 7 3. Place panel 11 centred on the floor, pull panel 10 out to 4. Arrange panel 9 to 7. Pull the upper and lower part of the the side, as well as the upper part (blue arrow). panel out to the side so that the panel forms a rectangle. 5.
- Page 8 9. Place panel 11 centred on the floor, pull panel 10 out to 10. Arrange panel 9 to 7. Pull the upper and lower part of the side, as well as the upper part (blue arrow). the panel out to the side so that the panel forms a rectangle.
- Page 9 Schematic Schematic illustration illustration S-fold S-fold 15. Fold the left side in an S-shape (step 1). 16. Fold the right side in an S-shape (step 2). 17. Remove packing cord. 18. Stow top of the canopy in the deployment bag. Fold the rest of the canopy in small S-folds and place it in the deployment bag.
- Page 10 17. Mounting in a front container (optional) 1. Connect the release handle at the loop in the middle of 2. Fix the Y-bridle in the required position on the front the deployment bag (flat side) by looping. container by using the velcro strips. Connect the parachute bridle with the Y-bridle of the front container (for details see No.
- Page 11 6. Close the bottom flap and secure provisionally with the 7. Put the packing cords through the eyelets of the top flap. pins of the release handle. 8. Close the top flap and secure with the pins of the release 9.
-
Page 12: Mounting / Integration To A Harness
18. Mounting / integration to a harness The adaptation of the NG / NG light series to the harness depends on the harness which is used. Always refer to the manual of the used harness. This is usually done at suitable attachment points in the shoulder area or in the main suspension of the harness. The NG / NG light series has one attachment point via the bridle. -
Page 13: Specialities For Paraglider´s Winch-Towing
Cloverleaf deployment bag packing with lines bundles on the bottom of the container: Closure loop cloverleaf deployment bag Lines Canopy in S-folds (stack pack) Cloverleaf container Bridle Bottom of container Lines hanks Cloverleaf deployment bag Closure loop cloverleaf deployment bag packing with lines bundles on top of the canopy: Lines Lines hanks...
Need help?
Do you have a question about the NG 100 and is the answer not in the manual?
Questions and answers