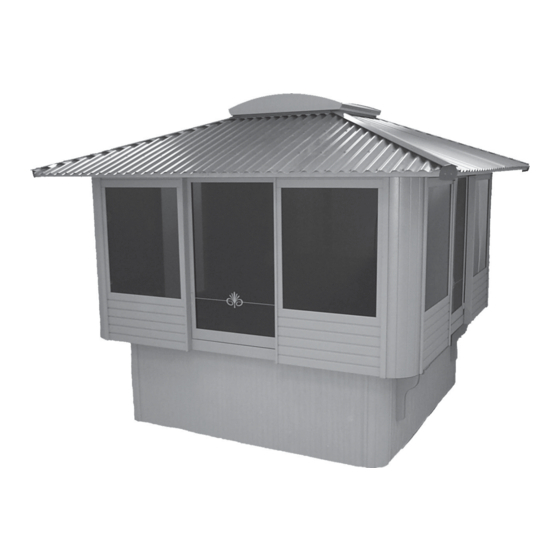

Summary of Contents for Sequoia TubTop 72-80
- Page 1 TubTop™ Assembly Guide for the TubTop™ Version 7—January 10, 2017 Sequoia Spa Shelters™ by Sequoiaworks Inc.
-
Page 2: Required Tools For Assembly
The components are easily damaged by mishandling. Be extra careful when using knives and other sharp objects in removing packaging material. Do not set components directly on to rough surfaces. Use padding or packaging material to protect the component from abrasion. Sequoia Spa Shelters™ by Sequoiaworks Inc. - Page 3 Eleva on view* 80-88 96” 104” 117” 125” 80-92 96” 108” 117” 129” 96-92 112” 108” 133” 129” 100-92 116” 108” 133” 129” Top View* *Typical installa on. Control side may vary on some models. Sequoia Spa Shelters™ by Sequoiaworks Inc.
- Page 4 #8 x 1 ¼” pan head screws (qty. 26) #8 x ¾” pan head screws (qty. 10) #8 x ½” self-drilling pan head screws (qty. 18) #6 x 1 ¼” wood screws (qty. 7) Sequoia Spa Shelters™ by Sequoiaworks Inc.
- Page 5 Use #8 x 1 1/4” pan head screws to fasten the radius corner of the hot tub. Place so as not to metal connector at the bracket into the side of the interfere with any access panels for the hot tub. spa. Sequoia Spa Shelters™ by Sequoiaworks Inc.
- Page 6 One #10 x 3 ½” wood screw Use one #10 x 3 ½” to fasten the bracket leg to the side of the spa. Sequoia Spa Shelters™ by Sequoiaworks Inc.
- Page 7 (Distance from spa side = the screw. (This may need to be removed and the shelf distance “SD” minus the spa width then divide by 2.) adjusted when installing the wall panels) Sequoia Spa Shelters™ by Sequoiaworks Inc.
- Page 8 Fasten the wall panel and the corner panel together inch wood screw downward into the top end of the down the side of the frame using three #8 x 2 ½ inch corner panel frame. wood screws. Sequoia Spa Shelters™ by Sequoiaworks Inc.
- Page 9 Set the shelf-mounted door wall onto the shelf and Connect with one 3 inch screw into the top of the frame connect to the corner panel. and three 2 ½ inch screw into the side of the frame as done previously. Sequoia Spa Shelters™ by Sequoiaworks Inc.
- Page 10 Place the wall onto the shelves and connect to the two wall. walls. Adjust the posi on of the shelves if necessary. This may require removing the screws from the brack- ets, reposi oning the shelves and replacing the screws. Sequoia Spa Shelters™ by Sequoiaworks Inc.
- Page 11 Insert the flashing strip into the the C-metal trim of the frames together using 2 ½ inch wood screws. (Three per roof panel so that it is over the top surface of the corru- set) gated roofing. This does not get fastened. Sequoia Spa Shelters™ by Sequoiaworks Inc.
- Page 12 Add a second W-bracket at the lower end of the in- Connect the bo om frame of the roof panel to the roof stalled roof panels. stops of the wall panel using 3 inch wood screws. Sequoia Spa Shelters™ by Sequoiaworks Inc.
- Page 13 The inside ledge of the skylight frame aligns to ings. Fasten the molding to the a achment frame using the inside surface of the a achment frame. #6 x 1¼ inch wood screws. Sequoia Spa Shelters™ by Sequoiaworks Inc.
- Page 14 Install the doors by sliding the plas c guide at the top of The photo above shows the properly installed door. the door into the track at the header. Li the door up and swing the bo om guide into the track at the bo om. Sequoia Spa Shelters™ by Sequoiaworks Inc.
- Page 15 A ach the bar brackets to the sides of the wall opening as shown below. Use 2 1/2 inch wood screws. Place the bar top on to the brackets. Center the bar top to the opening and fasten from underneath with 2 1/2 inch wood screws. Sequoia Spa Shelters™ by Sequoiaworks Inc.
- Page 16 Use the “deck-mounted” method and a ach directly to the shelves of the TubTop. If in- stalling a bar top on the TubTop, install the Cover Valet™ first for ease of installa on. The photos below show the basic steps of the installa on. Sequoia Spa Shelters™ by Sequoiaworks Inc.
- Page 17 TubTop™ Sequoia Spa Shelters™ by Sequoiaworks Inc.
Need help?
Do you have a question about the TubTop 72-80 and is the answer not in the manual?
Questions and answers