Table of Contents
Advertisement
Quick Links
Advertisement
Table of Contents

Related Manuals for HARFO HL10 Series


Summary of Contents for HARFO HL10 Series
- Page 1 HARFO ® HL10 series USER MANUAL...
- Page 2 Visit our Amazon store or YouTube for installation videos, FAQs and more. www.amazon.com/harfo HARFO Amazon store: Search “HARFO HL10” on YouTube. Welcome to link HARFO facebook, and get more promotions. Please contact us before returning the lock. We are here to help you! E-mail: harfoseller@hotmail.com...
- Page 3 Please mind the drill bit. Avoid hurting yourself and the lock...
-
Page 4: Table Of Contents
Catalogue I. Introduction 1.Overview....................1 2.Installation diagram................1 3.Change the handle direction..............3 4.Install batteries..................4 5.Backup key..................4 6.Test after installation................5 7.Technical parameter................5 II. Operation instruction 1.Add/delere the main administrator code..........6 2.Add/delere the normal user code ............7 3.Restore factory settings(Erase all code)..........8 4.Enable/Disable the passenger mode...........8 Ⅲ.Others....................9 Password memo..................10... -
Page 5: Introduction
10. Inner lock 11.Battery 12.Battery cover 13.Silicone sheet 14.Spring 2.Installation diagram Visit our Amazon store for installation videos(www.amazon.com/harfo), or search “HARFO HL10” on YouTube. 2.1 Drilling Hole 1.Mark the top screw hole on door face through guide on template for 2-3/8”(60mm) or 2-3/4”(70mm) basket. - Page 6 2.2 Installation of the latch and strike plate 1.Adjust the length of latch to match the hole size(60mm or 70mm). 2.Insert the latch in the hole with the beveled edge of the latch facing the door frame and tighten screws. 3.Install the bottom case and strike plate on door jamb.
-
Page 7: Change The Handle Direction
2.4 Installation of the inner lock 1.Make sure the spring is in the handle hole of the inner lock. If not, find it from the package and put it in. 2.Remove the battery cover. 3.Connect the data line. 4.Positioning the inner lock properly, install 3 screws to fix it on the door.(longer one on the top and 2 shorter ones at the bottom) -
Page 8: Install Batteries
4.Install batteries Install 4pcs AA batteries and notice the dirction of the positive and negative electrode. Put the battery cover back after finish the installation and tighten the screw. 5.Backup key If the battery died or you forget the password, please use the backup key. Remove the hex socket screw on the handle by L wrench remove the outer handle... -
Page 9: Test After Installation
6.Test after installation 1.Check the handle can be twisted smoothly. 2.Check the function ablity of password can work. 3.Check the backup key can work. 4.Check the inner handle can open the door. 7. Technical parameter Battery type 4pcs 1.5v AA batteries Working voltage 4.5~6V ( Low power alarm at 4.8v... -
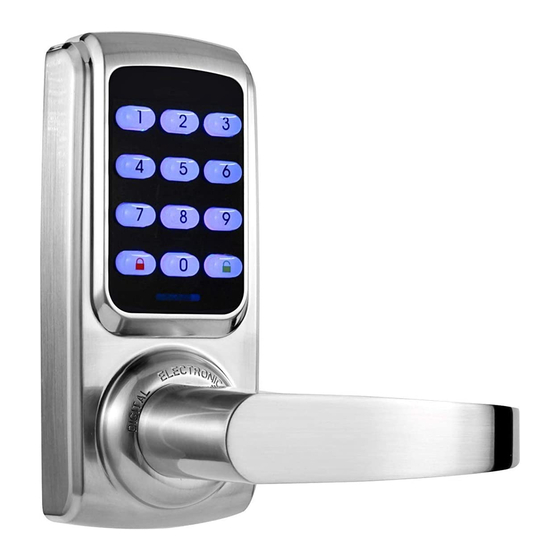
Page 10: Operation Instruction
II.Operation instruction Add the administrator Lock status password Install 3 batteries, press the The blue light will flash, you will SET button and hold on, then hear a long “di” sound. install the last battery. After you hear a long “di” Release the SET button. -
Page 11: Add/Delere The Normal User Code
Add the normal user Lock status password Unlock the door with the The blue light will flash, you administrator password, then will hear a long “di” sound. press the Green button and hold on for 5 sec. The blue light will flash, you Input xx(02~50 group number) + will hear a long “di”... -
Page 12: Restore Factory Settings(Erase All Code)
Restore factory settings Lock status (Erase all code) The blue light will flash.You will Remove 1 battery, press the hear a long “di” (If you hear a Erase button and hold on for 5 short “di,di” sound, it’s failure) sec, then install the last battery. Erase all code. -
Page 13: Ⅲ.others
Ⅲ.Others 1.Open the door by password Input xx(group number) + xxxxxx(6 digital code) + Green button(Enter), the door will open. After 5 sec the door lock will lock again. For security, you can add any number before or after the correct password when you unlock it. -
Page 14: Password Memo
Password Memo ID User Name Password 00 Admin 01 Admin 10... - Page 15 11...
Need help?
Do you have a question about the HL10 Series and is the answer not in the manual?
Questions and answers