Advertisement
Advertisement
Table of Contents

Related Manuals for HoneyGuaridan S36

Summary of Contents for HoneyGuaridan S36
- Page 1 Smart Pet Feeder User Manual...
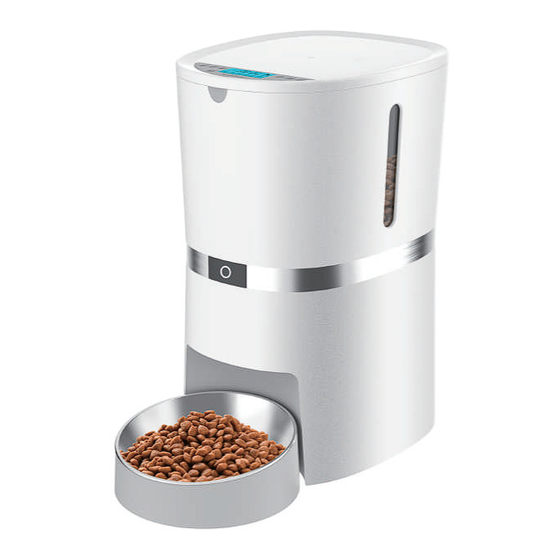
- Page 2 S36 Smart Pet Feeder (Structural image): Control panel Stainless steel bowl Feeder lid Hopper release button Food viewport WIFI Indicator light Power Feeder interface base Battery cover Packing List: Accessories: host x1, power adapter x1(5v-1A), feeder base x1, user manual×1 Notice 1 .
-
Page 3: Power Supply
Power supply Plug the power cord into the feeder's power socket. You can insert spare batteries (4 D-size alkaline batteries) as well, It can be also work automatically according to the feeding plan you set even when the feeder is not connected external power supply. - Page 4 Single basin installation Please assemble the base of the food bowl with the host 。...
- Page 5 Two-Way Distributor System (If you purchased the double basin version) Step 1: Please install the two way splitter into the host. Buckle A Buckle B Buckle hole A Buckle hole B...
- Page 6 Step 2: Please assemble the two bowls bases with the double bowls base Step 3: Please put the host in place.
-
Page 7: Distributor Removal
Distributor removal Please hold the two way splitter with both hands and press down with the thumb can be removed the two way splitter. Add pet food Press the lid open button and open the lid, pour the pet food into the food container. - Page 8 Food shortage reminder: When the feeder is short of pet food , the blue light will be flashed. Please open the feeder lid and add the pet food, then the blue indicator light will be turn off. Please open the desiccant box, load the desiccant and close. ( To keep pet food dry and fresh)
- Page 9 For keeping your pet's health, please clean the food container and stainless steel food bowl regularly. Please don't washable feeder body instead of wipe with a rag.
-
Page 10: Software Installation And Setup
Software installation and setup 1. Search the APP store to download and install or scan the QR code below to download and install "Smart Life" Smart Life 2. Run the app, read and agree to the privacy policy, and register a new account or log in a registered account. Please select the correct country when you register or log in to your accountor region. - Page 11 3.The APP will ask you to access certain permissions when you log in, such as Bluetooth usage permissions and bit set usage permissions, these permissions are very important to the application, so please allow them. (allowed to enter Enter home page data, allow APP to send notifications as well)
- Page 13 4. Please note that the feeder not supports 5GHz WIFI network instead of 2.4GHz WIFI network only. Please check that the mobile phone is currently connected to the 2.4GHz WIFI network,if not, please switch the Mobile phone's Wi-Fi network to a 2.4GHz Wifi network. 5.
- Page 14 6. Drop down the interface in the blank space Refresh, pop up at the bottom of the interface window for the new feeder, Click "Add". 7. Please allow it. then your WIFI network name when the APP asks for your phone location permission,It will automatically appear in the text box, after entering the password, click "Next ".
- Page 15 Please be patient for waiting "add when the APP enters to device” page, when the device's WIFI indicator stops Installation flickering and stays on, the progress APP interface jumps to the device name modification page, click , the APP interface pops up the device name modification viewwin- dow, enter a new name and click “Done”, The APP...
- Page 16 9.The APP jumps to the feeder control page, and the feeder is successfully connected to the Internet. Recording Setup: "Press “ ” and hold for three seconds then you can record for Max 10 seconds after the recording indicator lighting up. Release the button during recording as the recording is completed.After finishing the recording, you can press “...
- Page 17 Feeding Manually Feeding 1. Enter the feeder control page, click Manually feeding, select "Feeding confirm" the portion of food and click the feeder will feed immediately. Select Manually food portions feeding button Feeding confrim 2. You can also press and hold the Manually feeding button on the feeder for 3 seconds, after a "beep",The feeder will be feed a grain.
- Page 18 Make a feeding meals plan 1. The feeder supports a daily 6-meal feeding plan, click the feeding meals plan feedings portions button to select the volume feeding times, open the feeding meals plan click Save. Select the feedings portions Clik the volume feeding meals plan...
- Page 19 2. If you need to disable feeding meals plan, 2:Clik Save click the desired feeding close meals plan button, the feeding meals plan, and then click Save. 1:close the feeding meals plan button View feeding records 1. Click " ”, pull down to refresh the page, It will be display...
-
Page 20: Basic Setting
Basic setting Click the Settings button to jump to the Settings page. Voice plays times Setting The number of times button (0 times - 6 times) plays a recording before feeding Backup battery status Display battery status Slow feed Turn on/off the slow feed function of the feeder Voice play times... -
Page 21: Advanced Settings
Advanced settings Click device Info to enter the advanced settings page. Click device Info to enter the advanced settings page. Device Information Display device ID, IP, MAC, device time zone, signal strength Device Offline Notification Information Turn on this function , the APP will notify you when the device Offline. - Page 22 Q: The LCD screen does not light up when plugged in A: 1) Poor contact of the power adapter. 2) There is a problem with the power adapter, please contact the seller on Amazon for a new one. Q: The food won’t come out A: 1) Please be sure to fill with dry food, kibble size should range from 5-12mm/0.19-0.47 inch diameter.
- Page 23 Q: Is there an indicator light when the battery is low? A: Yes. When the batteries are low, the battery level sign on the LCD screen will turn on. After new batteries are installed, the sign will be turned off.(Battery model :4*D size alkaline) Q: Why I can’t hear any voice recordings when feeding? A: Please press the Recording button to check whether the recorded successfully.
- Page 24 Q: How to delete/reset the feeding schedule? A: Please open the lid and press the reset button. Q: For two way distributor system, Why the food split not evenly in each bowl? A: The first few portions may vary and it doesn’t mean a faulty equipment.
Need help?
Do you have a question about the S36 and is the answer not in the manual?
Questions and answers