Advertisement
PIÈCES
I NCLUSES
•
D ESCRIPTION
•
Q TÉ.
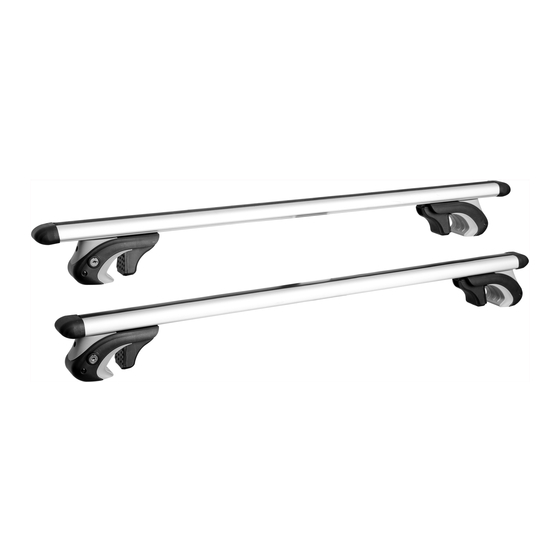
A
Assembled
u niversal
c rossbars
B
Removable
c aps
C
Hexagonal
w rench
D
Two
( 2)
k eys
s et
A
Reduce
s peed
a nd
a dapt
d riving
w hen
c arrying
a
l oad
o n
c rossbars;
•
Maximum
l oad
c apicity
o f
t he
c rossbars
i s
2 00lbs
( 90kg).
T his
m aximum
l oad
c apacity
d oes
n ot
e xceed
t he
r oof
m aximum
l oad
c apacity
o f
t he
c ar;
•
Be
a ware
o f
t he
c ar
m anufacturer
l imitations
o n
w hich
t he
c rossbars
a re
i nstalled;
•
Install
t he
c rossbars
a ccording
t o
t he
r ecommandations
o f
t he
c ar
m anufacturer;
•
Be
a ware
o f
t he
m anufacturer
l imitations
f or
t he
a ccessories
t hat
a re
u sed;
•
Load
m ust
n ot
b e
w ider
t han
t he
c rossbars
a nd
m ust
b e
e venly
d istributed;
•
When
e xceeding
m ore
t han
2 4''
( 60cm)
t o
t he
f ront
o r
r ear
o f
t he
c rossbars,
t he
l oad,
i n
a ddition
t o
b eing
a ttached
t o
b oth
s ides,
m ust
b e
a ttached
•
to
t he
f ront
a nd
r ear
o f
t he
l oad;
All
l oose
o r
m oving
p arts
o f
t he
l oad
m ust
b e
r emoved
o r
a ttached
p roperly
t o
a void
f alling
p arts
o n
t he
r oad;
•
Always
a ttach
c arried
l oad
w ith
c arrying
s traps
a dapted
t o
t he
w eight
o f
t he
l oad.
B ungee
c ords
a ren't
r ecommanded;
•
Ensure
r egularly
t hat
t he
c rossbars
a re
s olid,
i n
g ood
c ondition
a nd
w ell
a ttached
t o
t he
v ehicle;
•
Ensure
t hat
t he
l oad
i s
s ecure
b efore
t aking
t he
r oad.
R egularly
c heck
t hat
t he
l oad
i s
a lways
w ell
f ixed
a nd
s afe
d uring
t ransport;
•
Not
f or
o ffroad
u se;
•
Do
n ot
u se
u niversal
c rossbars
S R-‐CB-‐101
a nd
a ccessories
f or
p urposes
o ther
t han
t hose
f or
w hich
t hey
w ere
d esigned.
•
F ailure
t o
f ollow
a bove
g uidelines
v oids
w arranty.
Installation
o f
t he
U niversals
C rossbars
1.
Using
t he
H exagonal
w rench
( C)
a nd
t he
K ey
( D),
o pen
t he
j aws
o f
t he
C rossbars
( A)
s ufficiently
s o
t hat
t hey
c an
f it
o nto
t he
raised
r ails
o f
t he
v ehicle;
2.
Place
t he
C rossbars
( A)
o n
t he
r aised
r ails
o f
t he
v ehicle
r especting
a
d istance
b etwen
t he
C rossbars
( A)
o f
a pproximately
2 7''
(700
m m)
d epending
o n
t he
a ccessories
a ttached
t o
i t.
C enter
t he
C rossbars
( A)
f rom
l eft
t o
r ight
o n
t he
v ehicle;
3.
Using
t he
H exagonal
w rench
( C)
a nd
t he
K ey
( D),
t ighten
t he
j aws
o f
t he
C rossbars
( A)
o n
t he
r aised
r ails
o f
t he
v ehicle
s o
t hey
hold
f irmly
o n
t he
r ails.
B e
c areful
n ot
t o
o vertighten;
4.
If
t he
a ccessories
u sed
a ttaches
i n
t he
' 'T''
s lot
o n
t op
o f
t he
C rossbars
( A),
r emove
t he
r ubber
s trip,
i nsert
t he
T -‐bolts,
c ut
t he
rubber
s trip
t o
t he
d esired
d imensions
a nd
i nsert
i t
i nto
t he
T -‐slot;
5.
Insert
t he
R emovable
c aps
( B)
a t
t he
e nds
o f
t he
C rossbars
( A).
B e
c areful
t o
i nsert
t hem
s traight
i n
o rder
n ot
t o
b end
o r
b reak
any
p art
o f
t he
R emovable
c aps
( B)
w hich
m ay
s ubsequently
b ecome
u nuseable;
6.
If
t he
a ccessories
u sed
d o
n ot
a ttach
i n
t he
T -‐slot
o n
t op
o f
t he
C rossbars
( A),
i nsert
t he
R emovable
c aps
( B)
a t
t he
e nds
o f
t he
Crossbars
( A).
B e
c areful
t o
i nsert
t hem
s traight
i n
o rder
n ot
t o
b end
o r
b reak
a ny
p art
o f
t he
R emovable
c aps
( B)
w hich
m ay
subsequently
b ecome
u nuseable;
7.
Attach
t he
a ccessories
t o
t he
C rossbars
( A)
f ollowing
t he
m anufacturer
r ecommandations.
Skyrack
C anada
•
( 514)
5 03-‐2311•
i nfo@skyrack.ca
•
w ww.skyrack.ca
Instructions
s heet
a nd
a ssembly
U niversal
c rossbars
M ODEL
#
S R-‐CB-‐101
B
C
W ARNINGS
/
L IMITATIONS
2
4
1
1
D
1
Advertisement
Table of Contents

Summary of Contents for SkyRack SR-CB-101
- Page 1 Attach t he a ccessories t o t he C rossbars ( A) f ollowing t he m anufacturer r ecommandations. 1 Skyrack C anada • ( 514) 5 03-‐2311• i nfo@skyrack.ca • w ww.skyrack.ca ...
- Page 2 m aterials. T he w arranty e nds i f t he o riginal p urchaser t ransfers t he p roduct t o a ny o ther p erson. I f a ny d efect a ppears o n y our Skyrack p roduct d uring t he w arranty, p lease c ontact u s b y e mail. ...
Need help?
Do you have a question about the SR-CB-101 and is the answer not in the manual?
Questions and answers