Table of Contents
Advertisement
Available languages
Available languages
Quick Links
Advertisement
Chapters
Table of Contents

Subscribe to Our Youtube Channel
Summary of Contents for elink YL-71
- Page 1 Smart Lock YL-71 Smart Lock Cylinder User's Manual ● Thank you for choosing YL-71 smart lock cylinder ● Please read this manual carefully before using it ● Please keep user's manual properly for future reference...
-
Page 2: Table Of Contents
CATALOGUE 1. Included in the box ..............2 2. Product features ..............2 3. Technical specification ............4 4. Installation instructions ............5 5. Restoring factor y settings ............6 6. User settings................7 7. Troubleshooting...............9 8. Daily maintenance..............9 9. Warranty Card.................10... -
Page 3: Included In The Box
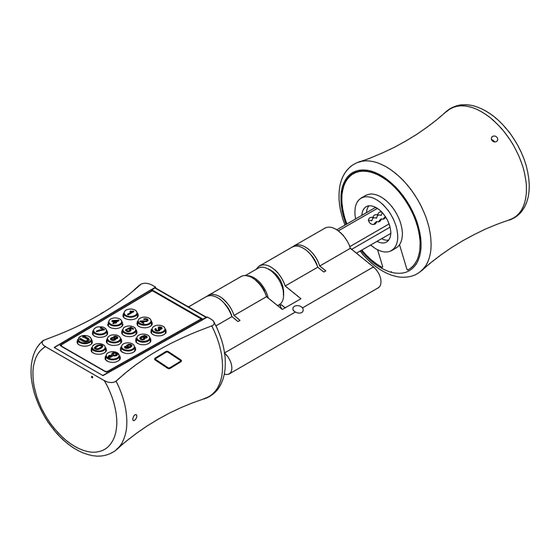
1. Included in the box Description Quantity Smart lock cylinder YL-71 (Fingerprint + Pin Code) Magnetic key Hexagon screwdriver User manual 2. Product features Rear handle The lock picks Cipher keyboard Fixed screw hole Fixed core screw hole Stainless steel... - Page 4 Product Features: Open With: Support Fingerprint, Pin Code, Core key. Wrong Pin Code Locked: Entering the wrong Pin Code 5 times in 1 min, the system will automatically lock for 3 mins to prevent random Pin Code. Fingerprint Algorithm: Aadopting international leading fingerprint algorithm to eliminate false fingerprints and residual fingerprints.
-
Page 5: Technical Specification
3. Technical Specification Item specification YL-71 Model Fingerprints, PIN Code,Mechanical Basic function Keys Semiconductor module Type of finger print sensor 152 fingerprints Fingerprint capacity False recognition rate <0.001% <1% Rejection rate 1:N<7s/fingerprint Contrast speed 12 keys, Capacitive Touch button, Code button... -
Page 6: Installation Instructions
4. Installation instructions Confirmation before installation 1) Door material: Security door, gate, wooden door, glass door. 2) Door thickness: 60mm (The door thickness less than 60mm can also be installed, but some parts of the lock core will be exposed, not beautiful, if it exceeds 60mm, it can not be installed). -
Page 7: Restoring Factor Y Settings
4.3 Check after the installation 1. Check whether the rear and front handle is smooth, and whether the key can open the lock latche, other wise loosen the screws, fine-tune the handle, and tighten the screws until the latche move freely. 2. -
Page 8: User Settings
A. The administrator user can add 1 of fingerprint and 1 set of Pin Code. B. The user PIN code consists of 6 keys. Each PIN code is independent. 6. User settings 6.1 Menu management settings 6.1.1 Registering the administrator user 1. - Page 9 2. According to the voice prompt, press “2” and then press “ ". Register a new genneral user fingerprint. 3. Press the fingerprint for the first time. 4. Press the fingerprint a second time. 5. Press the fingerprint for the third time and the fingerprint registration is successful.
-
Page 10: Troubleshooting
7. Troubleshooting 1. The fingerprint can not be logged: A.If the fingerprint is damaged or unclear, you can change another finger with clear fingerprint. 2. Fingerprint verification failed: A.If the user's fingerprint is not registered, it can not be verified. B.Please confirm that the fingerprints are properly placed in the sensing area. -
Page 11: Warranty Card
Warranty Card Product Information Customer Deposit Product NO. Purchase Date Place Store Purchase Price Invoice NO. Email Customer Name Customer Address Warranty Policy Thanks for using our product. To obtain better service, please read the following clauses and keep this warranty card properly. Warranty 1. - Page 12 KATALOG 1. In der Box enthalten..............12 2. Produktmerkmale ..............12 3. Technische Spezifikation ............13 4. Installationsanweisungen .............14 5. Werkseinstellungen wiederherstellen .........15 6. Benutzereinstellungen............16 7. Fehlerbehebung..............18 8. Tägliche Wartung..............18 9. Garantiekarte................20...
-
Page 13: In Der Box Enthalten
1. In der Box enthaltenx Quantität Nummer Beschreibung Schließzylinder YL-71 (Fingerabdruck + PIN-Code) Magnetschlüssel sechseck schraubenzieher Benutzerhandbuch 2. Product features Benutzerhandbuch Das Schloss wählt Zifferntastatur Festes Schraubenloch Festes Schraubenloch Front griff aus Edelstahl... -
Page 14: Technische Spezifikation
3. Technische Spezifikation Artikel spezifikation Modell YL-71 Fingerabdrücke, PIN-Code, Entsperrmodus Mechanische Schlüssel Art des Fingerabdrucksensors Halbleiter modul Fingerabdruckkapazität 152 fingerabdrücke Falsche Erkennungsrate <0.001% Ablehnungsrate <1% Kontrastgeschwindigkeit 1:N<7s Fingerabdrück 12 Taste, kapazitive Touch-Taste, Taste LED-Hintergrundbeleuchtung Passwortkapazität 32 Sets of PIN codes... -
Page 15: Installationsanweisungen
Installationsanweisungen Bestätigung vor der Installation 1) Türmaterial: Sicherheitstür, Tor, Holztür, Glastür. 2) Türstärke: 60mm (Die Türstärke unter 60mm kann ebenfalls installiert werden, aber einige Teile des Schlosskerns werden freigelegt, unansehnliche, Wenn es 60 mm überschreitet, kann es nicht installiert werden.) Hinweis: 60 mm ist die gesamtdicke der tür und das ursprüngliche schloss die vorderen und hinteren platten. -
Page 16: Werkseinstellungen Wiederherstellen
4.3 Überprüfen Sie nach der Installation 1. Prüfen Sie, ob der hintere und der vordere Griff glatt sind, und ob der Schlüssel die Schlossleiste öffnen kann, andernfalls lösen Sie die Schrauben, den Griff feinabstimmung, und ziehen Sie die Schrauben an, bis sich die Latche frei bewegen kann. -
Page 17: Benutzereinstellungen
A. Der Administrator kann einen Fingerabdruck und einen Satz PIN-Code hinzufügen. B. Der Benutzer-PIN-Code besteht aus 6 Schlüsseln. Jeder PIN-Code ist unabhängig. 6. Benutzereinstellungen 6.1 Menüverwaltungseinstellungen 6.1.1 Registrieren des Administratorbenutzers 1. Drücken Sie die Zifferntaste, um das System zu aktivieren, und drücken Sie "... - Page 18 3. Geben Sie den 6-stelligen PIN-Code zum ersten Mal ein und drücken Sie zur Bestätigung " ". 4. Geben Sie den PIN-Code ein zweites Mal ein und drücken Sie zur Bestätigung " " . 5. Wenn der allgemeine Benutzer-PIN-Code erfolgreich registriert wurde,drücken Sie "...
-
Page 19: Fehlerbehebung
6.1.5 Urlaubsmodus 1. Drücken Sie die Zifferntaste, um das System zu aktivieren, und drücken Sie die Taste " ". Drücken Sie dann die Taste" ". Geben Sie den PIN- Code des Administrators ein und drücken Sie zur Bestätigung die Taste " ". - Page 20 2. Berühren Sie nicht das korrosive Material auf der Oberfläche der Platte und des Schlosskörpers. Es zerstört die galvanische Schicht und beeinflusst den Oberflächenglanz. 3. Der Türgriff ist der wichtige Teil des Schlosses. Bitte hängen Sie nichts an den Türgriff. 4.
-
Page 21: Garantiekarte
Garantiekarte Produktmodell: Fabriknr.: Uberprufen durch: Kaufdatum: Kaufort: Kundenname: Kundentelefon Nr.: Kundenadresse: Aufzeichnungen reparieren Unterschrift Fehlerursache Reparaturdatum Reparatur durch das Wartungspersonal... - Page 22 Shenzhen Elink Smart Co,. Ltd Factory ADD:Building 1 , New Fengze Industrial Park, East Road 123. Baoan District, Shenzhen, China Service line: 400-180-3033 Email:admin@elinksmart.com Website:www.elinksmart.com...
Need help?
Do you have a question about the YL-71 and is the answer not in the manual?
Questions and answers