Advertisement
Quick Links
Advertisement

Related Manuals for Artiphon ORBA


Summary of Contents for Artiphon ORBA
- Page 1 ORBA 2 & ORBA USER MANUAL V 2 . 0 . 0 Orba User Manual Page 1...
- Page 2 You might see how many loops you can make as you ride the bus to work. Or perhaps you’ll use Orba as a gestural synth at your next gig – waving it through the air to control effects as the crowd goes wild. Or maybe you’ll use Orba to play a software synth in that track you’ve been working on in your DAW.
-
Page 3: Charging Indicators
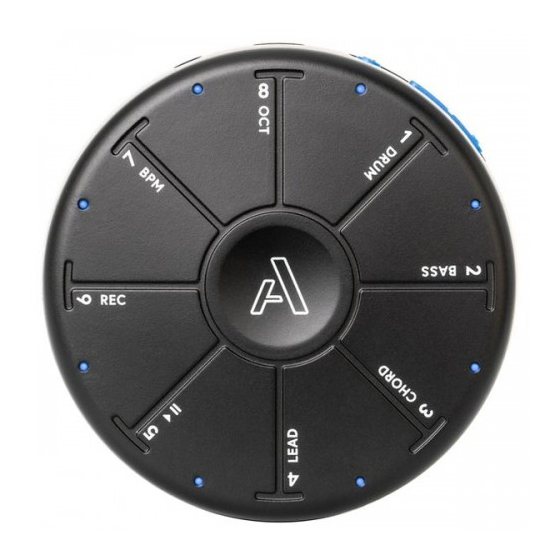
Charging Indicators When you connect Orba to a power source and turn it on, you’ll see a single green LED blinking on pad 8. This indicates that Orba’s battery is charging. If Orba is off, you won’t see any lights, but rest assured it’s still charging. - Page 4 Panel and Controls Volume button Increase and decrease the volume of Orba’s speaker Power and Bluetooth Press and hold to turn Orba on and off pairing button USB-C Port Charge Orba’s built-in battery and connect your external hardware devices Headphone/aux out 1/8”...
- Page 5 Command key on Mac or the Control key on Windows. Any time you want to change what you’re doing on Orba, you’ll use the A button to make it happen. A single tap of the A button will cycle through each of the four main modes.
- Page 6 Functions Orba User Manual Page 7...
- Page 7 Hold A + Pad 6 (Rec) until a series of red LEDs followed by Clear everything a series of orange LEDs each make a complete cycle around Orba. Alternatively, hold A + Pad 6 (Rec) while shake Orba. Hold A + Pad 7 (BPM) and slide clockwise (increase tempo) or Change BPM counter-clockwise (decrease tempo) Alternatively, hold A and tap Pad 7 (BPM) at the desired tempo.
- Page 8 Hold volume down ( - ) button and power button for 15 seconds Note: Holding volume up ( + ) and power button puts Orba Hard reset into update mode. In this state Orba appears unresponsive. To exit update mode, connect via USB to the desktop app, open the settings menu and hold Shift while clicking the firmware...
- Page 9 You can alternate between open and closed hi-hat sounds on the same pad simply by changing the way you touch it. A tap with a quick release will let the “cymbal” ring out, a tap and hold will “choke” the sound. Orba User Manual Page 10...
- Page 10 Modes BASS Orba’s Bass mode is monophonic, meaning only the most recent note is played at a given time (this is called “last-note priority” in synthspeak). By default, Bass is tuned to a C major diatonic scale. Try it: Bass is a great mode for trying different motion gestures, especially Tilt and Radiate.
- Page 11 Modes CHORD In Chord mode, each of Orba’s pads triggers multiple notes simultaneously to form a chord in the key of the song. Chords are a fun way to casually explore song structures and create new ideas quickly. Like Bass, Chord mode is very responsise to the gestures Tilt and Radiate.
- Page 12 In Lead, the pads are tuned to a C major pentatonic scale. This is a fun scale with five notes per octave, making it easy to find a melody that goes along all that rhythm you just played. Orba User Manual Page 13...
- Page 13 Looping Looping is a fun and intuitive way to create a lot of musical ideas very quickly. Orba’s built-in looper lets you record and layer all four modes together, and even overdub to add more notes as you get going.
- Page 14 While your first loop continues to play, you can begin to layer additional notes and loops on other modes. Orba will stay in overdub mode until you pause or stop playback by pressing A + Pad 5 (Play/Pause) to pause the song, or if you press A + Pad 6 (REC) to disarm your recording.
-
Page 15: Clearing A Song
To clear your Song (all of your loops at once): 1. Press and hold A + Pad 6 (REC) for 5 seconds. Alternatively, you can hold A + Pad 6 (REC) and Shake Orba to clear your song. Orba User Manual... -
Page 16: Adjusting Tempo
Adjusting Tempo Orba’s default tempo is 120 beats-per-minute (BPM). There are a few different ways to adjust the tempo of your song. You can do this both in the app or on the device itself. For now, we will focus on the device itself. - Page 17 Transposing Orba Changing Octaves You can transpose octaves right on Orba itself. To shift octaves, press and hold To shift octaves, press and hold A + Pad 8 (OCT) Slide your finger from the octave pad up to Pad 1 to shift one octave higher, or down to Pad 7 to shift one octave lower.
- Page 18 Gestures Orba’s touch and motion sensors combine to capture even your most subtle gestures. Pick it up and hold it, or just reach over and play a few notes while it’s sitting on your desk. Tap it with one hand or both, with your fingertips or thumbs, or shake it and bump the side.
- Page 19 Tap your finger on a pad. Orba is velocity-sensitive, so the harder you Tap, the louder the sound. MIDI Message: Note On/Off Orba User Manual Page 20...
- Page 20 Vibrato Tap and move your finger from side-to-side on a pad. Vibrato produces a change in pitch. the range of pitch can be adjusted with the Pitch Bend Scaling setting in the Orba App. MIDI Message: Pitch Bend Orba User Manual...
- Page 21 Press is activated by making your finger take up more (and less) surface area. Think about it like this: the more you spread out your finger, the more Press is activated. Pressing with sustained pressure will modulate effects on Orba’s synth.
- Page 22 Radiate Press and move your finger within a pad, in and out from the center to the edge of Orba. Radiate effects Brightness. When using it with Orba’s internal synthesizer it may be affecting volume, envelopes, and others effects. Try it in Bass and Chord modes to start.
- Page 23 Tilt Tilt Orba to the side to play effects. Tilt is Orba’s version of the mod wheel on a t raditional keyboard controller. As mod wheel is a very common MIDI effect, you’ll find Tilt works automatically with most software synths and apps.
- Page 24 Spin Rotate Orba like a knob. MIDI Message: CC#112 Orba User Manual Page 25...
- Page 25 Move Move Orba in space to modulate sounds and effects. MIDI Message: CC#113 Orba User Manual Page 26...
- Page 26 Shake In Drum mode, hold pad 8 and shake Orba. Shaker works best using soft movements in a side-to-side motion. MIDI Message: MIDI note 69 and CC#2 Orba User Manual Page 27...
- Page 27 Bump Tap Orba on its side. Try to Bump in drum mode: you’ll get a “clap” sound! MIDI Message: MIDI note 39 Orba User Manual Page 28...
- Page 28 Drum mode. Changing a preset on Orba is done within the Play tab in the browse menu in the Orba app. If you want to change your sound, you do this by selecting a new preset! There are two ways to do this.
-
Page 29: Play Settings
Song Settings Adjusting Tempo in the App You can make incremental adjustments to the Tempo of your song within the Orba app. Tap the Settings dropdown caret in the upper-right corner of the app, and then tap ‘Tem- po.’... - Page 30 Changing Keys Orba’s default tuning is in the key of C major. However, Orba can play in a wide range of keys. To change Orba’s key, tap the Song Settings icon in the Orba app and select ‘Key’ . Details You can customize your songs metadata, including Cover Image, Song Title, Name, and Description.
- Page 31 Whichever preset you currently have loaded and active on Orba is displayed at the cen- ter of the Play screen in the Orba 2 app. As you cycle through Modes on Orba, the preset displayed here will update to reflect the current instrument and preset selection. You can...
- Page 32 Transport Controls Orba’s play, pause, and record functions can be accessed and triggered from within the Orba app. Triggering these functions from the app has the same effect as triggering them directly from Orba itself. Try it: Watch your song come alive in a colorful dance. We’ve added a visualizer that grooves to your performance.
- Page 33 Preset Effects (Orba 2 only) Mode Settings Dive in deeper with Orba ‘s Mode settings. Crank up the Reverb and Delay on your Chords to become the next Reggae sensation, or make your sick bassline stand out with volume-per-part. Clear Mode Loop Accidentally added a snare on the wrong down beat, no problem.
- Page 34 Quantize (Orba 2 Only) Was your timing ever so slightly off on that drum part? Just activate quantize in the Orba app to ensure that all notes are automatically sync’d to the nearest 16th note of your loop. This is especially great for electronic genres where robot-like timing and precision can be crucial.
- Page 35 Sample (Orba 2 Only) With the Orba 2 app, you’ll be able to record any sound from the real world and trans- form it into a playable musical instrument. You will also be able to load in your favorite samples. Orba 2 can hold 2GB of user samples.
- Page 36 4. You can select and preview how the sample will sound in each of Orba’s me- lodic modes. The smart technology will re-tune and modify the sample for you. For instance if you have a single banjo string and select Chord mode, it will turn your single string into a full chord.
- Page 37 Orba so that you can play it at any time. 1. To preserve the quality of your samples, this process will require a hardwired USB connection. Let’s begin by checking that Orba 2 is connected via USB cable and not Bluetooth.
- Page 38 Now that you’ve recorded and saved your sample onto the app, you can pre-load it onto Orba so that you can play it at any time. If you’re on an iOS device, you need an Apple Lightning to USB converter. To preserve the quality of your samples, we require a hard- wired USB connection.
-
Page 39: Updating Firmware
Updating firmware can only be done on desktop through a USB-C connection. Note: If you are on a macOS, you must accept privacy permissions. Orba will automat- ically request these permissions when opening the app. If you initially deny these per- missions and wish to enable them, you can do so by going into your Mac’s Security and... - Page 40 For ease, we’ve provided instructions below on connecting to macOS, Windows, iOS, and Android. If you like, you can disable Orba’s internal synth to make sure you’re not hearing two dif- ferent sound sources. To do that, you must open the Settings page by navigating to the Play tab and clicking the top right Orba wedges.
- Page 41 Orba wedges on the top right of the screen. 2. Select Bluetooth LE MIDI and choose the Orba device from the window that follows. If you don’t see Orba in the list of available devices make sure that Orba is turned on and within range of your computer.
- Page 42 Studio, or use the keyboard shortcut Command+2. 3. Select the Configure Bluetooth icon from the header window. 4. Select Orba from the list of available devices. If you don’t see Orba on the list, make sure you have it turned on and in range.
- Page 43 1. In the Orba app, navigate to the Orba icon in the upper right-hand corner of the screen. 2. Select Orba from the list of Bluetooth MIDI Devices. 3. Note: If you don’t see Orba as an option in this list, make sure the instrument is powered on and within range. Orba User Manual...
- Page 44 Connecting to Android With USB • Open the Orba app and connect to your Android phone with a USB-C cable. Orba User Manual Page 48...
- Page 45 • Select Orba from the list of Bluetooth MIDI Devices and connect. • Note: If you don’t see Orba as an option in this list, make sure the instrument is powered on and within range. Orba User Manual Page 49...
- Page 46 This display shows Orba’s battery percentage. Auto Power-off In order to conserve battery, Orba will shut off after being idle for a couple of minutes. You can disable this by toggling the Auto Power-Off button within the Orba settings. Orba Sounds On/Off...
- Page 47 Pitch Bend Scale Adjusts Orba’s Pitch Bend Scaling settings by ranges (0% - 25% - 50% - 100%). This af- fects the rate of change in pitch shifts when performing Vibrato.es (0% - 25% - 50% - 100%). This affects the rate of change in pitch shifts when performing Vibrato.
- Page 48 For example when drum mode is selected only the drum notes are sent out on MIDI. Channel-Per-Part Each instrument mode sends MIDI data out on a dedicated channel. Switching modes will switch the output channel accordingly. Channel 10 Drum Channel 9 Bass Channel 16 Chord Channel 1 Lead Orba User Manual Page 52...
- Page 49 (the default setting) Orba shows separate ports for Drum, Bass, Chord, and Lead. When enabled, Orba shows just one port. Some third-party apps may work better when only one MIDI input port is available, in which case enable Mobile MIDI Mode.
-
Page 50: Midi Implementation Chart
48. Vibrato Pitch Bend Pitch bend range is limited to a few cents for better playability on each of Orba’s individual pads (except for the Vibrato Bass preset, which has a pitch bend range of 2 semitones). Radiate CC 74... - Page 51 CC2 (Shaker) Move CC 113 Bass, Chord, Lead only Spin CC 112 Bass, Chord, Lead only Tilt CC 1 (Mod- Bass, Chord, Lead only wheel) Press “A” Program button to Change 1-4 change mode Orba User Manual Page 55...
- Page 52 Note MIDI Number Pad 1 (Kick) Pad 2 (Snare) Pad 3 (Closed Hi-hat) Pad 4 (Open Hi-hat/ Crash) Pad 5 (High Tom) Pad 6 (Low Tom) Pad 7 (Ride Cymbal) Pad 8 (Shaker) Bump (Clap) Orba User Manual Page 56...
- Page 53 Bass MIDI Note Mapping Bass Note MIDI Number Pad 1 Pad 2 Pad 3 Pad 4 Pad 5 Pad 6 Pad 7 Pad 8 Orba User Manual Page 57...
- Page 54 G2, B2, D3, G3 55, 59, 62, 67 Pad 6 A2, C3, E3, A3 57, 60, 64, 69 Pad 7 G2, B2, D3, B3 59, 62, 71, 55 Pad 8 G2, C3, E3, C4 60, 64, 72, 55 Orba User Manual Page 58...
- Page 55 Lead MIDI Note Mapping Lead Note MIDI Number Pad 1 Pad 2 Pad 3 Pad 4 Pad 5 Pad 6 Pad 7 Pad 8 Orba User Manual Page 59...
- Page 56 Orbasynth With the Orbasynth app, you can now connect your Orba and quickly see how expansive your instrument becomes. Tweak sounds or completely reinvent instruments to your liking. You’ll be able to map Velocity, Press, Radiate, Tilt, and Move to control multiple synth parameters at once.
-
Page 57: Troubleshooting
It ay feel like all hope is lost. Fear not, here are a couple of common issues Orba players may run into. But please, if you’ve hit a snag or have any questions, submit a ticket to our Customer Support team, and they will be happy to help you out (and yes, we have real people) . - Page 58 Get in touch, stay in touch! For a wealth of resources, including videos, in-depth tutorials, inspriation from other creators and more, visit start.artiphon.com Got questions? We love answering them. Reach out any time at support@artiphon.com. Orba User Manual Page 62...
- Page 59 Orba User Manual Page 63...
Need help?
Do you have a question about the ORBA and is the answer not in the manual?
Questions and answers