Table of Contents
Advertisement
Quick Links
Advertisement
Chapters
Table of Contents

Subscribe to Our Youtube Channel
Related Manuals for Huananzhi H310C-D3


Summary of Contents for Huananzhi H310C-D3
- Page 1 User Manual H310C-D3...
-
Page 2: Table Of Contents
........... Drivers installation If you need any assistance in the process of installation, please contact our after-sales customer service or contact us on Huananzhi official Facebook or Huananzhi official ..............BIOS Settings LINE for professional technical support. Prior to installation or disassembly, please switch off the power and pull the power cable from the socket. -
Page 3: Packing
Providing audio input/microphone/front speaker/rear speaker possible. and side speaker output port 1. 1*HUANANZHI H310C-D3 motherboard Audio output: this is the front speaker output port that 2. 1*SATA data cable stereo speakers or earphones can be plugged into 3. -
Page 4: Motherboard Diagram
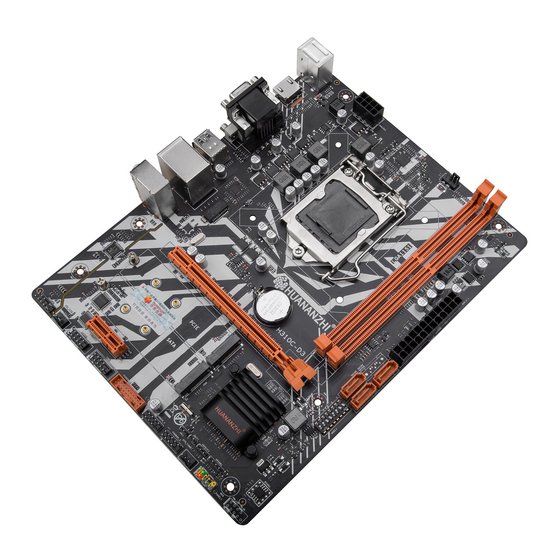
4 Pin Fan Interface JUSB3.0 4 Pin Fan Interface Audio Input JUSB2.0 Audio output/ POWER LED POWER SW JAUDI Front speaker output Microphone input RESET SW HDD LED 1-1 H310C-D3 motherboard illustration 1-4 Audio Port Configuration 05 Motherboard Diagram Rear I/O Panel 06... -
Page 5: Installation And Settings
Installation And Settings NOTICE ! PCI-Ex16 please check the motherboard where all pins marked number “1” or white bold line with are position “1”. PCI-Ex1 2-4 PCI-E Slot 2-1 Clear CMOS Jumper CLR-CMOS PWR_LED+ HDD_LED+ PWR_LED- HDD_LED- POWER_SW RESET_SW POWER_SW RESET_SW MIC+ Ground... - Page 6 1.M.2 NGFF available 2.M.2 NVME available 3.M.2 NVME/NGFF available 4.Do not dial all the code to In order to properly place the CPU in the motherboard, the surface the ON location, of the LGA1151 CPU has two pairs it will cause a short circuit of starting points and a golden triangle.
-
Page 7: Drivers Installation
4.1Audio driver installation (take HD Audio series for example) Tools\Directx11 Directx11 installation win7/win10 Run driver : / H310C-D3 SOUND CARD DRIVER/VISTA-WIN7- R267, take WDW-267 if OS is XP Realtek series sound card H310C-D3 Suond Card Driver win7/win10 driver installation Click on "next"to continue,and then"finished"... -
Page 8: Bios Settings
Advanced Advanced Settings 6.Driver installation of network BIOS special function settings, such as virus alert, booting Run driver: H310C-D3 LAN DRIVER/WIN7/10 disk priority etc. click on "next"-"installation"-"finished" and Chipest restart the computer,the system will Advanced Chipest Settings... - Page 9 安全信息 目录 此包装中包含的组件有可能静电放电 (ESD) 损坏。 请遵 守以下注意事项, 以确保成功组装计算机 安全信息 ..............确保所有组件连接牢固。 若连接不紧可能会导致计算机 无法识别组件或无法开启 包装说明 ..............拿取主板时为防止静电损坏其配置, 请在拿取主板前 通过接触其它金属物体释放自身的静电 简介 ................. 拿起主板时请手持主板边缘, 避免触及主板的敏感组件 主板图解 在不安装主板时,请将主板放在静电屏蔽容器或防静电垫上 ..............在打开计算机前,确保计算机机箱内的主板或任何位置上 后置I/O面板 ............没有松动的螺丝或金属组件 在安装完成之前不要启动计算机。 否则可能会导致组件 安装与设置 ............永久性损坏以及伤害使用者 在任何安装步骤中,如果您需要帮助,请咨询专业的售后客 驱动程序的安装 ..........户人员 BIOS设置 安装或拆卸计算机任何组件之前,请先关闭电源,并将电源 ............
- Page 10 1 x M.2 NGFF接口 1 x PS/2 键鼠 包装说明 1 x RJ45 千兆网卡接口 1 x 3.5MM音频接口 请确认您所购买的主板包装是否完整, 如果有包装损坏或是 任何配件损坏、 短缺的情况, 请尽快联系我们 板载HD AUDIO 音效: 支持5.1声道高保真音频输入输出 (ALC662) 1.华南金牌H310C-D3主板一片 音源输出: 此为前喇叭输出孔, 立体声喇叭或耳机音源插头 可以接至音源输出孔来输出声音 2.SATA数据线1根 提供音源输入/麦克风/前喇叭/后喇叭、 侧喇叭输出插孔 3.I/O后挡板一块 板载网卡: 千兆网卡 4.用户手册一本 扩展槽:1 x PCI-E x16 图形加速插槽...
-
Page 11: 主板图解
传输速率 100 Mbps PCI-E X16接口 闪烁 网络数据在使用中 橙色 传输速率 1 Gbps M.2MVME 图1-3 LAN端口状态表 M.2NGFF PCI-E X1接口 3针风扇接口 前置USB3.0 3针风扇接口 POWER LED POWER SW 开机指示灯 开关机 音频接口 前置USB2.0 HDD LED RESET SW 硬盘指示灯 重启键 图1-1 H310C-D3主板图解 图1-4 音频端口配置 05 主板图解 后置I/O面板 06... -
Page 12: 安装与设置
安装与设置 注意 ! PCI-Ex16 请仔细查看主板, 凡有表明 “1” 或是白色粗线标记的接 脚均为1脚位置。 PCI-Ex1 图2-4 PCI扩展插槽 图2-1 清除CMOS 跳线 硬盘指示灯-电源正极 电源指示灯-电源正极 硬盘指示灯-电源负极 电源指示灯-电源负极 重新启动接口-重启开关 电源开关-电源开关 重新启动接口-重启开关 电源开关-电源开关 MIC+ 麦克风插口 Ground 接地 key 不连接 空 Vbias麦克风电压 AuD_Vcc(AVCC) 声卡电源 图2-5 F_PAMEL1开机接口 L_R_Out 右声道输出 R_Out Back 右声道输出返回 N.C 不连接... - Page 13 为了正确的将 CPU 放置在主板 中, LGA1151CPU 的表面有两个 对起点和一个金色三角指示。 金 色三角指示为 Pin1 图2 -9 拨码开关使用说明 图2-7 CPU安装 1.用螺丝刀拆除主机箱上的挡板和螺丝 1. 将内存插槽两端的卡扣往外扳开, 内存条与插槽的凸出位置做对应, 确 定安装的方向 2.安装显卡时需掰一下卡槽的卡头 2. 将内存条对准插槽, 按下去 3.把显卡插到显卡的卡槽中 3. 让插槽两端的卡扣自动弹起来 图2-8 内存安装 4.安装到位以后,卡头会自动归位 5.用螺丝把显卡固定在机箱上 6.装好电源线即可 图2 -10 显卡安装 09 安装与设置 安装与设置 10...
-
Page 14: 驱动程序的安装
的声卡芯片 (可参考本手册主位标有声卡芯片位置) 看看 是何种型号, 然后根据芯片型号选择对应的驱动程序进 行安装 驱动程序说明 驱动程序目录 适用操作系统 win7/win10 Intel 芯片信息安装 H310C-D3 Chipset Driver 4.1 安装声卡驱动程序 (以 HD Audio系列安装为列) 运行驱动: /H310C-D3 SUOND CARD DRIVER/VISTA- Directx11安装 win7/win10 Tools\Directx11 WIN7-R267 win7/win10 H310C-D3 Suond Card Driver Realtek系列声卡驱动安装 选择 “下一步” 继续 Intel 芯片网卡安装 win7/win10 选择... -
Page 15: Bios设置
点击 “下一步” , 继续 System Overview(系统信息) 点击 “完成” , 系统将会自动查找设备完成安装 设定日前 时间 软硬盘规格及显示器种类 Advanced 6.网卡驱动程序的安装 Advanced Settings(高级BIOS功能设置) 运行驱动: H310C-D3 LAN DRIVER /WIN7/10 设置BIOS提供的特殊功能, 例如病毒警告、 开机引导磁盘 优先等 点击 “下一步” , 继续 Chipest 选择 “安装” 进行下面的安装 Advanced Chipest Settings(高级芯片组功能设置) 选择 “完成” , 重新启动计算机, 系统将自动查找设备完成安装...
Need help?
Do you have a question about the H310C-D3 and is the answer not in the manual?
Questions and answers