
Subscribe to Our Youtube Channel
Summary of Contents for Paselec N5236
- Page 1 Owner’ s Manual www.paselec-ebike.com Paselecbike service@paselecbike.com +1(415)7796667 @paselecbikes +1(626)7204188...
- Page 2 USERS GUIDE N5236...
-
Page 3: Table Of Contents
CONTENT 1. Preface ..................- 1 - 2. Appearance, Size and material ..........- 1 - 3. Function Summary ..............- 3 - 4. Main Display Figures ..............- 4 - 5. Note for users ................- 6 - 6. Standard operation ..............- 6 - 6.1 On/Off ................ -
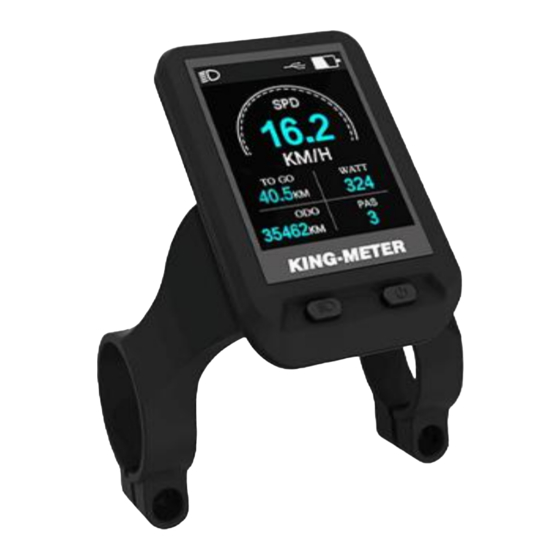
Page 4: Preface
1. Preface To ensure better performance of your e-bike, please read through the N5236 product introduction carefully before using it. We will use the brief words to inform you of all the details (including hardware installation, setting and normal use of the display) when using our display. - Page 5 Display Size and Installation Size (Unit: mm) Button unit is connected to the bottom of the N5236 display via lead cable. In the following introduction, is named as “Switch”. is named as “Headlight”. - 2 -...
-
Page 6: Function Summary
N3-button unit is connected to the bottom of the display via lead cable In the following introduction, is named as “MODE”. is named as “UP”, is named as “DOWN”. 3. Function Summary N5236 display content list as follows: ◆capacity of the battery - 3 -... -
Page 7: Main Display Figures
◆Power of Cycling ◆Speed (current speed, average speed and Max speed) ◆Distance (single trip distance and ODO) ◆PAS level ◆Turn on/off headlight ◆6km/h walk assist ◆USB Charging ◆Bluetooth, GPS location ◆Error code ◆Multi set up parameters: Wheel Size, Speed limited, unit settings (metric/imperial), Backlight Setting, Single trip distance Clearance ◆Photosensitive backlight (Automatically adjust the... - Page 8 Normal display interface Detailed information interface Navigation interface normal display detailed navigation interface interface information interface Headlight Headlight Headlight Walk assist Walk assist Walk assist Navigation Navigation Navigation USB Charging USB Charging USB Charging Battery Capacity Battery Capacity Battery Capacity Power of Cycling Single trip distance Remaining distance...
-
Page 9: Standard Operation
Single trip distance PAS level Current speed PAS level Single trip time Current speed Navigation direction indicator 5. Note for users When the instrument displays the error code, please go to the dealer for maintenance. 6. Standard operation 6.1 On/Off Press and hold the “Switch”... - Page 10 display is: current speed → max speed → average speed. Normal display interface: Current speed Max speed Average speed Detailed information interface: Current speed Max speed Average speed Navigation interface - 7 -...
-
Page 11: Turn On/Off Headlight
Current speed Max speed Average speed 6.3 Turn on/off headlight Press the “Headlight” button briefly to turn on/off the headlight Normal display interface: Headlight on Detailed information interface: - 8 -... -
Page 12: 6Km/H Walk Assist
Headlight on Navigation interface: Headlight on 6.4 6km/h Walk assist Press and hold the "Down" button in the main interface to enter the 6km walk assist mode, and release to exit the the walk assist mode. Normal display interface: - 9 -... - Page 13 6km/h walk assist mode Detailed information interface: 6km/h walk assist mode Navigation interface: 6km/h walk assist mode - 10 -...
-
Page 14: Pas Level Adjustment
6.5 PAS Level Adjustment Short press the “UP” or “DOWN” button to switch the power assisted level of the e-bike and change the output power of the motor. The level range is level0-level5, level0 is the lowest power, level 5 is max power. The default level is level1. -
Page 15: Capacity Of Battery
PAS level1 PAS level5 6.6 Capacity of battery When the battery voltage is high, the LCD segments shows 100%. When the battery is under low voltage (<=20%), the battery power indicator color turns yellow, when the battery capacity is insufficient (<=10%), the battery power indicator color turns red, indicating that the battery is under voltage seriously and needs to be charged immediately. -
Page 16: Auto Backlight
Detailed information interface: Battery power display Low power Under voltage Navigation interface: Battery power display Low power Under voltage 6.7 Auto Backlight When the brightness of the surrounding environment changes, the instrument will automatically control the brightness of the screen backlight through the built-in photosensitive element. -
Page 17: Usb Charging
6.8 USB Charging Plug in the USB device before power on the instrument, turn on the power to charge the USB device, the USB icon will lights up, unplugs the USB device, and the USB icon turns off after 2 Seconds; after starting up the instrument, insert the USB device, and long press the “UP”, “Down”... -
Page 18: Bluetooth Mode
USB Charging interface Navigation interface: USB Charging interface 6.9 Bluetooth Mode Users need to search app "Tahuna" in app store, download and install it. When the instrument is powered on and the Bluetooth is on, log in to the app for use. The Bluetooth name of the instrument is "BR2262e". - Page 19 Bluetooth mode interface Detailed information interface: Bluetooth mode interface Navigation interface: Bluetooth mode interface - 16 -...
-
Page 20: Navigation Mode
6.10 Navigation mode The navigation mode can only be used when Bluetooth function is turned on in the navigation interface. The instrument can display the current remaining distance and riding directions. Direction indication position Indicators as following: Indicator Icon Indicator Icon No navigation U-Turn... - Page 21 Turn Sharp left Turn Sharp Right Turn Slight Left Turn Slight Right Roundabout Roundabout, reversed Roundabout, Take Roundabout, Take first exit. second exit. Roundabout, Take Roundabout, Take third exit. fourth exit. Roundabout, Take Roundabout, Take fifth exit. sixth exit. Roundabout, Take Roundabout, seventh exit.
- Page 22 Roundabout, Roundabout, reversed. Take reversed. Take sixth exit. seventh exit. Turn left, then left Turn left, then right Turn left, then Turn left, then sharp left sharp right Turn left, then Turn left, then slight left slight right Turn right, then Turn right, then left right...
- Page 23 Turn sharp left, Turn sharp left, then slight left then slight right Turn sharp right, Turn sharp right, then left then right Turn sharp right, Turn sharp right, then sharp left then sharp right Turn sharp right, Turn sharp right, then slight left then slight right Turn slight left,...
-
Page 24: Error Code
6.11 Error Code When the system is wrongly working, display will show the error code automatically. Only when the fault is eliminated can the error display interface be exited, and the e-bike will not be able to continue driving after the error occurs. Error display interface Common error codes are defined in the following table: Code number... -
Page 25: Wheel Size Check
to enter the setting interface. Short press the “MODE” button to switch the setting items, which are as follows: wheel size check- speed limit check-single trip distance reset setting- backlight brightness setting- unit setting -wheel size check. In the setting interface, press and hold the “MODE” button (>... -
Page 26: Clearance Of Single Trip Distance
Speed limited check interface 7.4 Clearance of Single trip distance The single trip reset setting can clear the single trip distance of the instrument. Short press the “MODE” button to enter the setting state of single trip distance clearing. Short press the “UP” button or “DOWN” button to clear the single distance (yes) and not clear (no). -
Page 27: Unit Settings
The backlight brightness setting can set the backlight brightness value of the instrument. The default value of the instrument backlight is automatic adjustment mode. Short press the “MODE” button to enter the backlight brightness setting interface. Short press the “UP” button or “DOWN”... -
Page 28: Circuit Diagram And Wire Sequence
Unit setting interface 8. Circuit Diagram and wire sequence Connecting end with controller Standard connector wire sequence table (Ananda) Standard Wire Color of standard Wire Function sequence Red (VCC) Display power wire Blue(K) Power control wire of controller Black(GND) Instrument Ground wire Green(RX) Data receiving wire of display Yellow(TX) -
Page 29: Instrument Printing Code
9. Instrument printing code If customer has special requirements, print the code according to the customer's requirements If the customer has no special requirements, the code printed according to the requirements of King-meter Co. The printing code is two lines. The first line is the hardware version number of the instrument, and the second line is the combination of production date, serial number, and the instrument's wire length, connector type. - Page 30 3, For the storage and handling of the products, please comply with local laws and regulations and environmental protection requirements II, The following are not covered by warranty: 1, Shell opened. 2, Failure or damage is caused by misuse or incorrect installation and debugging by users or the third party.
Need help?
Do you have a question about the N5236 and is the answer not in the manual?
Questions and answers