
Summary of Contents for LOBAS Major LO TF
- Page 1 GA-4-19-72 REV: 08 LOBAS Major LO TF Installasjonsmanual – Assembly Instruction Portbredde > 3 m Door width > 3 m MAJOR TORSJON FREMME EKSKLUSIV / ELEGANT www.lobas.no Garasjeporter www.lobasgarasjeporter.no Garage doors...
- Page 2 Installing cables, shaft and fjærsystemer. Smøring. spring systems. Lubrication. 18-19 Problemløsning. Installasjon Problem solving. Installing the av portåpner motorised opener. 20-21 Demontering. Bruk og Disassembling the door. Use vedlikehold and maintenance Vedlikeholds skjema Maintenance log Installasjonsmanual / Assembly Instruction Major LO TF...
- Page 3 • Max door weight: 165 kg • Temperaturer: -20°C til • Temperature range: -20°C +50°C to +50°C • Luftfuktighet: 20-90% • Humidity: 20-90 % • Fjærens livstid: 15000 • Spring lifetime: 15000 sykluser cycles Installasjonsmanual / Assembly Instruction Major LO TF...
- Page 4 åpnerens documentation part at the installasjonsmanual. end of this document. • If an automatic door opening system is installed, please follow the instructions in the appropriate installation manual. Installasjonsmanual / Assembly Instruction Major LO TF...
- Page 5 • Use the appropriate tools. høyden for å montere takskinner og lignende. • Sikre at barn og dyr ikke har adgang til arbeidsplassen. • Bruk egnet verktøy. Installasjonsmanual / Assembly Instruction Major LO TF...
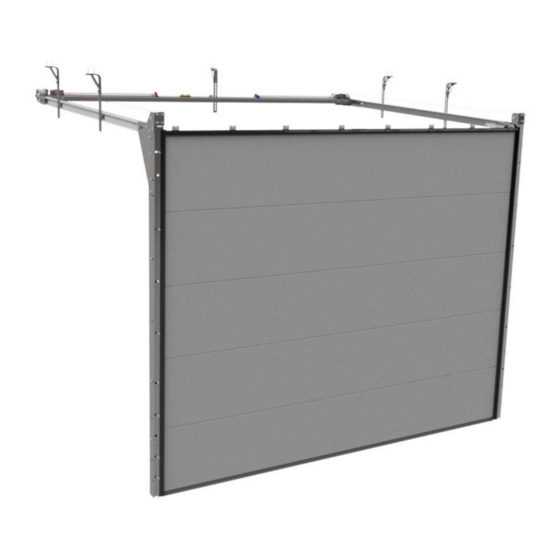
- Page 6 2x Dual top roller Plastdeksler 2x Horisontalskinne Plastic cover 2x Horisontal track 1x Portåpnerfeste 1x Operator plate Portavstiver 2x Bunnbrakett Strut 2x Bottom bracket 1x Motorfeste 2x Bunnbrakett Portavstiverfeste 2x Bottom bracket Strut plate Installasjonsmanual / Assembly Instruction Major LO TF...
- Page 7 System oversikt Major LO TF 2300 2630 når DH 2300 2980 når DH GH = VS + 10 FIH = VS - 390 Manuell GH = VS + 10 FIH = VS - 190 Portåpner Dersom en portåpner eller en portavstiver blir montert, reduseres fri innkjøringshøyde...
- Page 8 (mm) 8023CR5 3271 3151 8323CR5 3271 3151 8025CR5 3460 3340 EXTENSIONS 840CR5 4954 4834 Sommer portåpner Sommer engine Maks porthøyde Maks portbredde Portåpner Max door width Max door height Engine (mm) BS400N 3553 Installasjonsmanual / Assembly Instruction Major LO TF...
- Page 9 109464 – Sleideklips - Monteres med skrue G Bag: Bag: L-106: 3 L-22: 2 Y = Antall portavstiverferster / Y = Number X = Antall hengsler / X = Number of hinges of strut attachments Installasjonsmanual / Assembly Instruction Major LO TF...
- Page 10 Verktøy Tools 10 mm 13 mm 2,5 mm 4 mm ≥ 5 m Installasjonsmanual / Assembly Instruction Major LO TF...
- Page 11 Oppmåling av Measurement of portåpning garage doorway DH - X X = Skjevhet i gulv X = Variations in the floor Assembling sealing on Montering av pakning vertical track Installasjonsmanual / Assembly Instruction Major LO TF...
- Page 12 Kapping av pakning Cutting the sealing Montering av overkarm Assembling header på vertikalskinne piece on vertical track Installasjonsmanual / Assembly Instruction Major LO TF...
- Page 13 Montering av skinner Assembling tracks on på portåpning doorway Tips: Bruk støtte for oppheng til å holde rammen på plass Tip: Use the support for the roof attachment to position the tracks Installasjonsmanual / Assembly Instruction Major LO TF...
- Page 14 Kontroll av skinner på Control that the portåpning assembly is level X = Max 600mmz 10 x 10 x Demontering av Disassembling avstandsskinne rear spacer Installasjonsmanual / Assembly Instruction Major LO TF...
- Page 15 Posisjonering av Positioning engine motorfeste attachment Tips: Legg avstandsskinne på toppen av vertikalskinne Tip: Position rear spacer on top of vertical tracks 33,5 mm Montering av Assembling engine motorfeste attachment Installasjonsmanual / Assembly Instruction Major LO TF...
- Page 16 Montering av Assembling horizontal takskinner tracks and roof attachment Montering av buet Assembling radius skinne tracks Installasjonsmanual / Assembly Instruction Major LO TF...
- Page 17 Montering av Assembling takskinner horizontal tracks Tips: Bruk tau til å holde takskinnene på plass til opphengsstagene er montert Tip: Use ropes to maintain the parts in position Montering av Assembling rear spacer avstandsskinne Installasjonsmanual / Assembly Instruction Major LO TF...
- Page 18 Montering av Assembling rear engine motorfeste og attachment and roof opphengsvinkel bak attachment Montering motorfeste Assembling rear engine attachment Installasjonsmanual / Assembly Instruction Major LO TF...
- Page 19 Montering Assembling rear roof opphengsvinkel bak attachment Montering av Assembling cover hjørnedeksel Installasjonsmanual / Assembly Instruction Major LO TF...
- Page 20 7.10 Kontroll av diagonal Control the diagonal Tips: Bruk spor i vertikalskinne for å feste målebånd (se utsnitt) Tip: Use the slot in the rail to attach the measuring tape (top left image) Installasjonsmanual / Assembly Instruction Major LO TF...
- Page 21 Portbredde Antall rader med hengsler Door width Rows of hinges DB/DW ≤ 3,0 m 3,0 m < DB/DW ≤ 4,5 m DB/DW > 4,5 m Montering av nedre Assembling bottom portseksjon door panel Installasjonsmanual / Assembly Instruction Major LO TF...
- Page 22 Montering av vaier på Attaching lifting cable bunnbrakett to bottom bracket Montering av Assembling bottom 9.2 A bunnbrakett bracket Installasjonsmanual / Assembly Instruction Major LO TF...
- Page 23 A are at the top of oblong holes Bunnprofil uten lufting Bunnbrakett plasseres slik at skruer A står nederst i avlange hull The bottom bracket is placed so that screws A are at the bottom of oblong holes Installasjonsmanual / Assembly Instruction Major LO TF...
- Page 24 øverste seksjon. Stram alle 5 skruer. Repeat on left and right side for all sections up, to, and including, the last door section. Tighten all 5 screws. Installasjonsmanual / Assembly Instruction Major LO TF...
- Page 25 øverste seksjon. Stram alle 6 skruer. Repeat on left and right side for all sections up, to, and including, the last door section. Tighten all 6 screws. Installasjonsmanual / Assembly Instruction Major LO TF...
- Page 26 Montering av øverste Assembling the top portseksjon door panel Montering av Assembling operator portåpnerfeste plane Installasjonsmanual / Assembly Instruction Major LO TF...
- Page 27 Montering av Assembling toppbrakett top bracket Installasjonsmanual / Assembly Instruction Major LO TF...
- Page 28 Montering av 10.1 Assembling top roller toppbrakett Montering av 10.2 Assembling top roller toppbrakett Ikke skru til skruer Do not tighten Installasjonsmanual / Assembly Instruction Major LO TF...
- Page 29 If the door width is under 4,5 Bottom m and a row of windows is installed in the top door panel, Topp then a strut is required above the mentioned row of 2,33 - 2,5 m windows. Bunn Bottom Installasjonsmanual / Assembly Instruction Major LO TF...
- Page 30 Dersom man har et 460 mm høyt portpanel med en rad vinduer: Se Anneks B If you have a 460 mm panel with a row of windows: See Annex B Montering av 12.2 Assembling strut portavstiver Installasjonsmanual / Assembly Instruction Major LO TF...
- Page 31 Montering av Assembling protection plastdeksler covers Montering av torsjonsaksling og fjær Assembling shaft and spring systems Installasjonsmanual / Assembly Instruction Major LO TF...
- Page 32 Then connect the shafts. Shaft and spring 14.1 Torsjonsakslinger systems Svart trommel Black drum Rød fjær Red spring Blå/Svart fjær Blue/Black spring Rød trommel Red drum Installasjonsmanual / Assembly Instruction Major LO TF...
- Page 33 14.2 Montering av fjær Assembling spring Forhåndsmontering av Preassembling the 14.3 akslinger shafts Innbøyd ende av fjæren MÅ være opp på fjærbruddsikringen (opp mot tak) Venstre / Left side Høyre / Right side Installasjonsmanual / Assembly Instruction Major LO TF...
- Page 34 Posisjonering av Positioning of bolts for 14.4 skruer for montering assembling the spring av fjærbruddsikring break device OBS! Begynn med NB! Start on the venstre side left side Installasjonsmanual / Assembly Instruction Major LO TF...
- Page 35 Posisjoner venstre Position left hand shaft 14.5 aksling og monter and spring break device fjærbruddssikring 14.6 Posisjoner lager Position bearing Installasjonsmanual / Assembly Instruction Major LO TF...
- Page 36 14.7 opplagringssenter OBS! Ikke NB! Do not stram til tighten skruene bolts Sjekk at aksling er i Check that the shaft is 14.8 vater – Stram skruer på level and tighten bolts opplagringssenter Installasjonsmanual / Assembly Instruction Major LO TF...
- Page 37 Assembling left hand 14.9 midtplate (DB > 5m) plate (DW > 5 m) DB ≤ 5m: DW ≤ 5m: 14.10 Posisjonering av kobling Positioning coupler OBS! Ikke NB! Do not stram til tighten skruene bolts Installasjonsmanual / Assembly Instruction Major LO TF...
- Page 38 DW > 5m: 14.11 Posisjoner kobling Position coupler OBS! Ikke NB! Do not stram til tighten skruene bolts Legg høyre aksling i Position right hand 14.12 endeplate og posisjoner shaft and spring break fjærbruddssikring device Installasjonsmanual / Assembly Instruction Major LO TF...
- Page 39 14.13 Posisjoner lager Position bearing Koble sammen Assemble shafts and 14.14 akslinger (DB ≤ 5m) coupler (DW ≤ 5 m) 20 Nm Installasjonsmanual / Assembly Instruction Major LO TF...
- Page 40 Koble sammen Assemble shafts and 14.15 akslinger (DB > 5 m) coupler (DW > 5 m) 20 Nm Monter høyre Assemble right hand 14.16 midtplate (DB > 5 m) bracket (DW > 5 m) Installasjonsmanual / Assembly Instruction Major LO TF...
- Page 41 Stram fjærbrudds- Tighten spring break 14.17 sikring device Posisjonering av 14.18 Positioning drum trommel Installasjonsmanual / Assembly Instruction Major LO TF...
- Page 42 Montering av vaier og Assembling cable and oppstramming av fjær tightening of spring NB! Blue spring on OBS! Blå fjær på venstre side, rød fjær the left, red spring på høyre side on the right Installasjonsmanual / Assembly Instruction Major LO TF...
- Page 43 Vaier skal trekkes Position cable between 15.1 mellom port og roller and door trinsebolt Oppstramming av 15.2 Tighten cable vaier Installasjonsmanual / Assembly Instruction Major LO TF...
- Page 44 15.3 Lås aksling Blocking the shaft Tighten cable equally Vaier strammes likt på 15.4 on the left and right side høyre og venstre side of the door Installasjonsmanual / Assembly Instruction Major LO TF...
- Page 45 Rotating the spring fjær N x 360° N x 360° Antall rotasjoner avhenger av porthøyde. Tabellen finnes i Appendiks A The number of rotations depends on the door height. Details in appendix A Installasjonsmanual / Assembly Instruction Major LO TF...
- Page 46 Strekk fjæren Extend the spring 15.7 10-15 mm 10-15 mm X + 15 mm X + 15 mm Aktiver Activate spring break 15.8 fjærbruddssikring device Installasjonsmanual / Assembly Instruction Major LO TF...
- Page 47 Om nødvendig: If necessary: 16.1 Justering av toppbrakett Adjusting top bracket For å justere: Løsne skruer og flytt toppbrakett opp eller ned To adjust: Loosen screws and move top bracket up or down Installasjonsmanual / Assembly Instruction Major LO TF...
- Page 48 Smøring Lubrication Installasjonsmanual / Assembly Instruction Major LO TF...
- Page 49 PORTEN FYKER OPP: • Slakk fjæren. • Loosen spring. KONDENS PÅ INNSIDEN AV CONDENSATION ON THE INSIDE OF PORT: THE DOOR: • Sjekk lufting i garasjen. • Verify that the garage is sufficiently aired. Installasjonsmanual / Assembly Instruction Major LO TF...
- Page 50 Modell Maks Maks portvekt portstørrelse LM60EVF 12,5 m² 110 kg LM80EVF 16,5 m² 130 kg LM100EVF 23,5 m² 150 kg LM130EVF 30 m² 200 kg BS400N 3,0 m x 2,3 m 90 kg Installasjonsmanual / Assembly Instruction Major LO TF...
- Page 51 7. Keep this document for utskifting av deler. instructions and documentation. 7. Ta vare på 8. Maintenance of motorised monteringsanvisningen. opener: Check the openers’ documentation 8. Vedlikehold av portåpner: Se egen manual for åpneren. Installasjonsmanual / Assembly Instruction Major LO TF...
- Page 52 Deretter brukes system in the opposite begge stengene til å order to when you gradvis spenne ned assembled it. fjæren. 4. Nå kan resterende deler demonteres i motsatt rekkefølge som de ble montert. Installasjonsmanual / Assembly Instruction Major LO TF...
- Page 53 Lonevåg Beslagfabrikk AS, N-5282 Lonevåg, Tlf. (+47) 56 19 31 00 Identifikasjonsnummer (Skriv av fra etikett) Installatør (Navn, adresse, telefonnr.) Dato for installasjon Evt. Portåpnertype Evt. Sikkerhetsutstyr (Fotoceller, varsellys, etc.) Vedlikehold / Reparasjoner / Oppgraderinger Navn (utført av) Dato Signatur Installasjonsmanual / Assembly Instruction Major LO TF...
- Page 54 • Bruk og vedlikehold Vi anbefaler at torsjonsfjæren(e) blir smurt jevnlig. Om det kommer lyd fra fjæren(e), eller porten returnerer rett før den er lukket, kan det hjelpe å smøre fjæren(e). Smøring forlenger levetiden til torsjonsfjæren(e). Installasjonsmanual / Assembly Instruction Major LO TF...
- Page 55 Pose L-97 / -99: 107456 - 6,3x18 TEK skrue med borspiss Position and attach strut Pose L-36: M8x30 seksk.skrue DIN 933 Elzn. Pose L-36: M8 låsemutter Din985 elzn Posisjoner og skru fast portåpnerfeste Position and attach operator plate Installasjonsmanual / Assembly Instruction Major LO TF...
- Page 56 2. Modellbetegnelse: Eksklusiv Trend, Eksklusiv Modern, Eksklusiv Horisont, Eksklusiv Line, Eksklusiv Kassette 3. Bruksområde: Dør for innkjøringsåpning i garasjer 4. Produsent: Lonevåg Beslagfabrikk A/S (LOBAS), Flatevad, N-5282 Lonevåg 5. Autorisert representant: Ikke relevant 6. System for vurdering og kontroll av byggevarens konstante ytelse: System 3 7.