Table of Contents
Advertisement
Available languages
Available languages
Quick Links
FAN COIL MURAL
Control remoto
WALL-MOUNTED FAN COIL
Control remoto
Gama EFSP
MANUAL DE
INSTRUCCIONES
INSTRUCTION MANUAL
GUIDE D'UTILISATION
Escanee para ver este manual en otros idiomas y actualizaciones
MANUAL D'INSTRUÇÕES
Scan for manual in other languages and further updates
Manuel dans d'autres langues et mis à jour
Manual em outras línguas e actualizações
V.2
Advertisement
Chapters
Table of Contents

Related Manuals for EAS Electric Gama EFSP


Summary of Contents for EAS Electric Gama EFSP
- Page 1 FAN COIL MURAL Control remoto WALL-MOUNTED FAN COIL Control remoto Gama EFSP MANUAL DE INSTRUCCIONES INSTRUCTION MANUAL GUIDE D'UTILISATION Escanee para ver este manual en otros idiomas y actualizaciones MANUAL D'INSTRUÇÕES Scan for manual in other languages and further updates Manuel dans d'autres langues et mis à...
-
Page 2: Table Of Contents
NOTA 1. La imagen de la portada es solo para referencia, puede diferir del producto que adquirió. 2. Asegúrese de leer el capítulo 'PRECAUCIONES' antes de conectar la unidad de aire acondicionado 3. Este manual está disponible para el modelo RM05. 4. -
Page 3: Preca Utiones
PRECAUCIONES ► Cortinas, puertas u objetos similares limitan que el aire acondicionado reciba la la señal infrarroja del control remoto. ► No humedezca ni congele el control remoto. Está prohibido exponerlo a la luz directa del sol o colocarlo en lugares con una temperatura muy alta. ►... -
Page 4: Botones Y Sus Funciones
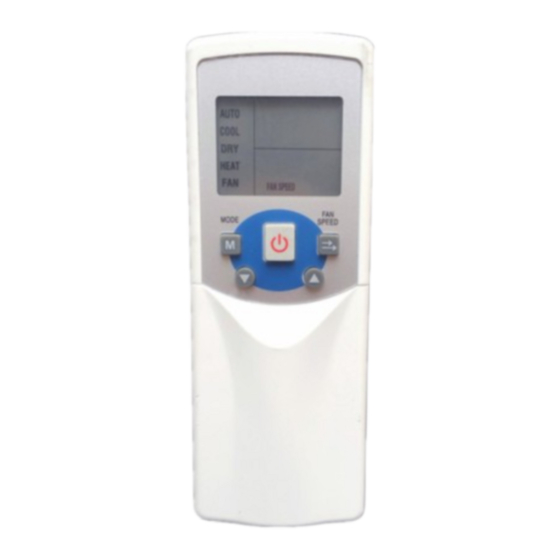
BOTONES Y SUS FUNCIONES Velocidad Ajuste de modo ventilador Ajuste Ajuste Dirección aire ON/OFF Ajuste hora Swing aire vertical Temporizador encendido Swi n g ai r e hori z ontal Temporizador apagado Reinicio Botón Bloqueo confirmación Modo económico Frío/Calor... - Page 5 CD Modo: Una vez que lo pulse, podrá seleccionar el modo de funcionamiento siguiendo la siguiente secuencia: DESHUMIDIFICACIÓN AUTO REFRIGERACIÓN CALEFACCIÓN VENTILACIÓN NOTA: El modo calefacción no está disponible en los modelos de solo frío. ® VELOCIDAD DEL VENTILADOR: Puede seleccionar la velocidad del ventilador siguiendo la siguiente secuencia: ALTO AUTO...
- Page 6 El ajuste o su modificación solo será efectiva si se pulsa OK para realizar la confirmación. @TEMPORIZADOR ON: Para activar el temporizador de encendido. Cuando pulse este botón el temporizador aumentará en 0.5 horas. Cuando el tiempo excede las 10 horas, al presionar el botón el temporizador aumentará en 1 hora. Si se ajusta en 0.00 se cancela el temporizador de encendido de la unidad.
-
Page 7: Indicadores Y Sus Funciones
INDICADORES Y SUS FUNCIONES Temperatura ON/OFF Señal transmisión Modo de funcionamiento Reloj Bloqueo Temporizador ON/OFF Modo económico Velocidad ventilador Temp: Muestra la temperatura. Ajuste la temperatura con.6. yT . No se mostrará nada en este apartado en el modo ventilación. ®... -
Page 8: Instrucciones De F Uncionamietno
® Velocidad de ventilador: Pulse FAN SPEED para mostrar la velocidad de salida del aire. Puede seleccionar AUTO, L OW (BAJO), HIGH (ALTO). ajuste predertminador es alto para las unidades sin nivel medio. ® Funcionamiento económico: Este icono se iluminará si se se pulsa el botón ECO. -
Page 9: Deshumidificación
NOTA: En el modo de ventilación, la temperatura no se puede ajustar y el moco ECO no se puede activar. El paso 2 está omitido. Modo deshumidificación 1. Pulse MO DE para seleccionar DRY. Ajuste la temperatura con • . Generalmente el rango es 17~30º C 3. - Page 10 .- Ajuste de temporizador ON y temporizador OFF simultáneamente 1. Ajuste Temporizador ON de acuerdo a los procedimientos 1 y 2 especificados en Funcionamiento de temporizador ON. 2. Ajuste Temporizador OFF de acuerdo a los procedimientos 1 y 2 especificados en Funcionamiento de temporizador OFF. 3.
- Page 11 NOTE 1. The outline figure on cover is for reference only, which may differ from what you purchased. 2. Make sure to read chapter PRECAUTIONS befare you operate the air conditioner. 3. This manual is available for model RM05. 4. Can be applicable for cool only type and cool&heat type air conditioners.
-
Page 12: Precautions
PRECAUTIONS ► Curtain, door or the like objects will preven! the remole signal from being received by air conditioner. ► Do not gel the interior of remole controller wet. 11 is forbidden to expose it to direct sunlight or locate it in the place with high temp. ►... -
Page 13: Buttons Ano Their Functions
BUTTONS AND THEIR FUNCTIONS Mode setting Fan speed setti n g Adjust Adjust Ai r di r ecti o n setti n g ON/OFF Time Setting Wind Vert. Swing Timer ON Wi n d VHori z . Swi n g Timer OFF Reset Confirm button... - Page 14 MODE: Once pressing, running mode will be selected in the following sequence: --+�!'.�'.'\�.:- AUTO COOL NOTE: No heating mode for cool only type unit. ® FAN SPEED: Fan speed will be selected in following sequence once pressing this button: AUTO HIGH ®...
- Page 15 to adjust the figure. Setting ar modification is effective only by pressing OK button to make confirmation. @TIME ON: Far time ON setting. Once pressing this button, the time will increase by 0.5 hour. When the set time exceeds 1 O hours, pressing the button will increase the time by 1 hour. Adjusting the figure to 0.00 will cancel time ON setting.
-
Page 16: Inoicators Ano Functions
INDICATORS AND FUNCTIONS Temperature Transmitting display ON/OFF Running mode Time Lock Time ON/OFF Economic operation Fan Speed Temp: Display the set temperature. Adjust temperature via.6. andT . No display in this area if the unit is on FAN mode. ® Transmitting display: The icon will flash once when the signal is sent by remate controller. -
Page 17: Operation Instructions
® F an speed: Press FAN SPEED to display the current wind speed. AUTO, L OW, MEO and HIGH can be selected. The default state is high fan speed far the unit without medium fan speed. ® Economic operation: This icon will be lightened or off when pressing EC O button. -
Page 18: Ory Operation
NOTE: O n FAN mode, temp is nonadjustable and ECO is ineffective. Procedure 2 is omitted. DRY operation 1. Press MO DE to select DRY. 2. Adjust temp via • . Gene rally the range is 1 TC ~30 ºC. andT 3. - Page 19 .- Set TIME ON and TIME OFF simultaneously 1. Set TIME ON according to procedures 1 and 2 specified in TIME ON operation. 2. Set TIME OFF as the procedures 1 and 2 specified in TIME OFF operation. 3. lf both the set time of TIME ON and TIME OFF not exceed 1 O hours, time OFF operation will activated 0.5 hour later than time ON operation.
- Page 20 Toda la documentación del producto Complete documents about the product Documentation plus complète sur le produit Mais documentação do produto EAS ELECTRIC SMART TECHNOLOGY, S.L.U. P.I. San Carlos, Camino de la Sierra, S/N, Parcela 11 03370 Redován (Alicante) - ESPAÑA...
Need help?
Do you have a question about the Gama EFSP and is the answer not in the manual?
Questions and answers