
Related Manuals for oneConcept All-You-Can-Eat


Summary of Contents for oneConcept All-You-Can-Eat
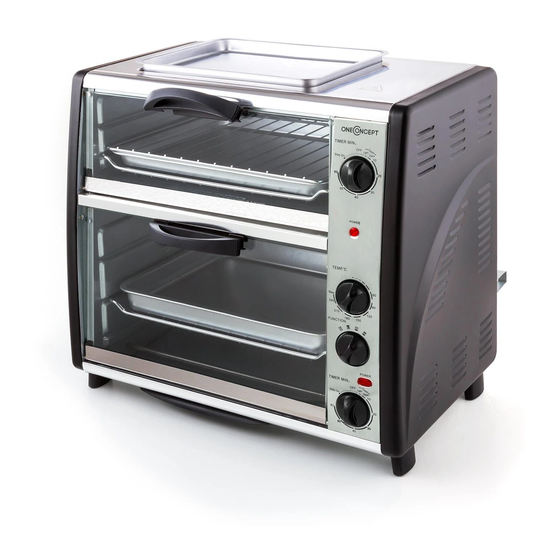
- Page 1 All-You-Can-Eat Mini-Backofen Mini oven Mini horno Mini four Mini forno Mini oven 10026452...
-
Page 3: Table Of Contents
Sehr geehrter Kunde, wir gratulieren Ihnen zum Erwerb Ihres Gerätes. Lesen Sie die folgenden Hinweise sorgfältig durch und befolgen Sie diese, um möglichen Schäden vorzubeugen. Für Schäden, die durch Missachtung der Hinweise und unsachgemäßen Gebrauch entstehen, übernehmen wir keine Haftung. Scannen Sie den QR-Code, um Zugriff auf die aktuellste Bedienungsanleitung und weitere Informationen rund um das Produkt zu erhalten. -
Page 4: Sicherheitshinweise
SICHERHEITSHINWEISE • Lesen Sie sich alle Hinweise durch und bewahren Sie die Anleitung zum Nachschlagen gut auf. • Die Oberflächen werden während des Betriebs sehr heiß, berühren Sie sie nicht. • Benutzen Sie das Gerät in Anwesenheit von Kindern nur unter Aufsicht. •... -
Page 5: Bedienfeld
BEDIENFELD Zeitregler Die maximale einstellbare Zeit beträgt 60 Minuten. Nach Ablauf der gewünschten Zeit ertönt ein Signal und das Gerät schaltet sich ab. Kontrollleuchte Diese Leuchte schaltet sich ein, sobald das Gerät eingeschaltet ist. Temperatur-Regler für untere Ofeneinheit An diesem Temperatur-Regler können Sie eine Temperatur zwischen 60°C und 240°C einstellen. -
Page 6: Inbetriebnahme Und Bedienung
INBETRIEBNAHME UND BEDIENUNG Schalten mit dem Funktionsregler auf Ober- und Unterhitze und drehen Sie den Temperaturregler auf 240°. Drehen Sie nun den Zeitregler auf 10 Minuten, um das Gerät vor der ersten Verwendung durchzuheizen. Dabei kann zu einer leichten Rauch- und Geruchsentwicklung kommen. Dies ist völlig normal und stellt keine Fehlfunktion dar. -
Page 7: Reinigung Und Pflege
REINIGUNG UND PFLEGE • Ziehen Sie den Stecker aus der Steckdose und lassen Sie das gerät vollständig abkühlen, bevor Sie Teile zur Reinigung entnehmen. • Benutzen Sie zur Reinigung keine spitzen oder scharfen Gegenstände, um die Oberflächen nicht zu beschädigen. •... - Page 9 Dear Customer, Congratulations on purchasing this device. Please read the following instructions carefully and follow them to prevent possible damages. We assume no liability for damage caused by disregard of the instructions and improper use. Scan the QR code to get access to the latest user manual and more product information.
-
Page 10: Safety Instructions
SAFETY INSTRUCTIONS • Don’t touch hot surfaces of oven. • Close supervision is necessary when any appliance is used by or near children. • To protect against electric shock, do not immerse cord, plug or any parts of the oven on water or other liquid. Don’t let cord touch hot surfaces of oven. -
Page 11: Control Panel
CONTROL PANEL Timer The maximum adjustable time is 60 minutes. When the desired time has elapsed, a signal sounds and the unit switches off. Indicator light This light comes on when the unit is turned on. Temperature knob for the lower cave Temp knob suit to lower chamber setting temp when bake various food. -
Page 12: Use And Operation
USE AND OPERATION Use the function knob to choose top or bottom heat and turn the temperature control to 240 °C Now turn the time slider to 10 minutes for preheating before the fi rst use. There may be a slight odors and smoke. This is normal and does not indicate a malfunction. -
Page 13: Cleaning And Care
CLEANING AND CARE • Unplug the oven and allow all parts to cool completely before cleaning or moving. • Don’t use any sharp utensils to clean the bake pan, as this may cause damage to the surface painting. • Clean the glass door with a soapy damp rag or sponge and then dry it by towel. - Page 15 Estimado cliente, Le felicitamos por la adquisición de este producto. Lea atentamente las siguientes instrucciones y sígalas para evitar posibles daños. No asumimos ninguna responsabilidad por los daños causados por el incumplimiento de las instrucciones y el uso inadecuado. Escanee el siguiente código QR para obtener acceso a la última guía del usuario y más información sobre el producto.
- Page 16 INDICACIONES DE SEGURIDAD • Lea atentamente estas indicaciones y conserve el manual de instrucciones para consultas posteriores. • Las superficies del horno se calientan mucho durante su funcionamiento, no las toque. • En presencia de niños, utilice el horno solo si estos están bajo vigilancia. •...
- Page 17 CONTROLES Temporizador El tiempo máximo programable es de 60 minutos. Una vez transcurrido ese tiempo, el horno emite un pitido y se apaga. Piloto Esta lámpara se ilumina cuando el aparato está encendido. Regulador de temperatura para la parte inferior del horno En este regulador de temperatura puede ajustar la temperatura entre 60 °C y 240 °C.
- Page 18 PUESTA EN FUNCIONAMIENTO Y USO Seleccione el modo combinado de calor desde arriba y abajo en la rueda y establezca la temperatura a 240°. Programe el temporizador para 10 minutos para calentar el aparato antes del primer uso. Es posible que note cómo se forma un poco de humo y un ligero olor;...
- Page 19 LIMPIEZA Y CUIDADO • Desenchufe el aparato y deje que se enfríe por completo antes de retirar las piezas para su limpieza. • No utilice objetos puntiagudos ni afilados para limpiar el aparato, podría dañar su superficie. • Limpie la puerta de cristal con una esponja y un poco de agua con jabón y séquela posteriormente con un paño.
- Page 21 Chère cliente, cher client, Toutes nos félicitations pour l’acquisition de ce nouvel appareil. Veuillez lire attentivement et respecter les instructions de ce mode d’emploi afin d’éviter d’éventuels dommages. Nous ne saurions être tenus pour responsables des dommages dus au non-respect des consignes et à la mauvaise utilisation de l’appareil.
-
Page 22: Consignes De Sécurité
CONSIGNES DE SÉCURITÉ • Veuillez lire attentivement toutes les indications et conserver ce mode d’emploi soigneusement pour pouvoir le consulter à tout moment. • Ne pas toucher les surfaces externes de l’appareil pendant son fonctionnement, car elles devi- ennent très chaudes. •... -
Page 23: Panneau De Commande
PANNEAU DE COMMANDE Bouton de réglage du minuteur Le temps maximum réglable est de 60 minutes. Une fois le temps du mi- nuteur écoulé, un bip retentit et l’appareil s’éteint automatiquement. Témoin lumineux Le témoin lumineux s’allume dès que l’appareil est allumé. -
Page 24: Mise En Marche Et Utilisation
MISE EN MARCHE ET UTILISATION Avant la première utilisation, faire chauffer une première fois l’appareil. Pour ce faire, choi- sir l’espace de cuisson supérieur ou inférieur à l’aide du bouton de réglage des fonctions. Tourner ensuite le bouton de réglage de la température sur 240 °C et le bouton de réglage du minuteur sur 10 minutes. -
Page 25: Nettoyage Et Entretien
NETTOYAGE ET ENTRETIEN • Débrancher l’appareil et le laisser complétement refroidir avant de retirer les accessoires et de le nettoyer. • Ne pas utiliser d’objets tranchant pour le nettoyage et pour ne pas endommager les superficies. • Nettoyer la porte en verre avec une éponge et un peu d’eau savonneuse puis essuyer avec un chiffon sec. - Page 27 Gentile cliente, La ringraziamo per aver acquistato il dispositivo. La preghiamo di leggere attentamente le seguenti istruzioni per l’uso e di seguirle per evitare possibili danni. Non ci assumiamo alcuna responsabilità per danni scaturiti da una mancata osservazione delle avvertenze di sicurezza e da un uso improprio del dispositivo.
- Page 28 AVVERTENZE DI SICUREZZA • Leggere attentamente tutte le istruzioni e conservare il presente manuale per consultazioni future. • Quando il dispositivo è in funzione, le superfici diventano molto calde: non toccarle. • Sorvegliare i bambini se si utilizza il dispositivo in loro presenza. •...
- Page 29 PANNELLO DI CONTROLLO Manopola timer Il tempo massimo impostabile è di 60 minuti. Allo scadere del tempo impostato, il dispositivo emette un segnale acustico e si spegne. Spia luminosa La spia si illumina appena il dispositivo è acceso. Manopola temperatura (camera di cottura inferiore) Con questa manopola è...
- Page 30 MESSA IN FUNZIONE E UTILIZZO Ruotare la manopola di selezione delle funzioni sulla funzione riscaldamento combinato superiore e inferiore e impostare la temperatura a 240°. Ruotare la manopola timer su 10 minuti, per preriscaldare il forno al primo utilizzo. Questa operazione può comportare la fuoriuscita di un leggero fumo con conseguente odore di fumo.
- Page 31 PULIZIA E MANUTENZIONE • Staccare la spina dalla presa e far raffreddare il dispositivo completamente, prima di rimuovere i componenti per la pulizia. • Non utilizzare per la pulizia oggetti appuntiti o taglienti, per non danneggiare le superfici. • Pulire lo sportello con un panno, un po’ di acqua insaponata e asciugarlo. •...
- Page 33 Geachte klant, hartelijk gefeliciteerd met de aanschaf van dit apparaat. Lees de hierna volgende handleiding aandachtig door en volg de instructies op om schade te voorkomen. Voor schade veroorzaakt door het niet in acht nemen van de instructies of door onjuist gebruik nemen wij geen verantwoordelijkheid.
- Page 34 VEILIGHEIDSINSTRUCTIES • Lees deze instructies zorgvuldig door en bewaar ze als naslagwerk. • De oppervlaktes worden tijdens het gebruik heel heet, raak ze niet aan. • Gebruik het apparaat in aanwezigheid van kinderen alleen onder toezicht. • Dompel het apparaat, de stroomkabel en de stekker niet onder in water of andere vloeistof.
- Page 35 CONTROLEPANEEL Tijdschakelaar De maximaal instelbare tijd is 60 minuten. Na afloop van de gewenste tijd klinkt een signaal en schakelt het apparaat zichzelf uit. Controlelampje Dit lampje brandt zodra het apparaat aangezet wordt. Temperatuurknop voor de onderste eenheid Met deze draaiknop kunt u de temperatuur tussen 60°C en 240°C instellen Functieschakelaar Hiermee kunt u instellen of de onderste oven met...
- Page 36 INGEBRUIKNAME EN BEDIENING Zet de functieschakelaar op hitte bovenin en onderin en draai de temperatuurknop op 240°C. Zet nu de tijdschakelaar op 10 minuten om het apparaat voor het eerste gebruik goed te verhitten. Daarbij kan enige rook- en geurontwikkeling plaatsvinden. Dit is normaal en vormt geen probleem. LET OP Verbrandingsgevaar! De behuizing wordt tijdens het gebruik heel erg heet.
- Page 37 REINIGING & ONDERHOUD • Neem de stekker uit het stopcontact en laat het apparaat volledig afkoelen voordat u er onderdelen uithaalt om te reinigen. • Gebruik voor het reinigen geen scherpe of spitse materialen om beschadiging te voorkomen. • Reinig de glazen deur met een spons en wat sop en wis het daarna met een doek droog.
Need help?
Do you have a question about the All-You-Can-Eat and is the answer not in the manual?
Questions and answers