Advertisement
Quick Links
•
Read these instructions prior to using your ReproScan 2.0 Sunlight Readable Wireless Monitor.
•
Contact your ReproScan authorized dealer should you have further questions about the
operation of your new monitor
•
For further information, email: inquiry@repro-scan.com or call 1-877-890-2411
ReproScan 2.0 Monitor
Operator's Manual
Advertisement

Summary of Contents for ReproScan 2.0
- Page 1 ReproScan 2.0 Monitor Operator’s Manual • Read these instructions prior to using your ReproScan 2.0 Sunlight Readable Wireless Monitor. • Contact your ReproScan authorized dealer should you have further questions about the operation of your new monitor • For further information, email: inquiry@repro-scan.com or call 1-877-890-2411...
-
Page 2: Display Specifications
ReproScan 2.0 Monitor Features ●IP63 rated water and dust resistance ●1,000NIT Sunlight Readable with long life LED backlight ●HDMI Input x 1 ●VGA Input (15 pin D-SUB) x 1 ●Video Input x 1 ●8 channel 2.4GHz & 5.8 GHz WIFI video input ●NTSC / PAL Multi-System... - Page 3 3. Make sure the battery in the monitor is fully charged before use. 4. To charge, plug in the ReproScan 3 Amp Charger into the 12 DC power in socket as shown. Connect other end of the charger to 110 VAC (USA/Canada ) or 230 VAC (Australia/NZ/Other), turn on the “Toggle Switch”...
- Page 4 3. Understanding the ReproScan 2.0 Monitor Control Buttons ► Left Right Menu Select Power Touch Buttons are at bottom of the monitor display 1. Use the Touch Buttons to select the OSD (On-Screen Display) screen with the settings you wish to change.
- Page 5 4. To Change Brightness, Contrast and Backlight (Dimmer) 1. Press Power to turn on the monitor. 2. Press Menu and left ( ◄ ) or right ( ► ) to select OSD with appropriate screen 3. For Brightness, Contrast and Backlight changes use the Color Screen 4.
- Page 6 Eg. Channel 6 on the XTC matches with Channel 5.8 G: CH 6 on the ReproScan 2.0 Monitor. If you are using a 2018 or older XTC, the channel on the 2.0 Monitor will start with 2.4G CH# and...
- Page 7 8. Change the Channel on your Flexx by ReproScan - see owner’s manual for more details The Flexx has a built in wireless sender. There are 8 - 5.8 GHz channels are available. You will need to match these channels to the monitor channels. Eg. Channel 6 Flexx matches with 5.8G: CH6 5925MHz setting on the ReproScan 2.0 Monitor.
- Page 8 9. Switch to Direct Wired Connection (VGA or AV) - Enable Source 1. Press Power to turn on monitor. 2. Press Menu then Left or Right to go to Function screen 3. Press Select to scroll through to Source Enable 4.
-
Page 9: Battery Indicator
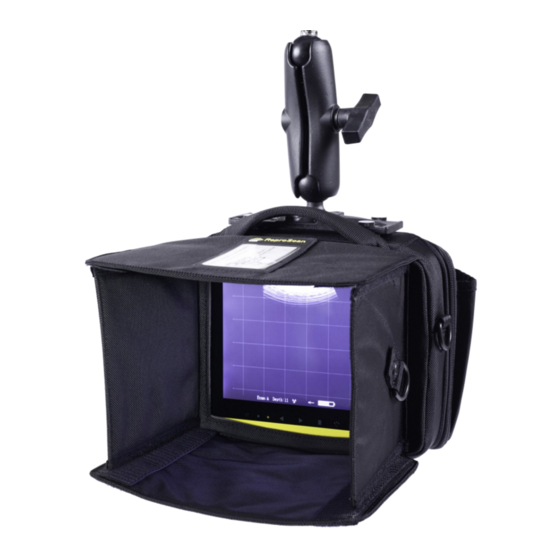
3. The battery life is approximately 8 hours. 4. You many use while charging. 5. If the indicator does not reach a level of at least 97, call the ReproScan office as the battery may need to be reset. Page 9... - Page 10 12. Mounting your ReproScan 2.0 Monitor using Ram Mount® Parts Recommended Ram Mount Kit—available from ReproScan The following Ram Mount Parts have proven to be very useful for mounting the ReproScan 2.0 monitor in almost all locations. RAM - 111BU 6.25” length with 1.5” ball (Type C ball = 1.5”...
- Page 11 XTC stays clean! The above photos are examples of Ram Mount components being used on a variety of chutes to sus- pend the ReproScan 2.0 monitor at the correct height and angle for the person scanning cows. Page 11...
- Page 12 15. Warranty - ReproScan 2.0 Monitor 1. There is a 12 month limited warranty on the ReproScan 2.0 Monitor. This warranty covers manufacturer’s defects. It does not cover damage due to trauma, excessive moisture, excessive voltage or excessive amperage applied to the ReproScan 2.0 Monitor and battery.
Need help?
Do you have a question about the 2.0 and is the answer not in the manual?
Questions and answers