Advertisement
Quick Links
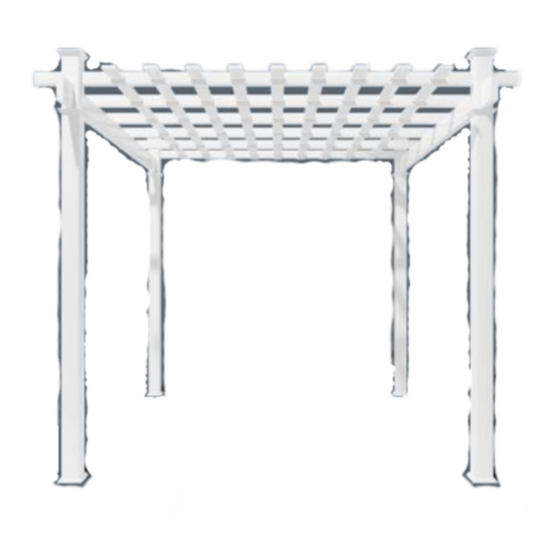
PERGOLA
GENERAL INFORMATION
80.5 in (204.6 cm)
85.5 in (217.3 cm)
93.5 in (237.7 cm)
Please see back side for contents .
Tools needed NOT included
· Wood Stakes (4)
(temporary support
for string line)
· Level
· Tape Measure
· Cordless dig
· Shovel
ISCLAIMER : This product is designed to
be used solely and exclusively as a
decorative
object.
intended for playing or climbing.
106 in (269.3 cm)
· Tube of Vinyl Glue
· Step Ladders (2)
· Rubber hammer
· String Line
· Pencil
· Stool or short
ladder
It
should
not
94 in (238.9 cm)
93.5 in (237.7 cm)
89.53 in (227.4 cm)
89.53 in (227.4 cm)
Assembly
Instrucions
For Assembly Instructions please read QR
code with cell phone or visit:
http://azemblaofamerica.com/pvc-pergola/
106 in (269.3 cm)
86.1 in (218.6 cm)
85.5 in (217.3 cm)
1
Advertisement

Summary of Contents for AZEMBLA PERGOLA
- Page 1 PERGOLA GENERAL INFORMATION 106 in (269.3 cm) 106 in (269.3 cm) 94 in (238.9 cm) 86.1 in (218.6 cm) 80.5 in (204.6 cm) 85.5 in (217.3 cm) 85.5 in (217.3 cm) 93.5 in (237.7 cm) 93.5 in (237.7 cm) 89.53 in (227.4 cm) 89.53 in (227.4 cm)
- Page 2 B´ Important: check the inside of posts for materials. Content art Description 3 x 7/8” profiles (9) 3 x 1½” profiles (4) B.´ 3 x 1½” profiles (2) 5 ½ x 11½” profiles (2) Snap pin for joining profiles (54) 5x5 post caps (4) 3 x 1½”...
- Page 3 LA ASSE BL escription 3 x 7/8” profiles (9) 3 x 1½” profiles (4) B.´ 3 x 1½” profiles (2) 5 ½ x 11½” profiles (2) Snap pin for joining profiles (54) 5x5 post caps (4) 3 x 1½” profile caps (12) 5½...
- Page 4 PE G A ASSE B 2. Slide the two 5½ x 1½” profiles through the bottom holes 3. Slide the two 3 x 1½” profiles through the upper holes B´ B´ 4- Place the B profiles (4) on the C profiles (2) 5.
- Page 5 O A A 6. Organize the distances between profiles where: B´ X = 6 " (15.8 cm) Y= 16 " (41.7 cm) B´ 3" x " profile 7- Place the A profiles (9) on the B and B´ profiles (6) until joining them with the D snaps.
- Page 6 1- Measure and mark the location of the post with a string. Diagonal distances must be the same to ensure a square installation. Adjust the string lines accordingly. ipos de instalaci n nstalaci n bajo nstalaci n sobre el ni el del suelo el ni el del suelo elleno con tierra para instalacion ni n mec nica...
- Page 7 I STA ATI I STRUCTI OPTION 1 4x4 steel post base kit (4) Extra material (purchase from local building HARD FLOOR INSTALLATION you will need center)consult the post base kit instructions for hardware (not included) requirements, as they pertain to your application. 1- Measure and mark the location of the brackets with string or chalk line.
- Page 8 OPTION 2 CONCRETE INSTALLATION 10" 1- dig a hole 10” diameter by 36” deep. 36" 96" 2- Install the 4 wood posts 96" x 3 " x 3 " (not included wood posts). 60" 3- Pour the concrete mix into the holes Concrete 36"...
-
Page 9: Ground Installation
OPTION 3 GROUND INSTALLATION 10" 1- dig a hole 10” diameter by 36” deep. 36" 96" 2- Install the 4 wood posts 96" x 3 " x 3 " (not included wood posts). 60" 3- Pour the concrete mix into the holes 36"... - Page 10 INST TI N INST CTI NS P 5. will need to “build” the shims into the post. Near the bottom and top (purchase at local building center) 33,33 Shims 3,15 Post PVC Post wood pcional " (2.2cm) 6- Insert the wood poles on the PVC posts, mind Secure level and plumb before...
- Page 11 TA AT 1 To finish the installation, install the upper part of the pergola that was previously assembled, on the plumbed and aligned posts. Apply a of vinyl glue to caps and attach them to the profiles as shown. Contact phone number + 1 305 735 2111 | Email: brisaz@azembla.com.co...
Need help?
Do you have a question about the PERGOLA and is the answer not in the manual?
Questions and answers