Table of Contents
Advertisement
Advertisement
Table of Contents

Summary of Contents for Growing GRENGINE Ultralite
- Page 1 GRENGINE Ultralite USER MANUAL BEFORE READING THROUGH THIS MANUAL: PLUG YOUR GRENGINE INTO AN ELECTRICAL WALL SOCKET AC OUTLET USING THE CHARGER CORD AND THE #3 PLUG (SEE DIAGRAM ON PG 4) FOR CHARGING. YOU SHOULD ALWAYS STORE YOUR GRENGINE INDOORS.
-
Page 2: Table Of Contents
TABLE OF CONTENTS With your new GRENGINE This product series is designed to portable power has never been keep you powered while you are easier, and with 480 watt hours at work or play. Whether you are of power, you will be able to living in your van while you travel keep electronics, lights, small the world, using small power tools,... -
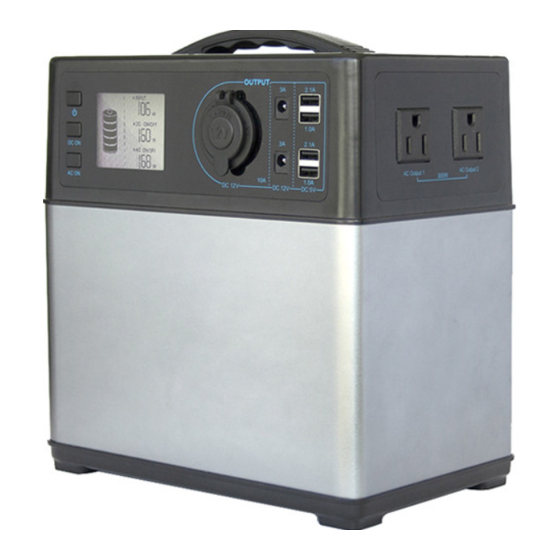
Page 3: Grengine Tm Components
1. GRENGINE COMPONENTS Handle Power on/off button Solar charging port LCD display Car/adapter charging port USB outputs Car jump starter port DC 12 output for LED lamp Master power on/off button DC 12.6V car cigarette output DC power on/off button AC outputs AC Power on/off button... -
Page 4: Unpacking
1. GRENGINE COMPONENTS Master power on/off button DC power on/off button AC power on/off button Master power on/off button DC power on/off indicator AC power on/off indicator Battery capacity Charging power DC on/off DC output power AC on/off AC output power Before opening the package, please check if the packaging is damaged. -
Page 5: Charging Your Grengine
3. CHARGING YOUR GRENGINE PLEASE NOTE: BEFORE USING OR STORING, PLUG YOUR GRENGINE INTO THE AN ELECTRONIC WALL SOCKET UNTIL IT IS FULLY CHARGED. NEVER CHARGE YOUR GRENGINE WITH SOLAR PANELS AND AN ELECTRONIC WALL SOCKET AT THE SAME TIME. INSERT THE ANDERSON PLUG INTO THE #2 INPUT PLUG. -
Page 6: Charging From The Electrical Wall Socket
3. CHARGING YOUR GRENGINE 3.2 CHARGING FROM THE ELECTRICAL WALL SOCKET BEFORE USING OR STORING, PLUG YOUR GRENGINE INTO THE WALL UNTIL IT IS FULLY CHARGED. ELECTRICAL WALL SOCKET GRENGINE DEVICE PLUG #3 • The included AC wall charger comes in two pieces. Connect the two pieces by plugging the cable into the box. -
Page 7: Using Your Grengine
4. USING YOUR GRENGINE 4.1 WHAT TO POWER FROM YOUR GRENGINE • Laptops (10x charges) • Hedge Trimmer (1 hour • E-Readers & Tablets (12x continuous use) charges) • Electric Drill (1 hour continuous • Lamp (5 hours) use) • CPAP Machines (10-16 hours) •... -
Page 8: Best-Use Strategy
4. USING YOUR GRENGINE 4.3 BEST-USE STRATEGY When charging any gear with your GRENGINE , take note of the LCD battery display. If you plug in devices that drain high power (a refrigerator), the charge level of your GRENGINE can drop quickly and you may not fully generate 480Wh of energy. Alternately, if you are recharging devices that draw power more slowly (e.g. -
Page 9: Emergency Car Jump Start
4. USING YOUR GRENGINE 4.6 EMERGENCY CAR JUMP START CAR BATTERY GRENGINE REQUIREMENTS (PLEASE STEPS: ENSURE...): • Clamp the red clip to the car battery’s positive The engine displacement of the pole and the black clip to the negative pole. vehicle is no more than 4L. -
Page 10: Technical Specifications
5. TECHNICAL SPECIFICATIONS PLEASE CHECK THE BATTERY CAPACITY BEFORE EVERY RE-START. MAKE SURE THE BATTERY IS OVER 50% (THREE BATTERY SEGMENTS ON). ITEM SPECIFICATIONS APPROXIMATE WALL CHARGER 6-8 HOURS CHARGE (70W) TIMES CAR CHARGER (48W) 10-20 HOURS SOLAR SOLAR CHARGER 4-6 HOURS (120W) CHARGE INPUT VOLTAGE... -
Page 11: Frequently Asked Questions
6. FREQUENTLY ASKED QUESTIONS WHAT TYPE OF BATTERY IS IN MY GRENGINE Your GRENGINE uses a 11.1V 43Ah lithium ion battery pack, similar in construction to a Tesla Motor EV battery cell. Li-ion batteries are much smaller and lighter than lead- acid batteries and also cycle much longer than lead acid batteries, including specialty batteries like AGM and Gel cells. -
Page 12: Troubleshooting
7. TROUBLESHOOTING IF YOUR DEVICES ARE NOT RECHARGING FROM YOUR GRENGINE FOLLOW THESE STEPS: 1. Make sure the master POWER button is turned on. 2. Ensure the Output Port has been turned on. The green LED light on the power button should light up. -
Page 13: Contact
8. CONTACT Growing Greener Innovations Should you have any technical questions, please contact your installer. 13311 146 Street NW Edmonton, AB Please note that the following information will be needed: T5L 4S8 1. Purchasing Date 2. Model Number 3. Failure Code info@growinggreener.ca...
Need help?
Do you have a question about the GRENGINE Ultralite and is the answer not in the manual?
Questions and answers
Grengrine ultra lite will not charge
The GRENGINE Ultralite may not charge due to several possible reasons:
1. Incorrect Power Source – Ensure it is plugged into the correct power source, such as an electrical wall socket, car charger, or solar panel (but never both solar and AC charging at the same time).
2. Improper Plug Connection – Make sure the charger cord is correctly inserted into the appropriate input plug (#2 input plug for AC charging).
3. Battery Fully Drained – If the battery is completely drained, it may take some time before the charging indicator appears.
4. Damaged Charger or Cable – Inspect the AC charger, solar charging cable, or car charging cable for any damage.
5. Environmental Conditions – Charging should occur within the specified temperature range (0–45°C). Extremely cold or hot conditions may prevent charging.
6. Device Malfunction – If none of the above issues apply, the unit may be defective and require support.
Check these factors to troubleshoot the charging issue.
This answer is automatically generated