Table of Contents
Advertisement
Quick Links
Power Supply
Input Voltage Adapter
Free Voltage (100~240V AC 50/60Hz)
Power Consumption
11W MAX
Power charger output
14V DC 3.0A
Battery
12.6V/4000mAh
Battery charging time
3~6H
Battery standard discharging time
>5H
A/V Data input/output
A/V IN/OUT
Video CVBS input/output
Audio L/R input/output
Audio output
Built-in Loudspeaker
HD TV
VER1.3 interface, up to 1080p
USB
1*USB 2.0 slot Compatible for Host
Transport Stream
MPEG-2/4,H.264
Physical Specification
LCD Display
5 inch
Size[W*H*D]
210 x150x 52(mm)
Net Weight
0.93Kg
Operating Temperature
0℃ ~ + 45℃
Storage Temperature
-10℃ ~ + 70℃
Storage Humidity
5%~95% RH (Non-Condensing)
User Manual
18ASF-7000
Digital Signal Meter
Advertisement
Table of Contents

Summary of Contents for Digitek 18ASF-7000
- Page 1 Power charger output 14V DC 3.0A User Manual Battery 12.6V/4000mAh Battery charging time 3~6H Battery standard discharging time >5H 18ASF-7000 A/V Data input/output A/V IN/OUT Video CVBS input/output Audio L/R input/output Digital Signal Meter Audio output Built-in Loudspeaker HD TV VER1.3 interface, up to 1080p...
- Page 2 Chapter 4 Technical Specifications System Resources Main Processor 600M Hz based CPU Flash Memory 64M Bits DDR SDRAM 1024M Bits Tuner/Front-end Tuner Type DVB-S/DVB-S2 Input Connector F-type, Connector, Male Frequency Range 950MHz~2150MHz Signal Level -65~-25dBm 75Ω Impedance LNB Power & Polarization Vertical:+13V Horizontal:+18V Current:Max.500mA...
-
Page 3: Table Of Contents
3.6 Upgrade CONTENTS Move cursor to “Upgrade ’’and press “OK’’, then you can enter the “Software Update’’ interface. Safety use Danger warning Battery Note Chapter 1 Overview 1.1 Features 1.2 Accessories Chapter 2 Introduction of panel functions 2.1 Remote Control 2.2 Front panel introduction 2.3 Top panel introduction 2.4 Rear panel introduction... -
Page 4: Danger Warning
Press [▲/▼] on PVR Configure and press “OK’’, then you can see the following menu. In this submenu, you can Safety use: get the information about the USB device you insert and set the correct format for PVR. Consumers using the product for the first time should read this manual carefully. Do not touch the LCD screen. -
Page 5: Battery Note
Press[◀ / ▶]to select PVR and press “OK’’ , press[▲/▼] to select the [HBPVR] file and press “OK’’ , then you can Battery Note: see the program you have recorded. Avoid use of the battery in strong sunlight. Please do not use the battery in the strong sunlight exposure, so as not to overheat, deform, smoke, affect battery performance, reducing life. -
Page 6: Features
Chapter 1: Overview Music The 18ASF-7000 is a HD digital signal meter and portable device for installation and adjustment of satellite and terrestrial receiving antenna. 1.1 Features: Combo of DVB-S2 and DVB-T2 High resolution 5’’TFT LCD Multi-lingual OSD and use-friendly UI ... -
Page 7: Remote Control
Multimedia Chapter 2: Introduction of panel function Move cursor to “Multimedia’’ and press “OK’’, then you can enter the “USB’’ interface. 2.1 Remote Control Press [▲/▼] on Multimedia and press “OK’’, then you can see the following menu. ... -
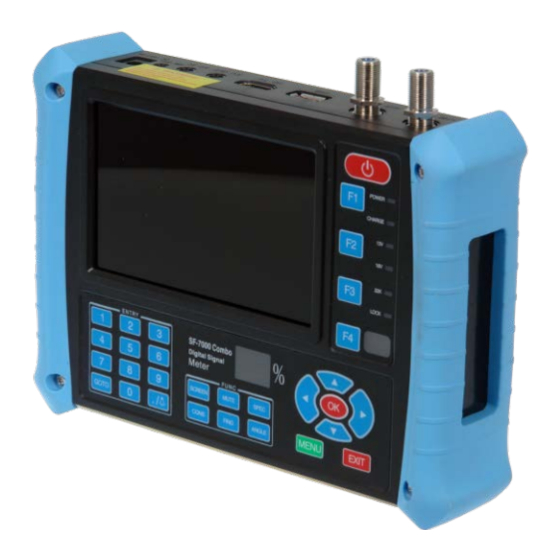
Page 8: Front Panel Introduction
2.2 Front panel introduction Press [▲/▼] on EPG option and press “OK’’, here you can see the all the program guide. Press [▲/▼] on Sort option and press “OK ’’, here you can Press [◀ / ▶] to select “By Freq’’ , “By Service Name’’, ... -
Page 9: Top Panel Introduction
Delete 2.3 Top panel introduction Press [▲/▼] on channel list, select the channels which you want to edit in channel list by press [Blue/F4] Key. Press the [OK] key to sure delete the channel. Press [EXIT] Key to save the settings. F connector male for LNB IN F connector male for ANT IN USB connector... -
Page 10: Chapter 3 Detail Operation Guide
Chapter 3: Detailed operation guide. Move Press [▲/▼] on channel list, select the channels which you want to edit in channel list by press [Red/F1] Key. Press [▲/▼] move the cursor to the position you want and press the [OK] key. When you turn on the device, you can see the main menu which consists of Satellite, Terrestrial, System Setting, Program, Press [EXIT] Key to save the settings. -
Page 11: Constellation Analyzer
3.1.2 Constellation Analyzer 3.3.4 Option Move cursor to “Constellation Analyzer ’’ and press “OK’’, then you can enter the “Constellation Analyzer’’ interface. Press [▲/▼] on Option and press “OK’’, then you can see the following menu. Press [▲/▼] to choose OSD Language, Subtitle Language or Audio Language you want. ... -
Page 12: Satellite Setting
Press “OK ’’on Restore Factory Default to Factory Reset. Press “EXIT’’ and press [▲/▼]to move cursor to choose “Analyze by Program’’ and press “OK’’ , then you can see this interface. Press “OK ’’on information option to get the hardware or software version. ... - Page 13 3.3.3 System Press [▲/▼] on System and press “OK ’’, then you can see the following menu. Press [F2] to edit existed satellite, which is including Satellite Name, Longitude Direction, Longitude Angle and Band. Press “OK’’ to get into the Parental Guidance (the default password is 000000). ...
- Page 14 3.3.2 Time Press [▲/▼] on Time option and press “OK’’, then you can see the following menu. Press [GOTO] to get into the TP list, you can also use [F1] [F2] [F3] [F4] to add, edit, delete or begin to scan the selected TP, and Press [GOTO] to return to the satellite list.
- Page 15 3.3 System Setting Move cursor to “System Setting ’’and press “OK’’, then you can enter the “System Setting’’ interface. DiSEqC1.1: Press [◀ / ▶] to choose between None / LNB1~LNB16. 3.3.1 Device Setup Press [▲/▼] on “Device Setup ’’ option and press “OK’’ , then you can see the following menu. ...
- Page 16 Press [▲/▼] on Manual Search and press “OK’’, then you can see the following menu. 22KHz: Choose AUTO/ON/OFF. Tone burst: Press [◀ / ▶] to choose between None / Burst A / Burst B. DiSEqC1.0: Press [◀ / ▶] to choose between None / LNB1 / LNB2 / LNB3 / LNB4.
-
Page 17: Satellite Finding
3.2 Terrestrial 3.1.4 Satellite Finding Move cursor to “Terrestrial ’’and press “OK’’, then you can enter the “Terrestrial ’’ interface. Move cursor to “Satellite Finding ’’and press “OK’’, then you can enter the “Satellite Finding’’ interface. Press “OK’’ on the Satellite option, then you can see the following window. Press [▲/▼] to select the existing satellite and you can press “OK’’... -
Page 18: Angle Calculation
Use the digital button to input the Frequency, Symbol Rate and Polarity manually, then you can press “OK’’ to 3.1.5 Angle Calculation confirm. Move cursor to “Angle Calculation ’’and press “OK’’, then you can enter the “Angle Calculation’’ interface. ...
Need help?
Do you have a question about the 18ASF-7000 and is the answer not in the manual?
Questions and answers