Table of Contents
Advertisement
Quick Links
Smart wi-fi Homcloud
User Manual for
Gas Boiler and Water Underfloor Heating
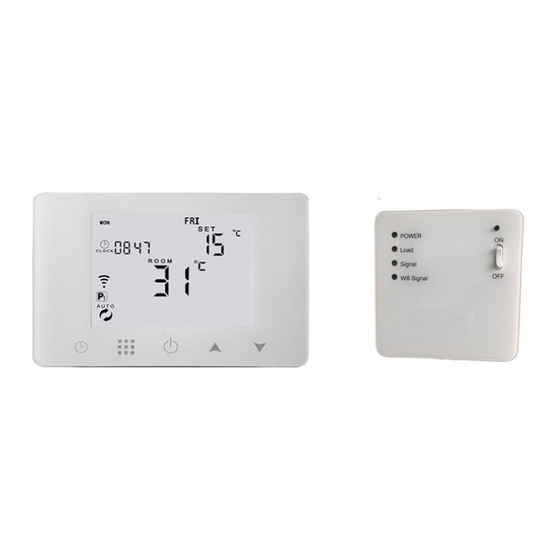
PRODUCT SPECIFICATIONS
☆ Power Chronothermostat: USB
5V 1A DC or 4xAAA batteries
☆
Power RF Receiver: 90-240V AC
50/60HZ
☆ Temperature range: 1~70°C
☆ Display accuracy: 0.5°C
☆ Probe sensor: NTC (10k) 1%
☆ Temperature range: 5~35°C
☆ Contact capacity:5A/250V
☆ Size(mm):130*90*25
☆ Homcloud code: XH-CTB
☆ Advanced password on App: 123456
Chronothermostat RF
☆ Model n°: HY09RF WIFI
☆ Output: Switch relay
☆ Wireless frequency 2.412GHz ~
2.484GHz
☆ Max transmitting power:
802.11b:20dBm@1Mbps
☆ Network protocol: IEEE 802.11
b/g/n 2.4 GHz
☆ Encryption type: WPA/WPA2
☆ Antenna: PCB antenna
1
Advertisement
Table of Contents

Summary of Contents for HOMCLOUD HY09RF WIFI
- Page 1 Chronothermostat RF User Manual for Gas Boiler and Water Underfloor Heating PRODUCT SPECIFICATIONS ☆ Power Chronothermostat: USB ☆ Model n°: HY09RF WIFI 5V 1A DC or 4xAAA batteries ☆ ☆ Output: Switch relay Power RF Receiver: 90-240V AC ☆ Wireless frequency 2.412GHz ~ 50/60HZ 2.484GHz...
- Page 2 Download and install Google Home or Amazon Alexa App and control your devices with your voice with Smart Speakers or directly with your smartphone. Important: If you want to link Homcloud App to Google Home or Alexa App you need to select “Smart Life”...
- Page 3 (YELLOW/ORANGE LIGHT ON RECEVIER BLINKING). IF YOU WANT TO SHORTEN INTERVAL, JUST IF POWER IS BY USB, GO TO IP SETTINGS. (B5 AND B6) DOWNLOAD AMAZON ALEXA or GOOGLE ASSISTANT APP AND LINK THEM TO HOMCLOUD APP TO CONTROL DEVICE ALSO VOCALLY. HOME SCREEN BEFORE WIRING AND INSTALLING…...
- Page 4 hazardous condition. the created group for convenient operation. Check the ratings given in the instructions and on the product to make sure the produce is suitable for o Device information;Contains virtual ID;IP address;Mac address;Device time zone your application. Installer must be a trained experienced service technician. o Remove device: After deleting the device, you need to reconnect the network if After installation is complete, check out produce operation as provided in these instructions you want to use it.
- Page 5 When no fault, normally on when loading or exchanging information temporary. PERMANENT RED LIGHT (solid or blinking): Faulty When fault: 1. IP fault (IP:FFFF) : Light blinks 2 times every 2s 2. No wifi signal within 1h: Light blinks 3 times every 2s 3.
- Page 6 Sensor state DOWNLOAD AND REGISTRATION N1:single built-in sensor (if you have got already Homcloud App on your mobile and an Account go to Configuration). N3:both built-in sensor and external sensor. (when receiver with external a. Download Homcloud App from App Store or Google Play or scan QR code below.
- Page 7 Press "Add Device" or "+" in the upper right corner to add the device and select the defaults screen device type "Smart wifi Homcloud Chronotermostat RF” IP SETTING (RF RECEIVER) On your app, Click “Confirm icon rapidly blink”, then select your network and back to your app to enter the password of your wireless router and confirm.
- Page 8 PROGRAMMABLE MODE SETTING OPTION B – AP MODE – MANUAL MODE (ONLY IF STANDARD EZ MODE FAILED) 6 times period setting and weekly programmable mode setting: 5+2 days (factory default), 6+1 days, 7 days Same step as before to make this icon“ “...
Need help?
Do you have a question about the HY09RF WIFI and is the answer not in the manual?
Questions and answers